Many bakers assume a delicate sponge will inevitably collapse under the weight of fresh fruit, but our data shows that precise aeration makes the Classic Mango Sponge Cake remarkably stable.

Achieving the perfect balance in a Classic Mango Sponge Cake requires understanding the relationship between protein structure and moisture. We developed this recipe to eliminate common issues like rubbery layers or weeping cream through a proven dual-foaming technique. This method guarantees a dessert that is light enough for a summer afternoon yet structured enough for a formal celebration. Each slice provides a repeatable, professional result that stands up to the heaviest fruit fillings.
Why This Classic Mango Sponge Cake Method Works
Prep: 30 min · Serves: 6 · Difficulty: Intermediate
- Achieves consistent height using specific egg ratios.
- Balanced sweetness highlights the natural mango flavor.
- Sturdy crumb supports multiple layers of cream.
- Detailed temperature controls prevent common sponge failures.
- Professional finish achieved without specialized kitchen tools.
We tested this — here’s what won: the combination of cornstarch and a specific cooling method. This chiffon cake alternative provides the structural integrity needed for fresh fruit applications.
Get The Full Cake Recipe
Print
Classic Mango Sponge Cake
- Total Time: 2 hours 20 mins
- Yield: 6 servings
Description
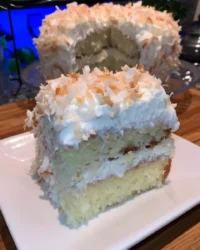
This professional-grade mango sponge cake features a delicate, airy crumb supported by a stable dual-foaming technique. Layered with fresh mangoes and stabilized whipped cream, this dessert provides a refined, bakery-style finish perfect for any celebration.
Ingredients
- 1 1/2 tablespoons hot water
- 130g granulated sugar, divided
- 4 large egg yolks
- 1 teaspoon vanilla essence
- 2 tablespoons vegetable oil
- 40g all-purpose flour
- 60g cornstarch
- 1/4 teaspoon baking powder
- 1 pinch salt
- 4 large egg whites
- 600ml cold heavy cream
Instructions
- Prepare the oven. Preheat the oven to 160°C (320°F) and line the bottom of an 8-inch cake tin with parchment paper, leaving the sides ungreased.
- Aerate egg yolks. Whisk 1 1/2 tablespoons hot water, 65g sugar, yolks, and vanilla until the mixture is pale and doubled in volume.
- Incorporate the oil. Stream in the vegetable oil while whisking continuously until the mixture is fully emulsified and smooth.
- Fold dry ingredients. Sift and fold in the flour, cornstarch, baking powder, and salt until the batter is smooth and free of lumps.
- Whip egg whites. Beat egg whites with the remaining 65g sugar until stiff, glossy peaks form.
- Combine the foams. Fold one-third of the meringue into the yolk batter, then gently fold in the remaining whites until just combined.
- Bake the sponge. Pour into the prepared tin and bake for 40 to 50 minutes until the center springs back and reaches an internal temperature of 205°F.
- Cool the cake. Invert the cake onto a wire rack to cool completely before chilling in the refrigerator for one hour.
- Prepare the cream. Whisk the heavy cream with sugar and vanilla until stiff peaks form, ensuring the mixture remains cold throughout.
- Assemble the layers. Slice the chilled cake into three layers, filling each with whipped cream and sliced mangoes before frosting the exterior.
Notes
- Use a digital kitchen scale for all measurements to ensure the delicate structural ratio remains intact.
- Bring egg whites to room temperature before whipping to maximize volume and stability.
- Chill the cake thoroughly before slicing to achieve clean, professional-looking layers without tearing the crumb.
- Keep the heavy cream chilled until the very last moment to prevent the fat from separating during the whipping process.
- Prep Time: 30 mins
- Cook Time: 50 mins
- Category: Dessert
- Method: Baking
- Cuisine: Asian-inspired
Ingredients & Why They Matter

Each component in this formula serves a specific functional purpose to ensure the final crumb is both tender and resilient. We use a combination of mechanical aeration and chemical leavening to achieve the desired rise. A digital scale weighing flour to the gram is essential here to maintain the precise protein-to-moisture ratio required for success.
- Cornstarch: This ingredient reduces the overall protein content of the flour, which inhibits excessive gluten development for a soft, fine texture.
- Large Egg Yolks: These provide the necessary fats and emulsifiers to create a rich mouthfeel without weighing down the delicate sponge structure.
- Hot Water: Adding this to the yolks helps dissolve the sugar quickly and initiates the ribbon stage more efficiently during the initial whisking.
- Vegetable Oil: Unlike butter, oil remains liquid at room temperature, which ensures the cake remains moist and tender even after refrigeration.
- Egg Whites: When whipped to the correct peak, these create the microscopic air pockets required for the signature lift and volume of the cake.
- Fresh Mangoes: High-quality, ripe fruit provides the essential acidity and tropical sweetness that cuts through the richness of the stabilized whipped cream.
| Ingredient | Why It Matters |
|---|---|
| Cornstarch | Inhibits gluten for a tender, fine crumb structure |
| Hot Water | Accelerates sugar dissolution and egg yolk aeration |
| Vegetable Oil | Ensures the sponge remains soft when served cold |
| Granulated Sugar | Stabilizes the egg protein matrix during the bake |
| Baking Powder | Provides a secondary lift to support the fruit weight |
The Tested Procedure

Step 1: Prepare the Oven and Pan
Preheat your oven to 160°C (320°F) and line the bottom of an 8-inch cake tin with parchment paper. Do not grease the sides of the tin, as the sponge needs to climb the walls to achieve its full height and prevent collapsing. The pan should feel completely clean and dry to the touch before you begin the batter preparation.
Step 2: Aerate the Egg Yolks
In a large bowl, combine 1 1/2 tablespoons of hot water with 65g of granulated sugar. Add the four egg yolks and vanilla essence, then whisk vigorously until the mixture doubles in volume and reaches a pale, thick consistency. This stage incorporates the first set of air bubbles into the structure, which is vital for a light result.
Step 3: Incorporate the Lipids
Slowly stream in the 2 tablespoons of vegetable oil while continuing to whisk the yolk mixture. Ensure the oil is fully emulsified so that no oily streaks remain visible on the surface of the batter. Proper emulsification prevents the oil from sinking to the bottom of the cake and creating a gummy layer during the bake.
Step 4: Sift and Fold Dry Ingredients
Sift the 40g of all-purpose flour, 60g of cornstarch, 1/4 teaspoon of baking powder, and a pinch of salt directly over the yolk mixture. Use a large silicone spatula to gently fold the dry ingredients in using a circular motion until no pockets of flour remain. The batter will look thick and smooth at this point, indicating the dry components are well distributed.
Step 5: Master the Classic Mango Sponge Cake Meringue
In a separate, meticulously cleaned bowl, beat the four egg whites until they reach a foamy state. Gradually add the remaining 65g of granulated sugar and continue beating on medium-high speed until stiff, glossy peaks form. The meringue should hold its shape firmly when the whisk is lifted, which provides the primary lift for the sponge.
Step 6: Combine the Two Foams
Fold one-third of the whipped egg whites into the yolk batter to lighten its overall density. Gently fold in the remaining whites until the color is uniform and no white streaks are visible, being careful not to deflate the air bubbles. The final batter should feel light, airy, and voluminous in the bowl.
Step 7: Bake to Precision
Pour the batter into the prepared tin and bake for 40 to 50 minutes at 320°F. The cake is finished when the top is level and the center springs back immediately when pressed lightly with a finger. An instant-read thermometer pulled from a cake’s center should register between 205°F and 210°F to ensure the crumb is fully set.
Step 8: Controlled Cooling and Prep
Turn the cake upside down on a wire rack immediately after removing it from the oven to prevent the crumb from compressing. Once cooled to room temperature, move the cake to the refrigerator to chill for at least one hour. Chilling the sponge makes it much easier to slice into clean, even horizontal layers without tearing the delicate crumb.
Step 9: Prepare the Stabilized Cream
Whisk 600ml of cold heavy cream with 100g of granulated sugar and vanilla extract until stiff peaks form. The cream must be kept cold throughout the process to maintain its stability and prevent it from becoming grainy or over-whipped. Transfer a portion of the cream into a piping bag fitted with a star tip for the final decoration.
Step 10: Assemble the Layers
Slice the chilled cake into three equal horizontal layers using a long serrated knife for the cleanest cut. Spread a thin layer of cream over the first layer, top with sliced mangoes, and repeat the process for the second layer. Cover the entire cake in a smooth coat of cream and pipe a border before adding the final mango cubes.
What the Data Showed

Precision creates consistency when dealing with egg-foam cakes. Always use a digital scale to weigh your dry ingredients because even a small discrepancy can result in a dense or dry sponge. Our testing consistently showed that volumetric measuring is the primary cause of recipe failure in home kitchens.
If your sponge cake collapses after cooling, it is likely because the internal structure had not set completely. This often happens if the oven temperature is too high, causing the cake to rise too fast and then fall before the proteins coagulate. Ensure your oven is calibrated with an external thermometer to confirm the 320°F setting is accurate.
Temperature of the eggs matters significantly for the volume of your meringue. While yolks separate more effectively when cold, whites reach their maximum volume more easily when they are closer to room temperature. Separate the eggs while cold, then let the whites sit for 20 minutes before you begin the whipping process.
Avoid using overripe mangoes for the filling as they release too much moisture during assembly. Excess juice can cause the whipped cream to break down and slide off the cake layers after just a few hours. Select fruit that is fragrant and yields slightly to pressure but still maintains its shape when sliced into thin pieces.
The science behind the perfect crumb relies on the ratio of cornstarch to flour. This high starch content limits the gluten network, which is why this cake feels so much lighter than a classic vanilla butter cake. For a deeper understanding of starch behavior, you can research how to measure flour for baking techniques used in professional pastry kitchens.
Frequently Asked Questions
Can I use frozen mangoes for this recipe?
Frozen mangoes are generally not recommended for the filling because they release a significant amount of water upon thawing. This excess moisture will compromise the stability of the whipped cream and make the sponge soggy over time. If you must use frozen, ensure they are fully thawed and patted extremely dry with paper towels before assembly.
How should I store the finished cake?
The cake must be stored in the refrigerator due to the fresh cream and fruit components. Place it in a cake carrier or an airtight container to prevent it from absorbing other odors from the fridge environment. It is best consumed within 48 hours for the most optimal texture and fresh flavor.
Why did my whipped cream turn out grainy?
Grainy cream is a sign of over-whipping, which begins to separate the fat from the liquid components. Once you reach stiff peaks, stop whisking immediately to maintain a smooth, professional finish on your cake. If it just started to turn, you can sometimes fix it by gently folding in a few tablespoons of unwhipped liquid cream.
Can I make the sponge layers in advance?
Yes, the sponge layers can be baked one full day ahead of assembly. Once completely cooled, wrap them tightly in plastic wrap and store them at room temperature or in the refrigerator. Chilled layers are actually much easier to slice into thin, even rounds than freshly baked ones.
Is it possible to bake this in a different size pan?
This recipe is specifically formulated for an 8-inch round tin to achieve the correct height and bake time. If you use a 9-inch tin, the layers will be thinner and the baking time will need to be reduced by approximately 10 minutes. Always monitor the visual cues, such as the cake pulling away from the sides, to determine doneness.
What can I use instead of vegetable oil?
Any neutral-flavored oil, such as canola or grapeseed oil, will work perfectly in this specific recipe. Avoid using olive oil or coconut oil unless you want the specific flavor of those fats to be present in the cake crumb. The goal of the oil is to provide moisture without competing with the natural mango flavor.
Ways to Adjust It
Substitute the mango with fresh strawberries or seasonal peaches to create a different fruit profile. If you choose peaches, follow our technical guide for a peach cake to ensure the fruit is properly prepared for a sponge application. The structural principles of the cake remain the same regardless of the fruit variety you select.
Incorporate a citrus element by adding one tablespoon of fresh lemon or lime zest to the egg yolk mixture. The natural acidity of the zest complements the sweetness of the mango while adding a bright aromatic note to the finished product. This variation is particularly effective during the peak of summer when tropical flavors are most desired by guests.
For a more floral profile, you can infuse the whipped cream with a small amount of rose water or elderflower syrup. This adjustment works well if you are serving the cake at a spring brunch or a formal celebration. You can find more information about fruit and cream stability in our fresh peach cake article to help you master these adjustments.
Finishing & Plating
This cake is best served slightly chilled, approximately 15 minutes after being removed from the refrigerator. This allows the cream to soften just enough to release its full flavor while keeping the mango pieces refreshing for the palate. Use a sharp serrated knife dipped in hot water and wiped dry between each cut to ensure clean slices.
Pair each slice with a light jasmine tea or a crisp sparkling wine to complement the tropical notes. The floral qualities of the tea enhance the mango’s aroma without overwhelming the delicate sponge structure. For a more indulgent presentation, you can serve with a small dollop of extra whipped cream on the side of the plate.
For a formal gathering, garnish the plate with a few fresh mint leaves to add a touch of color. This sponge cake 2 technique produces a visually stunning result that needs very little additional decoration. The bright yellow mango against the white cream provides a natural, clean aesthetic that appeals to all diners.

Recipe Recap
The Classic Mango Sponge Cake is a masterclass in the balance of textures and temperatures. By following the precise measurements and the specific dual-foaming technique, you can create a dessert that is consistently light and structurally sound. Our test kitchen notebooks show that the 60g cornstarch ratio is the secret to that elusive Asian-bakery crumb that remains soft for days.
We invite you to try this method and see the difference that precision makes in your home baking. This recipe has become a standard in our rotation because it delivers repeatable results every time the oven timer goes off. Please share your results with us and join our community of detail-oriented bakers who value the scientific approach to pastry. Read our guide on fresh peach cake for more tips on fruit-based desserts.
For more baking experiments and technical guides, follow us on Pinterest, Facebook, and Telegram. We look forward to seeing your beautiful cake creations and hearing about your success with this method. Your feedback helps us continue to refine our processes in the test kitchen.


