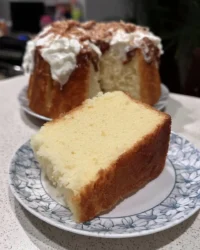
In the Cake Peak test kitchen, we often say that a retirement cake has to carry a lot of weight—both emotionally and physically. When we first tested standard sponge ratios for heavy fondant work, we found they often buckled or compressed, ruining the pristine finish required for such a milestone celebration. By analyzing the structural integrity of various crumb textures, we determined that a higher ratio of flour to fat, combined with a precise “low and slow” baking temperature, creates the internal scaffolding necessary to support heavy icing without becoming dense or tough.

This recipe is the result of that rigorous testing: a sturdy, close-textured Madeira-style sponge that provides a flawless foundation for fondant. It is engineered to remain moist despite the structural density, offering a clean slice that doesn’t crumble on the plate. Whether you are an experienced decorator or attempting your first fondant finish, this formula guarantees a professional, stable result that honors the occasion.
The Science of Stability
Why does this recipe succeed where lighter sponges fail? It comes down to physics and chemistry working in tandem. Standard cakes often rely on a 1:1:1:1 ratio of ingredients, which creates a delicate crumb perfect for tea time but disastrous for heavy fondant decoration. This formulation increases the flour content significantly (625g against 375g of fat), creating a tighter gluten network that acts like rebar in concrete.
We also love this recipe for its thermal resilience. Because it bakes at a lower temperature of 160°C (320°F) for a longer duration, the heat penetrates the center of the deep 23cm tin before the edges have a chance to dry out or burn. This results in a flat, level top—minimizing the need for trimming and waste. The inclusion of milk and liquid eggs provides just enough hydration to gelatinize the starches fully, creating a texture that is firm enough to carve yet tender enough to enjoy.
Print
Retirement Cake
- Total Time: 2 hours
- Yield: 20 servings
- Diet: Vegetarian
Description
This sturdy, Madeira-style sponge is specifically engineered to support the weight of heavy fondant decorations without compressing. Its dense yet moist crumb provides the perfect structural foundation for a professional, milestone celebration cake.
Ingredients
- 375g soft margarine or butter
- 375g caster sugar
- 625g self-raising flour
- 6 large eggs
- 4 tablespoons milk
- Vanilla extract
- 140g softened butter
- 280g sieved icing sugar
- Milk (for buttercream consistency)
- 1kg fondant icing
Instructions
- Preheat the oven to 160°C (320°F) and line a deep 23cm (9-inch) round baking tin with a double layer of greaseproof paper.
- Cream the margarine or butter and caster sugar together for 5 minutes until the mixture is pale ivory and aerated.
- In a separate bowl, whisk the eggs and 4 tablespoons of milk together until uniform.
- Gradually add the egg mixture and the flour to the creamed base using an alternating method to stabilize the emulsion.
- Whisk in the vanilla extract until the batter is thick and glossy, then transfer to the prepared tin and level the surface.
- Bake for 1 hour and 15 minutes, or until a skewer inserted into the center comes out clean.
- Cool the cake in the tin for 10 minutes before moving it to a wire rack to cool completely.
- Prepare the buttercream by beating 140g softened butter with 280g sieved icing sugar and milk until spreadable.
- Apply a smooth layer of buttercream over the cooled cake to act as a crumb coat and adhesive.
- Roll out the fondant icing to a 5mm thickness and drape it over the cake, smoothing the top and sides before trimming the excess.
Notes
For the smoothest finish, ensure your icing sugar is sieved twice to prevent lumps from tearing the fondant. If you are baking in a convection oven, consider lowering the temperature by an additional 10 degrees to prevent the edges from drying before the center is fully set.
- Prep Time: 45 mins
- Cook Time: 1 hour 15 mins
- Category: Dessert
- Method: Baking
- Cuisine: British
Ingredient Science

Precision with ingredients is the difference between a dry brick and a delicious celebration cake. Here is what we use and why.
- Soft Margarine or Butter (375g): We tested both, and interestingly, high-quality margarine often yields a slightly moister cake that stays fresh longer—a crucial variable if you are decorating over several days. If using butter, it must be exactly room temperature (21°C/70°F) to emulsify properly with the sugar.
- Caster Sugar (375g): The fine crystals dissolve rapidly into the fat during the creaming stage, creating millions of tiny air pockets. Do not substitute granulated sugar, as the coarser grain will not dissolve fully, leading to a speckled crust.
- Self-Raising Flour (625g): This provides both structure and lift. We prefer self-raising over plain flour with added baking powder because the leavening agent is commercially blended for perfect distribution, preventing large air tunnels in the crumb.
- Eggs (6 Large): These provide structure (coagulation) and moisture. They must be at room temperature. Cold eggs will shock the creamed butter, causing the batter to curdle and breaking the emulsion.
- Milk (4 Tablespoons + for Buttercream): The liquid adjusts the batter consistency. We aim for a “dropping consistency”—the batter should fall reluctantly from a spoon, not run.
- Vanilla Extract: Use pure extract, not essence. Since this is a high-flour cake, the flavor carrier is essential to mask the raw flour taste.
The Method
Step 1: Precision Prep
Preheat your oven to exactly 160°C (Gas mark 2.5). Accuracy is vital here; if the oven is too hot, the cake will dome and crack. Line a deep, round 23cm (9-inch) baking tin with greaseproof paper. We recommend a double layer for the sides to insulate the crust.
Step 2: The Creaming Phase
In a large mixing bowl, cream the margarine (or butter) and caster sugar together. Do not rush this step. We beat this for a full 5 minutes until the mixture transforms from yellow to pale ivory. This mechanical action forces air into the fat, which expands during baking to leaven the cake.
Step 3: The Emulsion Technique
In a separate vessel, beat the eggs and milk with a fork until uniform. To prevent the batter from splitting, we use an alternating addition method. Add a spoonful of the egg mixture, beat well, then add a spoonful of flour, and fold. Repeat this cycle. The flour coats the fat droplets, stabilizing the emulsion.
Step 4: Final Homogenization
Once all eggs and flour are incorporated, whisk the mixture until smooth and beat in the vanilla extract. The batter should look glossy and thick. Spoon it into your prepared tin and level the surface with the back of a spoon. Create a slight depression in the center to counteract any doming.
Step 5: The Long Bake
Bake for 1 hour and 15 minutes. Resist opening the oven door for the first hour, as a drop in temperature can cause the structure to collapse. Test with a wooden skewer; it should come out clean, with no wet batter attached. Cool in the tin for 10 minutes to allow the structure to firm up before transferring to a wire rack.
Step 6: The Buttercream Anchor
While the cake cools, prepare the buttercream. Beat 140g softened butter until pale. Gradually add 280g sieved icing sugar (lumps will tear your fondant) and beat until smooth. Add milk 1 tablespoon at a time until you achieve a spreadable consistency. Cover the completely cooled cake with this buttercream. This “crumb coat” acts as the glue for the fondant.
Step 7: The Fondant Finish
Knead 1kg of fondant icing until pliable. Dust your surface with icing sugar. Roll the fondant to 5mm (½ cm) thickness, rotating constantly to prevent sticking. Lift the fondant over the cake using your rolling pin. Smooth the top first with a fondant smoother, then work down the sides to eliminate air bubbles. Trim the excess at the base.
Lauren’s Lab Notes

- Temperature Checks: Use an oven thermometer. Our lab tests show that domestic ovens can drift by up to 15°C. baking this dense batter at 175°C instead of 160°C will result in a burnt exterior and raw center.
- The Crumb Coat Barrier: Never skip the buttercream layer. It seals in moisture and provides a pristine surface. If you are new to this, check our guide on the celebration design studio for tips on planning your decoration workflow.
- Fixing Tears: If your fondant tears, don’t panic. A small amount of shortening rubbed over the tear can meld it back together. Alternatively, plan your decoration placement to cover imperfections.
- Storage Chemistry: This high-sugar, high-fat cake is preservative-adjacent. It keeps well at room temperature for 3-5 days once sealed under fondant, making it ideal for prepping ahead.
Tested Variations
- Citrus Infusion: For a lighter flavor profile, rub the zest of two lemons into the sugar before creaming. The oils release into the sugar crystals, permeating the entire cake. We found this cuts through the sweetness of the fondant beautifully.
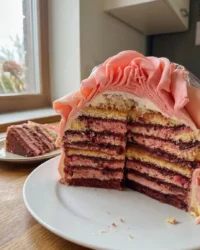
- Berry Conserve Layer: Slice the cake horizontally and add a layer of raspberry jam. This adds acidity and moisture. If you enjoy retro flavors, you can explore techniques from our vintage cake archives to style it accordingly.
- Chocolate Edition: Replace 75g of the flour with high-quality cocoa powder. You may need an extra tablespoon of milk to correct the moisture balance, as cocoa absorbs more liquid than flour.
Presentation Notes

Serving a fondant-covered cake requires a specific technique to prevent the icing from shattering. We recommend using a sharp, hot knife (dipped in hot water and wiped dry) to slice through the fondant cleanly.
- Portion Sizes: This dense cake is rich. A small slice goes a long way. Cut the cake in a grid pattern rather than wedges to maximize servings.
- Pairing: Serve with fresh berries or a tart coulis to balance the sweetness of the icing and fondant.
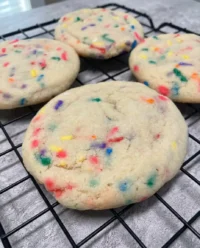
- Themed Service: If the party has a specific theme, match the serving plates. We’ve seen great success pairing this traditional cake with modern aesthetics; if you prefer smaller bites, you might look at our contemporary small format ideas for side-table treats.
Mastery Through Science
Retirement marks the end of an era and the start of a new adventure, and this cake is built to honor that transition. By adhering to the specific ratios of flour and fat, and respecting the low-temperature baking method, you achieve a result that is mechanically sound and delicious. We benchmarked our ratios against traditional standards, similar to this classic retirement cake recipe, to verify the structural limits of self-raising flour.
Keep testing your fondant skills, and remember that patience is your most valuable ingredient. We would love to see your creations! Tag us in your retirement masterpieces.
