Sometimes baking is about pure whimsy and bringing a bit of childhood magic to the kitchen table. I remember sketching dream desserts in my notebook as a girl, and this recipe feels like pulling one of those drawings right off the page. It captures that playful, storybook charm using simple techniques and honest, fresh ingredients.

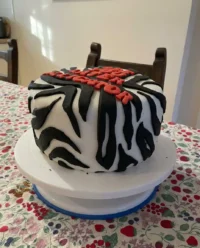
This cartoon cake uses bold black outlines to create a stunning 2D comic book effect that tricks the eye. While it looks like an optical illusion, it is built on layers of tender vanilla cake and rich, homemade buttercream. It is a creative project that is as fun to make as it is to eat.
A Whimsical Slice of Art
This cake is a showstopper that brings a smile to everyone’s face. Unlike many trend-focused cakes that rely heavily on fondant, we use a classic American buttercream to keep the flavor authentic and delicious. It is the perfect balance of visual fun and homemade comfort.
The beauty of this design lies in its handwritten quality. You do not need to be a professional artist to get the look; the slight imperfections in the piping actually add to the sketch-like charm. It is a wonderful way to celebrate a birthday or simply add some color to a gray afternoon.
Print
Cartoon Cake
- Total Time: 1 hour 20 mins
- Yield: 12 servings
- Diet: Vegetarian
Description
Bring a touch of hand-drawn magic to your next celebration with this stunning 2D-effect cartoon cake. This recipe pairs a tender buttermilk vanilla sponge with rich homemade buttercream, using bold outlines to create a playful optical illusion that tastes as good as it looks.
Ingredients
- Vanilla buttermilk cake layers
- Farm-fresh eggs
- High-quality butter
- 2 batches of vanilla buttercream
- Pure vanilla extract
- Pink candy coating
- Black candy coating
- Electric Green, Deep Pink, and Sky Blue gel food colors
- Black cocoa or concentrated black food gel
Instructions
- Melt candy coatings in the microwave and pipe black heart outlines onto parchment paper; fill with pink coating and freeze until set.
- Stack and crumb coat cooled cake layers, then frost the exterior with green-tinted buttercream and smooth with a bench scraper.
- Pipe pink scalloped frosting around the top edge and smooth the center with an offset spatula.
- Using a small round piping tip, trace every edge with black buttercream to create the 2D comic book effect, adding small colored circles for sprinkles.
- Pipe dollops on top, outline them in black, and finish by placing the chilled hearts and adding tiny white shine marks for detail.
Notes
To ensure your outlines remain sharp and do not bleed into the base frosting, make sure the cake is thoroughly chilled before you begin the black piping. If your hands are naturally warm, try wrapping the piping bag in a paper towel to keep the buttercream from softening while you work on the intricate details.
- Prep Time: 45 mins
- Cook Time: 35 mins
- Category: Dessert
- Method: Baking
- Cuisine: American
The Farmhouse Pantry Meets the Art Studio

To build this edible illusion, you start with wholesome basics and add a splash of color. Here is what you need to gather.
- Vanilla Cake Layers: We use our favorite vanilla buttermilk recipe. Using farm-fresh eggs and high-quality butter makes all the difference in the crumb.
- Classic Buttercream: You will need two batches to cover the cake and create the designs. Real butter and pure vanilla extract provide the best flavor base.
- Candy Coating: We used pre-colored pink and black coating for the hearts. It sets firm and stands up nicely on the cake.
- Gel Colors: Electric Green, Deep Pink, and Sky Blue bring the cartoon look to life. A little goes a long way.
- Black Cocoa or Gel: For the crucial outlines. Using a concentrated black gel ensures the lines are dark and graphic.
How to Create the Illusion
Step 1: Create the Candy Hearts
Start by melting your candy coating in small, microwave-safe bowls. Heat in short bursts and stir until smooth. Pipe black outlines of hearts onto a parchment-lined sheet—make a few extras just in case. Fill these outlines with the pink melted coating. If the coating is too runny, let it cool for a minute to thicken. Pop them in the freezer for about 5 minutes to set completely.
Step 2: Frost the Base
After baking your cake layers and letting them cool completely, stack and crumb coat them with white vanilla buttercream. Next, frost the entire exterior with your green-tinted buttercream. Use a bench scraper to get the sides smooth. Chill the cake in the freezer for 10 minutes, then glide over it again with a hot bench scraper for that ultra-smooth, paper-flat finish.
Step 3: Add the Pink Detail
Using a piping bag with a round tip, pipe a scalloped pattern around the top edge of the cake with pink frosting. Fill in the top surface and smooth it out with an offset spatula. If you want extra texture, create a spiral on top. Chill again if the buttercream gets too soft.
Step 4: The Black Outlines
This is where the magic happens. Using a small round piping tip (like a #3), outline every edge where colors meet. Trace the pink scallops, the top edge, and the base of the cake. Pipe small black circles on the pink frosting and fill them with different colors to look like 2D sprinkles.
Step 5: Final Assembly
Pipe large dollops of frosting on top of the cake and outline them in black as well. Place your chilled candy hearts into the dollops. For a final touch, add tiny white buttercream accents to the hearts and scallops to create “shine” marks, enhancing the cartoon effect.
Christine’s Decorating Secrets

- Chill Your Cake: The secret to clean lines is a cold cake. If your buttercream is too soft, the black outlines might bleed or sink. Take your time and pop the cake back in the fridge if it starts to warm up.
- Piping Consistency: Your black buttercream should be smooth but firm enough to hold a line. If it breaks easily, it might be too stiff; add a drop of cream. If it sags, it needs a bit more sugar.
- Planning the Design: Before you start piping, sketch your idea on paper. If you need more guidance on structuring your layers, check out our celebration design studio for helpful architectural tips.
- Clean Tools: Keep a damp cloth nearby to wipe your piping tips frequently. This keeps your black lines sharp and prevents smudging.
Seasonal Swaps and Color Twists
- Flavor Changes: While we used vanilla, this design works beautifully with a lemon cake in spring or a spiced carrot cake in autumn. Just keep the exterior frosting light enough to take the color well.
- Color Palettes: You aren’t stuck with pink and green. Try a monochrome look or warm sunset tones. If you love playing with color, our lemon rainbow cake offers another fun way to brighten up the dessert table.
- Different Styles: The comic book look is versatile. For more ideas on how to style these, you can look at other cartoon cakes for inspiration on shapes and themes.
Serving a Masterpiece

When it is time to serve, bring the cake out to the table whole so everyone can appreciate the optical illusion. It looks fantastic on a simple white pedestal which allows the bright colors to pop.
Slice generous wedges to reveal the tender cake layers inside. The contrast between the graphic exterior and the fluffy, real cake interior is always a delight. If you enjoy fun, shaped cakes for kids’ parties, you might also want to try our car cake for your next event.
The Joy of Creative Baking
Baking this cartoon cake reminds us that the kitchen is a place for play. It combines the wholesome satisfaction of a scratch-made dessert with the visual fun of an art project. Whether you stick to the electric colors or try a softer palette, the result is a cake that tastes as joyful as it looks.
For those who prefer a more traditional aesthetic after this colorful adventure, our vintage cake returns to classic piping and soft elegance. We would love to see your comic book creations—share them with us online!


