There is something deeply grounding about the smell of a simple vanilla cake baking in a quiet farmhouse kitchen. It reminds me of slow Sunday afternoons when the only agenda was enjoying the simple sweetness of life and the company of family. Baking from scratch connects us to those memories, using honest ingredients to create something that feels like home.

This recipe strikes the perfect balance between fluffy and moist, thanks to a thoughtful blend of butter and oil. It is one of my most reliable cake recipes for birthdays, celebrations, or just a rustic weeknight treat. With a tender golden crumb and a hint of vanilla, it lets the natural flavors shine without being overly fussy.
Why This Recipe is a Keeper
This cake captures the essence of farmhouse baking: simple, reliable, and incredibly delicious. By using both butter and oil, you get the rich flavor of butter with the lasting moisture that oil provides, ensuring every slice is tender days after baking.
It is also wonderfully versatile. Whether you are stacking it for a celebration or baking it in a 9×13 pan for a casual gathering, the structure holds up beautifully. It is the kind of recipe that feels special enough for a party but easy enough for a beginner to master.
Print
Classic Vanilla Cake
- Total Time: 50 mins
- Yield: 12 servings
Description
Experience the ultimate farmhouse comfort with this reliable vanilla cake that balances a rich buttery flavor with a moist, tender crumb. Perfect for birthdays or casual gatherings, this versatile recipe is a timeless staple for any home baker.
Ingredients
- 1/2 cup unsalted butter, softened
- 1/2 cup vegetable or canola oil
- 1 1/2 cups granulated sugar
- 4 large eggs, room temperature
- 2 teaspoons vanilla extract
- 2 1/2 cups all-purpose flour
- 2 1/2 teaspoons baking powder
- 1/2 teaspoon salt
- 1 cup buttermilk, room temperature
Instructions
- Preheat your oven to 350°F (177°C) and prepare two 8-inch round cake pans by lining the bottoms with parchment paper and lightly greasing the sides.
- In a stand mixer or large bowl, cream together the softened butter, oil, and granulated sugar until the mixture is pale, creamy, and well-combined.
- Add the eggs one at a time, beating well after each addition, then stir in the vanilla extract.
- In a separate medium bowl, whisk together the flour, baking powder, and salt to aerate and combine.
- Using a spatula, gently hand-mix the batter by alternating additions of the flour mixture and the buttermilk, starting and ending with the flour, until just combined.
- Divide the batter evenly between the prepared pans and bake for 30–35 minutes, or until the surface springs back and a toothpick comes out clean.
- Allow the cakes to cool in the pans for 10–15 minutes before inverting them onto a wire rack to cool completely.
Notes
To ensure the most tender results, avoid using a high-speed mixer once the flour is added, as hand-folding preserves the delicate air bubbles. For an extra touch of elegance, consider brushing the warm cake layers with a simple vanilla syrup to lock in moisture before frosting.
- Prep Time: 20 mins
- Cook Time: 30 mins
- Category: Dessert
- Method: Baking
- Cuisine: American
The Farmhouse Pantry

Butter and Oil
We use a combination here for the best of both worlds. Unsalted butter provides that classic creamy flavor, while a neutral oil (like vegetable or canola) keeps the crumb soft and moist. Make sure your butter is truly softened to room temperature for proper creaming.
Buttermilk
The acidity in buttermilk helps tenderize the gluten, resulting in a softer texture. If you don’t have farm-fresh buttermilk, you can make a quick substitute with milk and vinegar, but the real thing adds a lovely tang.
Eggs
Four large eggs provide structure and richness. It is crucial that these are at room temperature so they emulsify smoothly into the batter without seizing the butter.
Flour
Standard all-purpose flour works perfectly for a sturdy yet tender crumb. If you prefer an even lighter texture, you can swap this for cake flour by weight.
How to Make It
Step 1: Prep Your Pans
Preheat your oven to 350°F (177°C). Prepare two deep 8-inch round cake pans by lining the bottoms with parchment paper and lightly greasing the sides. This ensures your cakes release cleanly and keeps the edges from sticking.
Step 2: Cream the Fats and Sugar
In the bowl of a stand mixer, or using a large bowl with an electric mixer, cream together the softened butter, oil, and granulated sugar. Beat until the mixture is pale, creamy, and well-combined. This step builds the structure for your cake.
Step 3: Add Eggs and Vanilla
Add the eggs one at a time, beating well after each addition to ensure they are fully incorporated. Stir in the vanilla extract, which adds that nostalgic, aromatic warmth to the batter.
Step 4: Combine Dry Ingredients
In a separate medium bowl, whisk together the flour, baking powder, and salt. Whisking aerates the flour and ensures the leavening agent is evenly distributed, preventing uneven rising.
Step 5: Mix the Batter
Using a spatula, gently hand-mix the batter now. Alternate adding the flour mixture and the buttermilk to the butter mixture, starting and ending with the flour. Mix only until just combined after each addition. Do not use your electric mixer here; hand-mixing prevents overworking the gluten, keeping the cake tender.
Step 6: Bake and Cool
Divide the batter evenly between the prepared pans. Bake for 30–35 minutes, or until the surface springs back to the touch and a toothpick inserted in the center comes out with just a few moist crumbs. Allow the cakes to cool in the pans for 10–15 minutes before inverting them onto a wire rack to cool completely.
Christine’s Tips for Success

Room Temperature is Key
Ensure your butter, eggs, and buttermilk are all at room temperature before you start. Cold ingredients will not emulsify properly, leading to a dense or uneven cake. I like to set my ingredients out on the counter about an hour before I plan to bake.
Gentle Mixing
Once you add the flour, put the electric mixer away. Overmixing at this stage develops too much gluten, which can make the cake tough rather than tender. Use a spatula to fold the ingredients together just until the flour streaks disappear.
Check for Doneness Early
Ovens vary, so start checking your cake about 5 minutes before the timer goes off. You want a toothpick to come out with a few moist crumbs attached, not wet batter. If you are new to baking, check out our guide on foundational baking techniques to help you master these basics.
Seasonal Swaps and Twists
Cupcakes
This batter makes excellent cupcakes. Line a muffin tin and fill cups about three-quarters full. Bake for 17–18 minutes. It yields approximately 24 cupcakes, perfect for a party or a school treat.
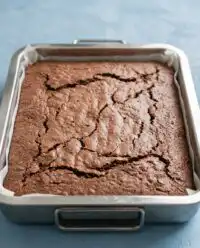
Pan Sizes
You can bake this in a 9×13 inch pan (approx. 30 mins) or a Bundt pan (40-45 mins). Keep an eye on the baking time as it varies with pan material and size. The rustic charm of a simple sheet cake is often understated but always welcome.
Flavor Profile
While this is a classic vanilla base, if you are craving something richer, you might prefer our old-fashioned chocolate cake. You can also fold in lemon zest or seasonal berries into this batter for a fresh, fruity twist.
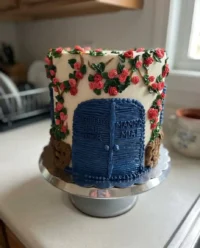
Rustic Presentation

I love serving this cake simply, perhaps on a wooden board or a ceramic platter that highlights its homemade nature. It pairs beautifully with a classic chocolate buttercream, but a simple dusting of powdered sugar and fresh berries is equally stunning for a lighter summer dessert.
If you want the full experience, frost this with our favorite classic yellow cake with chocolate frosting recipe. For those exploring other textures and global styles, I sometimes browse collections like this list of cake recipes for inspiration, but I always come back to this reliable vanilla staple.
The Simple Truth
Baking doesn’t have to be complicated to be perfect. This classic vanilla cake proves that with just a few honest ingredients and a little care, you can create something truly special. It is a testament to the idea that the best flavors often come from the simplest places.
I hope this becomes a staple in your kitchen just as it is in mine. For more baking ideas, browse our full recipe index.
Share your bake with us!

