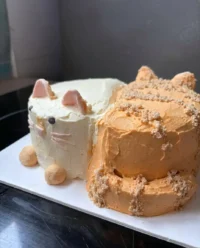
There is something incredibly special about a first birthday—the messy hands, the wide-eyed wonder, and the pure joy of discovering sugar for the first time. In my farmhouse kitchen, we believe that even a cake meant to be smashed should taste as good as it looks. This isn’t just a photo prop; it’s a tender, buttery introduction to the world of homemade baking, crafted with honest ingredients and love.

This simple vanilla smash cake uses classic pantry staples to create a tender crumb that is perfect for little fingers to dig into. While it is sturdy enough to hold its shape for the big moment, it remains soft and moist, offering a gentle sweetness that celebrates the occasion without overwhelming it.
A Sweet Farmhouse Tradition
We love this recipe because it strips baking back to its delicious essentials. There are no complicated techniques here—just pure vanilla flavor and the richness of sweet cream butter. It is perfectly sized for a high chair tray, making it the ideal centerpiece for your little one’s big day.
Whether you cover it in rustic swirls of frosting or a cascade of colorful sprinkles, this cake captures the heart of farmhouse baking: simple, seasonal (in spirit), and deeply satisfying. It’s a treat that feels manageable for busy parents but tastes like it came straight from a professional bakery.
Print
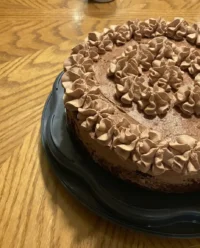
Smash Cake
- Total Time: 2 hours
- Yield: 1 small tiered cake
- Diet: Vegetarian
Description
This charming farmhouse smash cake is designed specifically for a baby’s first birthday celebration. With its tender crumb and classic vanilla flavor, it offers a simple, beautiful, and delicious way to mark a major milestone.
Ingredients
- 1 1/2 cups cake flour
- 1 1/2 teaspoons baking powder
- 1/4 teaspoon salt
- 1/2 cup unsalted butter, softened
- 3/4 cup granulated sugar
- 2 large eggs, room temperature
- 1 1/2 teaspoons pure vanilla extract
- 1/2 cup whole milk
- 1 container vanilla frosting
- 1/2 cup multi-colored sprinkles
Instructions
- Preheat your oven to 350°F (175°C). Grease one 6 1/2-inch cake pan and one 4 1/2-inch cake pan, then line the bottoms with parchment paper.
- In a medium bowl, whisk together the cake flour, baking powder, and salt until well combined.
- In a large bowl, use an electric mixer to cream the softened butter and sugar until light and fluffy. Add the eggs one at a time, beating well after each addition, then stir in the vanilla extract.
- Add half of the flour mixture to the butter mixture and mix until just combined. Pour in half of the milk and mix again. Repeat with the remaining flour and milk until the batter is smooth.
- Pour the batter into the prepared pans. Bake for 20 to 25 minutes for the smaller cake, and 35 to 40 minutes for the larger one, or until a toothpick inserted into the center comes out clean.
- Let the cakes cool completely on a wire rack for at least one hour. Spread frosting on the sides of the cakes and roll them in sprinkles before stacking the smaller cake on top of the larger one and finishing with a final layer of frosting.
Notes
To prevent the cake from sticking, always line the bottom of your pans with parchment paper after greasing. If the small cake finishes baking much earlier than the large one, remove it promptly to prevent drying while the larger layer finishes.
- Prep Time: 20 mins
- Cook Time: 40 mins
- Category: Dessert
- Method: Baking
- Cuisine: American
The Farmhouse Pantry

To make this cake shine, we rely on ingredients that you likely already have in your kitchen. Quality matters here—since the flavors are simple, fresh ingredients make all the difference.
- Cake Flour: This is the secret to a tender, melt-in-your-mouth crumb. It has less protein than all-purpose flour, ensuring the cake is soft rather than chewy.
- Butter: Use softened, unsalted butter so you can control the salt content. I always reach for the freshest local butter I can find for that rich, creamy flavor.
- Eggs: Room temperature eggs mix more evenly into the batter, creating a better rise.
- Whole Milk: Adds moisture and richness to the batter.
- Pure Vanilla Extract: Avoid imitation vanilla; the real stuff provides a warm, floral aroma that defines this cake.
- Frosting & Sprinkles: The recipe calls for convenient vanilla frosting and fun sprinkles to coat the sides, perfect for a festive look.
Step 1: Prepare for Baking
Preheat your oven to 350°F (175°C). Grease one 6 1/2-inch cake pan and one 4 1/2-inch cake pan thoroughly. I like to line the bottoms with parchment paper as well to ensure the cakes release perfectly without breaking.
Step 2: Mix Dry Ingredients
In a medium bowl, whisk together the cake flour, baking powder, and salt. This aeration helps distribute the leavening agents evenly, preventing any uneven rising during the bake.
Step 3: Cream Butter and Sugar
In a large bowl, use an electric mixer to cream the softened butter and sugar until light and fluffy. This step incorporates air into the batter, which is essential for a light texture. Add the eggs one at a time, beating well after each addition, then stir in the vanilla extract.
Step 4: Combine and Bake
Add half of the flour mixture to the butter mixture and mix until just combined. Pour in half of the milk and mix again. Repeat with the remaining flour and milk until the batter is smooth. Pour the batter into your prepared pans. Bake until a toothpick comes out clean—about 20 to 25 minutes for the smaller cake, and 35 to 40 minutes for the larger one.
Step 5: Cool and Decorate
Let the cakes cool completely on a wire rack for at least one hour. Once cool, spread frosting on the sides of the larger cake and roll it in sprinkles. Place it on a platter, frost the top, and stack the smaller cake (sides frosted and rolled in sprinkles) on top. Finish by frosting the very top and adding a final flourish of sprinkles.
Christine’s Baking Secrets

Making a smash cake should be stress-free. To ensure your cakes come out perfectly level, try using bake-even strips around the pans; they help the cake bake evenly without a domed top, which makes stacking much easier.
Be sure to let your ingredients reach room temperature before you start mixing. Cold milk or eggs can cause the batter to curdle slightly, affecting the final texture. If you enjoy baking petite treats like this often, you might find inspiration in our contemporary small format guide, which explores the beauty of smaller bakes.
Finally, don’t rush the cooling process. A warm cake will melt the frosting immediately, leading to a messy slide rather than a messy smash.
Simple Seasonal Twists
While this vanilla version is a classic, you can easily adapt the flavors to suit the season or your taste.
- Berry Fold-In: Gently fold in a half-cup of fresh blueberries or chopped strawberries for a burst of summer fruit.
- Natural Color: Instead of traditional food dye, use a little beet juice or turmeric in your frosting for soft, earthy tones that look beautiful in photos.
- Zesty Lemon: For a brighter flavor profile similar to our lemon rainbow cake, add a teaspoon of fresh lemon zest to the batter.
- Healthier Options: If you are looking for a recipe that uses alternative ingredients like maple syrup or almond flour, you might appreciate this first birthday smash cake approach, though we love the classic texture of our flour-based version.
Creating the Moment

When it comes time to serve, simplicity is best. Place the cake on a sturdy, low cake stand or a simple wooden board that won’t tip over easily. If you are setting up a designated area for photos, natural light is your best friend—it highlights the texture of the frosting and the joy on your little one’s face.
For the adults at the party, you might want to serve sheet cake or cupcakes on the side so the smash cake remains the baby’s special domain. If you are looking for styling tips to make the setup look professional yet rustic, check out our celebration design studio for creative ideas.
Celebrating Simple Joys
This smash cake is about more than just sugar and flour; it is about marking a milestone with something handmade and heartfelt. There is a rustic beauty in watching a child experience the texture of cake for the first time, a reminder to savor the messy, imperfect moments of life.
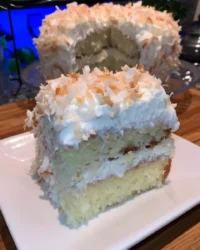
If you need a larger dessert to feed the rest of your guests, consider baking a classic vintage cake to complement this petite version. Happy baking, and enjoy the celebration!
Share your smash cake photos with us: Pinterest | Instagram | Facebook | X
