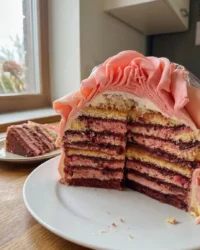
Growing up in the heart of Virginia, I learned early on that the most memorable Sunday dinners weren’t just about the fried chicken or the collard greens. They were about the centerpieces—those magnificent desserts that sat proudly in the middle of the table, adorned with handcrafted Cake Toppers that my grandmother lovingly shaped by hand. Those little details whispered of a home where every guest was cherished and every milestone was worth a celebration.

In my years of professional baking, I have found that you do not need a fancy degree to create something truly spectacular. These edible decorations are the perfect way to bring a touch of Southern hospitality to your own kitchen. They offer a reliable way to personalize any treat, turning a simple recipe into a treasured memory for your family and friends.
Why These Cake Toppers Are a Kitchen Game Changer
There is something deeply special about presenting a dessert that is uniquely tailored to the person you love. These Cake Toppers allow you to speak a person’s name, celebrate their favorite hobby, or simply add a splash of joy to a midweek treat. Unlike the plastic versions you find at the big-box stores, these are completely edible, which means no one has to worry about picking bits of non-food items off their frosting before they take a bite.
I also love this method because it is incredibly cost-effective. For just a few dollars in melting wafers, you can create a dozen custom designs that would cost a fortune at a professional bakery. It brings a sense of accomplishment to the home baker, proving that with a little bit of melted candy and a steady hand, you can craft a masterpiece. The results are always charmingly authentic, reflecting the heart and soul you put into your baking.
Print
Cake Toppers
- Total Time: 50 mins
- Yield: 12 toppers
- Diet: Gluten-Free
Description
Add a personalized touch to your desserts with these charming, handcrafted edible cake toppers made from melted candy wafers. This budget-friendly project allows you to create custom designs and shapes that bring a sense of professional artistry to any home-baked treat.
Ingredients
- Melting Wafers (such as Ghirardelli or Wilton)
- Sprinkles (optional)
- Gel Food Coloring (optional)
- Wooden Skewers
- Waxed Paper
Instructions
- Draw or print your desired designs onto paper to serve as templates for your toppers.
- Cut individual squares of waxed paper for each design and lay them directly over the templates on a flat baking sheet.
- Place candy wafers in a heat-safe bowl and microwave at 50% power in 30-second increments, stirring frequently until smooth.
- Transfer the melted candy into a piping bag with a small hole snipped at the tip and trace the outline of your design before filling in the center.
- While the candy is still wet, gently lay a wooden skewer onto the design and pipe an additional small amount of candy over it to sandwich it in place.
- Add optional sprinkles or decorations while the candy is still wet, pressing them gently into the surface.
- Allow the toppers to sit at room temperature for 20 to 30 minutes until completely solid before carefully peeling them off the waxed paper.
Notes
For the smoothest finish, ensure your piping bag tip is cut very small to allow for better control over fine details. If the candy begins to harden in the bag while you are working, you can gently massage the bag to distribute heat or place it in a warm spot for a few moments. Always store finished toppers in a cool, dry place until ready to use to prevent softening.
- Prep Time: 15 mins
- Cook Time: 5 mins
- Category: Dessert Decoration
- Method: Piping
- Cuisine: American
The Foundation of Your Edible Art

Before we start piping, we need to gather our supplies. I always tell my students that quality ingredients are the secret to a professional finish. For these toppers, the foundation is the melting wafer. While you might be tempted to use standard chocolate chips, melting wafers are designed to set firmly at room temperature without the need for complex tempering. This makes them a reliable choice for beginners and experts alike.
- Melting Wafers: I highly recommend using Ghirardelli melting wafers for their superior flavor, but Wilton candy melts are also a great option for bright colors.
- Sprinkles: These are optional, but they add a wonderful texture and a pop of color that children especially adore.
- Gel Food Coloring: If you are starting with white wafers, make sure to use gel rather than liquid to keep the consistency perfect.
- Wooden Skewers: You will need these to provide the structural support so your designs can stand tall on top of the cake.
- Waxed Paper: This is your best friend for easy removal once the candy has set.
Step-by-Step Instructions
Step 1: Design Your Templates
Draw or print your desired designs onto a piece of paper. This serves as your roadmap. Whether it is a name, a heart, or a specific character, having a template underneath your waxed paper makes the process much more manageable for everyone.
Step 2: Prepare Your Workspace
Cut individual squares of waxed paper for each character. This is a pro move because it allows you to move each piece independently without disturbing the others. Lay these squares directly over your templates on a flat baking sheet.
Step 3: Melt the Wafers with Care
Place your wafers in a heat-safe bowl and microwave at 50% power. Work in 30-second increments and stir frequently. You want the mixture to be smooth and just-slightly thick. If it is too runny, let it sit for a minute to cool; if it is too thick, a tiny bit more heat will fix it.
Step 4: Transfer and Pipe
Move the melted candy into a piping bag and snip a very small hole at the tip. Start by tracing the outline of your design on the waxed paper, then fill in the center. This two-step approach helps keep your edges crisp and clean.
Step 5: Secure the Skewers
While the candy is still wet, gently lay a skewer onto the design. Make sure at least half an inch of the skewer is resting on the candy. Pipe an additional small amount of melted wafer over the skewer to sandwich it in place, providing the strength needed to stand upright.
Step 6: Add the Finishing Touches
If you are using sprinkles, add them now before the candy sets. Gently press them into the surface if they seem to be sitting too high. This is the moment where your personality really shines through in your work.
Step 7: Set and Release
Allow the toppers to sit at room temperature until they are completely solid. This usually takes about 20 to 30 minutes depending on the humidity in your kitchen. Once firm, they will peel right off the waxed paper with no trouble at all.
Jesse’s Secrets to Success

One of the most important things to remember when working with candy melts is the temperature of your kitchen. If your home is particularly warm, you might find that the toppers take longer to set. In these cases, a quick five-minute stay in the refrigerator can help them firm up. However, do not leave them there too long, as the transition back to room temperature can sometimes cause condensation, which dulls the finish of the candy.
If you find your lines are a bit shaky, do not worry! You can always use a toothpick to gently nudge the melted candy into place while it is still wet. This technique is similar to how we might fix a vintage cake design when the frosting isn’t quite behaving. For more detailed guidance on professional piping techniques, you might want to look at how others manage easy diy edible cake toppers to see different hand positions that might work for you.
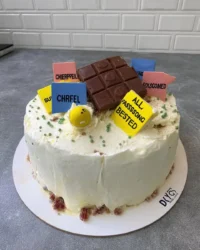
Making the Design Your Own
You can truly let your imagination run wild with these decorations. For a child’s birthday, try making a car cake theme by piping wheels and racing flags. You can even use different colored wafers to create a layered effect, letting the first color dry slightly before adding the next one on top. This adds a beautiful depth to the characters.
For more elegant occasions, like a wedding shower or an anniversary, consider piping delicate gold or silver accents. You can achieve this by painting a bit of edible luster dust onto the finished, hardened topper with a small brush. It creates a sophisticated look that rivals any high-end boutique bakery design while maintaining that homemade charm we love at Cake Peak.
Presentation and Celebration Time

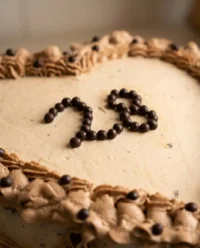
When it comes time to serve your cake, timing is everything. I suggest waiting to add your Cake Toppers until you are nearly ready to present the dessert. This prevents the weight of the topper from shifting in the frosting if the cake is moved frequently. For a romantic touch, you could even add a heart cake topper to a batch of cupcakes for a sweetheart’s tea.
These toppers look magnificent when paired with a simple dusting of powdered sugar or a crown of fresh berries. If you are hosting a larger gathering, consider placing the cake on a tall pedestal to give it the stage it deserves. The height provided by the skewers makes the design pop, making sure every guest can see the love and effort you poured into your baking.
Bringing the Celebration Together
Creating your own decorations is a wonderful way to bring family together and show your guests that you went the extra mile. Whether you are prepping for a grand reunion or a quiet Sunday supper, these handmade touches are what make a house feel like a home. If you are looking for more ways to make your events truly special, be sure to check out our celebration design studio for more inspiration.
I would love to see what you create in your own kitchens! Please share your photos with us and join our community of home bakers. You can find more tips and southern hospitality on our Facebook and Instagram pages. Happy baking, and remember that the most important ingredient is always the love you put into it.
