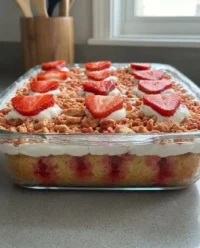
Growing up in Virginia, summer meant more than just heat; it meant the arrival of the most vibrant, sun-ripened berries you could imagine. I remember the quiet joy of sitting on my grandmother’s porch, hulling strawberries while she shared secrets about the perfect balance of sweet and tangy flavors. This Strawberry Cheesecake 3 is a tribute to those gentle afternoons where a simple treat brought the whole family together for a moment of pure bliss.

This particular version of the recipe focuses on achieving a silky, dense texture without ever turning on the oven. It is a no-bake masterpiece that relies on high-quality dairy and the natural brightness of fresh fruit to create a professional-grade dessert right in your own kitchen. By following a few simple techniques, you can create a center-piece that looks as beautiful as it tastes.
Why You Will Love This Strawberry Cheesecake 3
There is something deeply satisfying about a dessert that feels indulgent yet remains light enough for a humid Southern evening. This Strawberry Cheesecake 3 captures that balance perfectly, offering a buttery, crunch-filled base that supports a cloud-like filling. Unlike baked versions that can sometimes feel heavy or dry, this no-bake method guarantees a moist, velvety mouthfeel that melts away the moment it hits your tongue.
You will appreciate the simplicity of the process, which allows the natural quality of your ingredients to shine. We are using a method that prioritizes the structural integrity of the cream cheese while incorporating just enough air to keep things fluffy. It is a reliable crowd-pleaser that works just as well for a fancy Sunday dinner as it does for a casual neighborhood potluck.
Another reason to fall in love with this recipe is the deep strawberry flavor infused throughout the filling. By finely chopping and draining the berries, we concentrate their sweetness and prevent the cake from becoming watery. It is a technique I learned in culinary school that brings a professional touch to a traditional comfort food favorite. Every slice offers a vibrant pop of crimson against the pale, creamy filling, making it a visual treasure for any celebration table.
Print
Strawberry Cheesecake 3
- Total Time: 4 hours 30 mins
- Yield: 8-10 servings
- Diet: Vegetarian
Description
This luscious no-bake Strawberry Cheesecake 3 features a buttery digestive biscuit crust and a velvety filling bursting with fresh berries. It is the perfect refreshing dessert for summer gatherings, offering a professional-grade texture without needing an oven.
Ingredients
- 250g digestive biscuits, crushed
- 100g unsalted butter, melted
- 600g full-fat cream cheese, room temperature
- 100g icing sugar, sifted
- 284ml double cream
- 400g fresh strawberries, finely chopped and drained
- Extra strawberries for garnish
Instructions
- Combine the crushed digestive biscuits and melted butter until well coated, then press firmly into the base of a springform tin and refrigerate.
- Finely chop the strawberries and place them in a fine-mesh sieve for 10 minutes to drain away any excess juice.
- In a chilled bowl, whisk together the cream cheese, icing sugar, and double cream using an electric mixer until the mixture is very thick.
- Gently fold the drained strawberries into the cream mixture using a spatula, being careful not to over-mix.
- Pour the filling over the chilled biscuit base, smooth the top with an offset spatula, and refrigerate for at least 4 hours or overnight.
- Run a knife around the edge of the tin to release the cheesecake, then garnish with fresh strawberries before serving cold.
Notes
To ensure a perfectly smooth and stable filling, always use block-style full-fat cream cheese and ensure it is at room temperature before mixing. If your kitchen is particularly warm, try chilling your whisk and mixing bowl for 15 minutes prior to whipping the cream to help it set more effectively.
- Prep Time: 30 mins
- Cook Time: 0 mins
- Category: Dessert
- Method: No-Bake
- Cuisine: American
The Foundation of Your Strawberry Cheesecake 3

To create a dessert that truly stands out, you must start with the best possible building blocks. In my kitchen, we never compromise on the quality of our fats and fruits, as these are what define the final crumb and flavor profile.
- Digestive Biscuits: These provide a unique, wheaty crunch that Graham crackers simply cannot match. They create a sturdy, toasted base that holds up beautifully under the weight of the cream.
- Unsalted Butter: Melting high-quality butter allows us to bind the biscuit crumbs while controlling the exact level of salt in the crust.
- Full Fat Cream Cheese: This is the most critical part of your filling. Make sure you choose the full-fat variety in blocks, as spreadable tubs contain too much air and moisture for a firm set.
- Double Cream: With a higher fat content than standard whipping cream, double cream provides the richness and stability needed to keep the cheesecake thick and sliceable.
- Icing Sugar: Sifting your sugar is a vital step to avoid any gritty pockets, allowing it to dissolve perfectly into the fats.
- Fresh Strawberries: These are the star of the show. We use them both inside the filling for a burst of moisture and on top for a stunning presentation.
When gathering your supplies, make sure your cream cheese is at room temperature. This simple trick allows the proteins to bond more easily with the sugar and cream, preventing those pesky little lumps that can ruin a smooth texture. It is the kind of Southern baking wisdom that makes the difference between a good cake and a great one.
How to Create the Perfect Strawberry Cheesecake 3
Step 1: Prep the Biscuit Base
Begin by crushing your digestive biscuits into a fine, sandy rubble. You can do this in a food processor for speed, or place them in a zip-top bag and use a rolling pin for a bit of therapeutic kitchen work. Mix the crumbs with your melted butter until every bit is coated and looks like wet sand. Press this firmly into the bottom of a springform tin, using the back of a spoon to create an even, flat layer. Place this in the fridge to firm up while you focus on the fruit.
Step 2: Prepare the Strawberries
Finely chop your strawberries into small, uniform pieces. This is a great time to practice your knife skills to get a consistent texture throughout the cake. Place these pieces into a fine-mesh sieve over a bowl. Let them sit for at least ten minutes to drain away the excess juice. This step is vital because it prevents the liquid from thinning out your cheesecake mixture, maintaining that dense, luxurious consistency Jesse is known for.
Step 3: Whisk the Cream and Cheese
In a large chilled bowl, combine your double cream, room temperature cream cheese, and sifted icing sugar. Use an electric hand mixer or a stand mixer to whisk the ingredients together. Start on a low speed to incorporate the sugar, then increase to medium-high. You are looking for a transformation where the mixture becomes very thick, resembling the texture of soft-serve ice cream. Be careful not to over-whisk, or you might turn your beautiful cream into butter.
Step 4: Fold and Assemble
Once your cream base is thick and holding its shape, take a large spatula and gently fold in your drained, chopped strawberries. Use a slow, circular motion to distribute the fruit without knocking the air out of the filling. Pour this mixture over your chilled base and use an offset spatula to smooth the top into a level surface. The goal is a clean, professional finish that will look stunning once sliced.
Step 5: The Essential Chill
Patience is the most important ingredient in a no-bake recipe. Pop your tin into the fridge for at least four hours, though I always recommend leaving it overnight. This long rest allows the fats to solidify and the flavors to meld together, resulting in a much cleaner slice when it comes time to serve your guests.
Step 6: Final Presentation
Carefully run a thin knife around the edge of the tin before releasing the springform sides. Transfer your cake to a beautiful glass stand. Top the cheesecake with your remaining strawberries—I like to leave some whole and halve others for a natural, rustic look that celebrates the beauty of the harvest. Serve cold and enjoy the smiles around the table.
Jesse’s Secrets for Success

To achieve the perfect texture in your Strawberry Cheesecake 3, always use a heavy-bottomed pan to melt your butter slowly, which prevents it from browning and changing the flavor of your crust. If you find your filling isn’t thickening as expected, it might be due to the temperature of your kitchen; try chilling the bowl and whisk attachments before you start. For more detailed advice on handling seasonal produce, check out my guide on fresh fruit baking to make sure your berries are always in peak condition. I also recommend following the techniques found in this strawberry cheesecake reference if you want to see how other professionals handle the strawberry prep.
Classic Twists to Try
While I am a purist when it comes to the Strawberry Cheesecake 3, you can easily adapt this to suit different Southern traditions. For a bit of a zesty kick, try adding the finely grated zest of two lemons to the cream cheese mixture; the citrus acidity brightens the strawberries beautifully. If you want a more decadent fruit profile, you could look at our raspberry white chocolate cake for inspiration on how to pair different berries with creamy bases. Another wonderful option is to macerate the topping strawberries in a tablespoon of Southern bourbon for twenty minutes before serving to add a sophisticated, smoky depth to the finish.
At the Celebration Table

When it comes to serving your Strawberry Cheesecake 3, presentation is everything. I love to serve this on a vintage cake stand with a silver cake server to make the occasion feel truly special. Pair each slice with a tall glass of sweetened iced tea or a bold cup of coffee to balance the richness of the cream. If you are hosting a larger gathering, consider making a spread of berry-themed treats by including our strawberry tres leches cake alongside it. The different textures of the sponge and the cheesecake will give your guests a wonderful variety of fruit flavors to enjoy.
The Final Slice
Baking is about more than just food; it is about the love and care we put into creating something for the people who matter most. I hope this Strawberry Cheesecake 3 brings as much joy to your home as it has to mine over the years. If you enjoyed this journey into fruit-filled desserts, you might also want to try our blueberry coffee cake for your next brunch. Don’t forget to share your beautiful creations with our community on Instagram and Facebook. Keep baking with heart, and I will see you at the next Sunday dinner.
