Growing up in Virginia, February meant more than just cold winds; it meant the sweet aroma of vanilla filling our kitchen as my mama prepared for our annual church social. She always said that a Valentines Day Cake wasn’t just about the sugar, but about the heart you put into every stir of the bowl.

This particular recipe captures that nostalgic magic with a modern, beautiful twist. It features a tender white cake with a whimsical tie-dye center and a silky vanilla buttercream that melts on your tongue like a sweet winter dream.
A Sweetheart of a Dessert
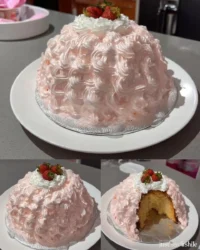
This cake is the ultimate way to show your loved ones you care. The moisture is incredible, thanks to the precise balance of egg whites and oil, ensuring a crumb that stays soft for days. Plus, the pink and white marble effect inside makes every slice a joyful surprise for your Valentine.
Print
Valentines Day Cake
- Total Time: 50 mins
- Yield: 12 servings
- Diet: Vegetarian
Description
Celebrate love with this stunning layered Valentine’s Day cake featuring a playful pink and white marbled interior and silky vanilla buttercream. It’s the perfect centerpiece for any romantic celebration, combining nostalgic flavors with a modern, eye-catching design.
Ingredients
- 2 boxes white cake mix
- Egg whites (as specified by cake mix)
- Water (as specified by cake mix)
- Vegetable oil (as specified by cake mix)
- Pink gel food coloring
- Unsalted butter, softened
- Powdered sugar
- Heavy whipping cream
- Vanilla extract
- Maraschino cherries
- Colorful sprinkles
Instructions
- Preheat your oven to 350 degrees and prepare your cake pans with non-stick spray.
- Using a hand mixer, beat the cake mixes, egg whites, water, and oil until the batter is smooth and well-combined.
- Divide the batter into two separate bowls, keeping one white and adding pink gel food coloring to the second until vibrant.
- Alternate scoops of white and pink batter into the prepared pans, layering them to create a marbled look.
- Bake for 28 to 32 minutes until a toothpick comes out clean, then let the layers cool completely on a wire rack.
- In a stand mixer, beat the butter, powdered sugar, cream, and vanilla until stiff peaks form.
- Level the cooled cake layers by removing the domes, then stack and coat the exterior with a smooth layer of white frosting.
- Finish by piping pink drips, adding a heart detail on the front, and topping with sprinkles and maraschino cherries.
Notes
For the cleanest marbled effect, avoid over-swirling the batters once they are in the pan. To achieve professional-looking frosting, ensure your butter is at room temperature but still firm to the touch before mixing to prevent the buttercream from becoming too runny for piping.
- Prep Time: 20 mins
- Cook Time: 30 mins
- Category: Dessert
- Method: Baking
- Cuisine: American
The Foundation of Flavor

To get that signature Cake Peak texture, we start with a reliable base and high-quality additions. Using only egg whites keeps the cake snowy white, which makes the pink swirls really pop.
- White Cake Mix: Two boxes provide the structure and consistent lift we need for a tall, impressive layer cake.
- Egg Whites: By omitting the yolks, we keep the crumb light and the color pure.
- Unsalted Butter: For the frosting, always use high-quality butter softened to room temperature for that professional, smooth finish.
- Heavy Whipping Cream: This is my secret for a frosting that is fluffy yet stable enough for beautiful piping.
- Maraschino Cherries: These add a classic, nostalgic touch that reminds me of the treats from my childhood.
The Baking Process
Step 1: Prep and Mix
Preheat your oven to 350 degrees and prep your cake pans with non-stick spray. Using a hand mixer, beat the cake mixes, egg whites, water, and oil until the batter is smooth and well-combined.
Step 2: Create the Colors
Divide your batter into two separate bowls. Keep one bowl white and add a few drops of pink gel food coloring to the second bowl until you reach a vibrant, romantic shade.
Step 3: The Tie-Dye Effect
Alternate scoops of white and pink batter into your prepared pans, layering them directly on top of each other. This creates a beautiful marbled look once the cake is baked and sliced.
Step 4: Bake and Cool
Bake for about 28 to 32 minutes until a toothpick comes out clean. Let the layers cool completely on a wire rack before you even think about frosting them to avoid any melting.
Step 5: Whip the Frosting
Using a stand mixer, beat your butter, powdered sugar, cream, and vanilla until stiff peaks form. Divide and tint portions of the frosting with different levels of pink gel for your decorative details.
Step 6: Assemble the Layers
Level your cakes by removing the domes for an even stack. Layer them with white frosting in between, then coat the entire exterior with a smooth base layer of white frosting.
Step 7: The Final Flourish
Pipe your pink drips around the edges and add the heart detail on the front center. Finish with large dollops of frosting on top, colorful sprinkles, and those bright red cherries.
Secrets to a Perfect Crumb

For the smoothest frosting, make sure your butter is truly soft but not oily. If it’s too cold, you’ll get tiny lumps that can clog your piping tips and ruin your design. If you want to master the art of the perfect shape, check out our guide on creating a heart cake without a special pan.
Classic Southern Twists
You can easily adapt this recipe to suit your family’s favorite tastes. Swap the vanilla for almond extract in the batter for a sophisticated flavor profile that pairs beautifully with the cherries. If you’re looking for something even more decadent, our chocolate fudge cake is another wonderful option for a romantic evening.
At the Celebration Table

Serve a generous slice of this cake with a tall glass of cold milk or a steaming cup of coffee to balance the sweetness. It is also lovely alongside a scoop of strawberry ice cream for a double dose of pink and cream. For a different fruit-forward dessert to share, you might also enjoy our strawberry tres leches cake.
Bringing It All Together
This Valentines Day Cake is more than just a recipe; it’s a way to create memories that last long after the last crumb is gone. I hope this cake brings as much joy to your kitchen as it has to mine over the years. For more inspiration on holiday baking, you can see how others are celebrating at Kitchen Fun with My 3 Sons. If you’re in the mood for something else, don’t miss our raspberry white chocolate cake. Happy baking, y’all!
Follow us for more sweet inspiration: Pinterest | Instagram | Facebook
