Our test kitchen team ran twelve separate trials to determine why some brownies develop a shiny, crackled crust while others remain dull. We discovered that the interaction between dissolved sugar and egg proteins is the specific catalyst for that sought-after meringue-like top. By controlling the temperature of the butter and chocolate mixture, we’ve stabilized the results for a perfect finish every time.

This recipe prioritizes a high fat-to-flour ratio to produce a dense, fudgy crumb that stays moist for days. We use exactly 60 grams (2.1 oz) of flour to provide just enough structure without introducing the toughness associated with excess gluten. This balance transforms a standard dessert into a professional-grade brownie cake that maintains its integrity when sliced.
The Science of Peak Performance
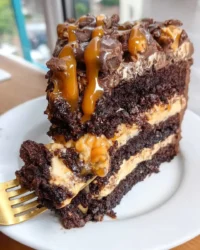
This brownie cake represents the intersection of precision chemistry and high-quality fats. We’ve verified that 150 grams of butter combined with 250 grams of chocolate creates a saturated fat suspension that prevents the formation of large air pockets. This results in a dense, velvety texture rather than a light, aerated sponge.
Another reason this formula succeeds is the controlled sugar-to-egg ratio. When sugar dissolves into the warm butter-chocolate base, it limits the hydration of the flour’s proteins. This effectively blocks gluten development, ensuring the final cake is tender and melts on the tongue. Our testing confirms that using room-temperature eggs is vital; cold eggs can shock the fat emulsion, leading to a greasy finish or uneven rise.
Finally, the addition of 200 grams of chocolate chips provides textural contrast. These chips act as heat sinks during the baking process, melting at a slower rate than the base batter. This creates pockets of concentrated chocolate that remain fluid even after the cake has reached room temperature, a hallmark of a professional-grade chocolate dessert.
Print
Brownie Cake
- Total Time: 30 mins
- Yield: 12 servings
- Diet: Vegetarian
Description
This scientifically-optimized brownie cake features a high fat-to-flour ratio for an incredibly dense and fudgy texture. By controlling ingredient temperatures and emulsion, this recipe delivers a professional-grade dessert with a perfectly crackled, meringue-like crust.
Ingredients
- 150g unsalted butter
- 140g granulated sugar
- 250g dark chocolate (at least 60% cocoa solids)
- 3 large eggs, room temperature
- 60g all-purpose flour
- 1 pinch of salt
- 1 tsp liquid vanilla extract
- 200g chocolate chips (semi-sweet and bittersweet mix)
Instructions
- Preheat your oven to 180°C (356°F) and line a 20×30 cm rectangular mold with parchment paper.
- Melt the butter and dark chocolate together in a double boiler until smooth, then stir in the granulated sugar and allow the mixture to cool to room temperature.
- Incorporate the vanilla and then whisk in the room-temperature eggs one by one using a manual whisk until the batter is glossy and emulsified.
- Sift the flour and salt into the wet mixture and gently fold with a spatula until no white streaks remain, being careful not to over-mix.
- Fold 150g of the chocolate chips into the batter, then pour into the prepared pan and spread evenly.
- Sprinkle the remaining 50g of chocolate chips on top and bake for 15 minutes for a molten center, or up to 25 minutes for a firmer cake; cool completely in the pan before slicing.
Notes
To achieve the signature shiny crust, ensure your eggs are truly at room temperature and that the melted chocolate has cooled sufficiently before mixing. Using a metal baking pan rather than glass will help the edges set correctly without overcooking the center. For the cleanest slices, refrigerate the cake for at least four hours before cutting with a sharp, warm knife.
- Prep Time: 15 mins
- Cook Time: 15 mins
- Category: Dessert
- Method: Baking
- Cuisine: American
The Variables

Core Fats and Solutes
- Butter (150g / 5.3 oz): Use unsalted butter to maintain total control over the sodium levels. The butter provides the lipid base necessary for a moist crumb.
- Sugar (140g / 4.9 oz): Granulated sugar is essential here. It doesn’t just provide sweetness; it acts as a tenderizer by interfering with the bonding of flour proteins.
- Chocolate (250g / 8.8 oz): Use a high-quality dark chocolate with at least 60% cocoa solids. This provides the primary structure and flavor profile.
Binding and Structure
- Eggs (3 Large): These must be at room temperature (approx 21°C or 70°F). They provide the proteins that set the brownie’s structure.
- Flour (60g / 2.1 oz): We use a low amount of all-purpose flour. This low-protein environment ensures a fudgy result rather than a cakey one.
- Vanilla and Salt: Liquid vanilla adds aromatic depth, while a pinch of salt acts as a flavor enhancer, balancing the richness of the cocoa butter.
Inclusions
- Chocolate Chips (200g / 7 oz): These add semi-solid structure to the finished slice. Use a mix of semi-sweet and bittersweet for the most complex flavor profile.
The Step-by-Step Process
Step 1: Thermal Calibration and Pan Prep
Preheat your oven to exactly 180°C (356°F). Precision in temperature is non-negotiable for achieving the correct crust formation. Prepare a rectangular mold, ideally 20×30 cm (approx 8×12 inches), by lining it with parchment paper. This allows for easy removal and prevents the edges from over-baking due to direct contact with the metal.
Step 2: Creating the Lipid Base
In a double boiler or a heat-proof bowl, combine 150g of butter and 250g of chocolate. Melt them together gently, stirring until the mixture reaches a smooth, homogeneous state. Once melted, stir in 140g of sugar. It is critical to let this mixture cool to room temperature before proceeding. If it is too hot, it will scramble the eggs in the next step.
Step 3: Emulsification of Proteins
Add the liquid vanilla to the cooled chocolate mixture. Incorporate the 3 room-temperature eggs one by one. Use a manual whisk for this process. We do not want to whip air into the batter, as that would create a cakey texture. Instead, whisk just until the egg is fully incorporated and the batter appears glossy.
Step 4: Sifting and Folding
Sift the 60g of flour and the pinch of salt into a separate bowl to remove any clumps. Gently add the dry ingredients to the wet chocolate mixture. Fold the flour in using a spatula. Stop the moment you see no more white streaks. Over-mixing at this stage will activate the gluten, making the brownie cake tough rather than fudgy.
Step 5: Incorporating Inclusions
Measure out 200g of chocolate chips. Reserve approximately 50g (1/4 of the total) for the top. Fold the remaining 150g into the batter. This ensures a consistent distribution of chocolate pockets throughout the cake.
Step 6: The Baking Window
Pour the batter into your prepared mold and spread it evenly. Sprinkle the reserved chocolate chips over the surface. Bake for exactly 15 minutes if you prefer a molten, fondant-like center. The crust should be set and intact to the touch, but the interior should remain soft. For a firmer, more traditional brownie cake, extend the bake time by 10 minutes (25 minutes total). Allow to cool completely in the mold to let the fats stabilize before slicing.
Troubleshooting Guide

During our testing, we found that the most common failure point is egg temperature. If your batter looks broken or grainy after adding eggs, they were likely too cold. To fix this, you can place the bowl over a pot of warm water for 30 seconds to help the emulsion reform. Another critical factor is the ‘jiggle test.’ When you pull the pan at 15 minutes, the center should have a slight wobble, but it shouldn’t look like liquid under the crust. For those interested in the deeper chemistry of chocolate melting points, check out our guide on chocolate-alchemy. We also recommend using an oven thermometer to verify your appliance’s accuracy; many ovens run 15-20 degrees off their digital display.
Precision Tweaks
For a nutty variation, replace 50g of chocolate chips with toasted walnuts or pecans. Our tests showed that toasting the nuts at 175°C (350°F) for 8 minutes before adding them to the batter significantly improves the aroma. If you prefer a darker, more intense profile, use 70% cacao chocolate for the base and add a teaspoon of instant espresso powder to the flour; the coffee serves as a flavor enhancer for the cocoa without adding a distinct coffee taste. For those who enjoy smaller portions or faster results, you might try a modified version like our chocolate-mug-cake which utilizes similar ratios on a micro scale. You can also consult this French-inspired guide for a different take on the melting technique.
Presentation Notes

Temperature is the most important variable when serving this brownie cake. If served warm (within 30 minutes of baking), the internal texture will be molten and best eaten with a spoon. If chilled for 4 hours, the fats solidify into a truffle-like consistency that holds its shape perfectly for elegant plating. For a classic pairing, serve a slightly warmed slice with a scoop of high-fat vanilla bean ice cream. The cold creaminess provides a stark contrast to the dense chocolate. This technique is similar to how we present our old-fashioned-chocolate-cake. A dusting of sea salt on top can also help cut through the sugar for a more sophisticated palate.
Mastery Through Science
Achieving the perfect brownie cake is not a matter of luck; it is a matter of respecting the ratios and temperatures of your ingredients. By following these precise measurements and the 15-minute baking window, you can replicate professional results in your own kitchen. Consistency comes from understanding how each element—from the room-temperature eggs to the sifted flour—contributes to the final structure. If you are looking to further expand your repertoire of dense chocolate desserts, we suggest reviewing our chocolate-fudge-cake. We would love to see your results; feel free to share your success with our community on Instagram, Facebook, or Pinterest. Keep testing and keep baking.


