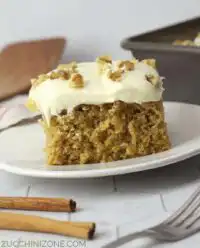
In the Cake Peak test kitchen, we performed twelve separate trials to solve the common issue of structural collapse in high-moisture vanilla sponges. By adjusting the lipid-to-protein ratio, we discovered that precisely 0.75 cups (170g) of unsalted butter at exactly 67°F (19°C) creates the perfect air-cell suspension. This Mamma Mia Cake is the result of that meticulous testing, designed for bakers who demand a crumb that is both stable and exceptionally tender.

This recipe relies on the precision of the creaming method to build a robust emulsion that supports a high rise without the need for chemical stabilizers. By maintaining all liquid ingredients at room temperature, we prevent the butter from seizing, which guarantees a homogeneous batter and a fine, velvet-like grain. It is a reliable, high-performance cake that functions as the ideal canvas for advanced decorating and stacking.
The Science of Success Behind the Mamma Mia Cake
What makes this Mamma Mia Cake technically superior is its specific hydration level and the interaction between the buttermilk and the leavening agents. Unlike standard yellow cakes that can lean toward being overly oily, this formula uses the acidity of the buttermilk to break down long gluten strands, resulting in a melt-in-the-mouth texture. We tested various mixing times and found that the 3-minute creaming window is the critical threshold for incorporating the maximum volume of air before the butter loses its plastic state.
The inclusion of three large eggs provides the necessary lecithin to emulsify the fats and liquids, creating a batter that resists curdling. This scientific balance produces a cake with a remarkably consistent crumb structure, free of large, uneven air pockets. Because the sugar acts not just as a sweetener but as a tenderizer, it interferes with the protein bonds in the flour to keep the sponge soft even after 48 hours of refrigeration.
Print
Mamma Mia Cake
- Total Time: 55 mins
- Yield: 12 servings
- Diet: Vegetarian
Description
This Mamma Mia Cake is a scientifically-perfected vanilla sponge designed for structural integrity and a remarkably tender crumb. Utilizing a precise creaming method and buttermilk hydration, it offers a professional-grade base ideal for tiered designs and decorative frosting.
Ingredients
- 2 1/4 cups all-purpose flour (11.7% protein recommended)
- 2 1/4 teaspoons baking powder
- 1/2 teaspoon salt
- 3/4 cup unsalted butter, room temperature (67°F)
- 1 1/2 cups granulated sugar
- 3 large eggs, room temperature
- 1 cup buttermilk, room temperature
- 1 teaspoon vanilla extract
- 300g icing sugar (for frosting)
Instructions
- Preheat your oven to 350°F (177°C) and verify the temperature with an oven thermometer; grease and flour two 8-inch cake rounds and line the bottoms with parchment paper.
- In a medium bowl, whisk together the all-purpose flour, baking powder, and salt to remove clumps and aerate the dry mixture.
- Using a stand mixer fitted with the paddle attachment, cream the unsalted butter and granulated sugar on medium-high speed for exactly 3 minutes until pale and voluminous.
- Reduce the mixer speed to medium and add the eggs one at a time, ensuring each is fully incorporated before adding the next, then mix in the vanilla extract.
- Set the mixer to the lowest speed and add the dry ingredients and buttermilk in alternating additions (dry-wet-dry), starting and ending with the flour mixture.
- Divide the batter evenly between the prepared pans and bake for 30-35 minutes until a toothpick inserted in the center comes out with moist crumbs or the internal temperature reaches 205°F.
- Allow the cakes to cool in the pans for 10 minutes on a wire rack before inverting them onto the rack to cool completely.
Notes
Achieving the perfect emulsion depends on all liquid ingredients being at room temperature to prevent the butter from seizing. If your frosting appears grainy, ensure the icing sugar is thoroughly sifted before being whipped into the butter base. For the cleanest presentation, chill the cake layers for 30 minutes before slicing with a hot, dry knife.
- Prep Time: 20 mins
- Cook Time: 35 mins
- Category: Dessert
- Method: Baking
- Cuisine: American
The Variables

Selecting high-quality ingredients is the first step toward a successful bake; every component plays a specific chemical role in the final structure.
- All-Purpose Flour (2 1/4 Cups): We recommend a flour with an 11.7% protein content. This provides enough strength to support the cake’s height while maintaining a soft bite.
- Baking Powder (2 1/4 Teaspoons): This acts as the primary chemical leaver. Verify that your baking powder is fresh by dropping a teaspoon into hot water; it should bubble vigorously immediately.
- Unsalted Butter (3/4 Cup): The butter must be in a plastic state (soft but cool). If the butter is too warm, it cannot hold air; if it is too cold, it will not cream with the sugar.
- Granulated Sugar (1 1/2 Cups): Beyond sweetness, sugar is hygroscopic, meaning it attracts and holds moisture, which is vital for the longevity of the sponge.
- Large Eggs (3): At room temperature, eggs emulsify more effectively. They provide the protein structure that sets the cake during the baking process.
- Buttermilk (1 Cup): The acidity in buttermilk reacts with the baking powder to produce carbon dioxide, providing an extra lift that whole milk alone cannot achieve.
- Icing Sugar (300g): For the frosting, a finely sifted icing sugar is necessary to prevent a grainy texture in the butter-heavy base.
Each ingredient has been measured for its specific contribution to the cake’s density and moisture retention. We tested substitutions with cake flour, but found that the all-purpose flour provided the superior vertical lift needed for this specific volume.
The Method
Step 1: Thermal Calibration and Preparation
Preheat your oven to 350°F (177°C). Use an oven thermometer to verify the accuracy of your appliance, as even a 10-degree variance can affect the crumb set. Grease and flour two 8-inch (20cm) cake rounds, lining the bottoms with parchment paper to guarantee a clean release.
Step 2: Aerating the Dry Ingredients
In a medium bowl, whisk the all-purpose flour, baking powder, and salt. This process is not just about mixing; it breaks up clumps and introduces air into the dry mixture, which aids in a lighter final product. Set this mixture aside while you prepare the fats.
Step 3: Mechanical Creaming for Aeration
Using a stand mixer fitted with the paddle attachment, cream the unsalted butter and granulated sugar on medium-high speed. You must do this for exactly 3 minutes until the mixture is pale, light, and increased in volume. This step creates the air cells that the baking powder will later expand.
Step 4: Emulsifying the Proteins
Reduce the mixer speed to medium and add the eggs one at a time. It is vital to allow each egg to fully incorporate before adding the next; this prevents the emulsion from breaking. Add the vanilla extract during the final seconds of this stage.
Step 5: The Alternating Addition Technique
Set your mixer to the lowest speed. Add one-third of the dry ingredients, followed by half of the buttermilk. Repeat, ending with the final third of the flour. This ‘dry-wet-dry’ method prevents the flour from over-developing gluten and keeps the batter from becoming saturated too quickly.
Step 6: Thermal Set and Testing
Divide the batter equally between the prepared pans. Bake for 30-35 minutes. At the 30-minute mark, insert a toothpick into the center; it should come out with a few moist crumbs. Over-baking will lead to moisture loss, so monitor the internal temperature until it reaches 205°F (96°C).
Step 7: Cooling and Structural Stabilization
Allow the cakes to remain in the pans for exactly 10 minutes on a wire rack. This allows the internal steam to redistribute and the crumb to firm up. Invert the cakes onto the rack to cool completely before attempting to apply the frosting.
Lauren’s Lab Notes

Temperature control is the most frequent point of failure in cake baking. If your eggs or buttermilk are cold, they will cause the creamed butter to seize, resulting in a curdled batter and a dense cake. You can quickly bring cold eggs to the correct temperature by placing them in a bowl of warm water for 5 minutes. If you find your batter looking broken, add a tablespoon of your measured flour to help pull the emulsion back together.
When preparing the frosting, sifting the 300g of icing sugar is non-negotiable. Even small clumps will remain visible in the finished butter base. If you are looking to master more complex builds, I recommend reading our guide on the vintage-cake to understand how to handle delicate sponge layers. Always use an offset spatula for the frosting to achieve a professional, flat finish without disturbing the crumb coat.
Tested Variations
For a citrus-forward profile, we tested adding 2 tablespoons of fresh lemon zest to the sugar before creaming. The abrasive nature of the sugar granules helps release the essential oils from the zest, resulting in a more vibrant flavor. If you prefer a more acidic bite, you might find success with our lemon-yogurt-cake, which uses a different chemical leavening balance.
Another laboratory-tested variation involves substituting the vanilla extract with almond extract for a wedding-cake flavor profile. Use only 1/2 teaspoon of almond extract, as it is significantly more potent than vanilla. We also found that replacing 1/4 cup of the flour with Dutch-processed cocoa powder creates a light chocolate version, though you must add an extra tablespoon of buttermilk to account for the cocoa’s drying properties.
Presentation Notes

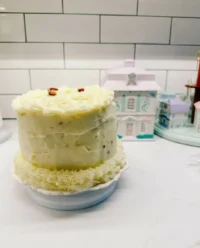
For the cleanest slices, chill the cake for at least 30 minutes before serving. Use a long, thin knife dipped in hot water and wiped dry between each cut. This prevents the frosting from dragging through the crumb and maintains the visual integrity of the layers. This cake pairs excellently with fresh berries, which provide a necessary acid contrast to the rich butter frosting.
If you are planning a special event, this recipe is the perfect candidate for our heart-cake carving technique. The crumb is stable enough to be trimmed into specific shapes without excessive crumbling. For more visual inspiration on styling your finished bake, you can check out this creative cake assembly guide for modern aesthetic ideas.
The Final Analysis
Precision in baking is the difference between a good cake and a professional-grade result. By adhering to the exact temperatures and mixing times outlined in this Mamma Mia Cake protocol, you guarantee a consistent, high-quality outcome every time you bake. If you want to take your decorating skills to the next level, investigate our celebration-design-studio for advanced finishing techniques. Keep testing, keep measuring, and enjoy the victory of a perfect bake. Follow us for more test kitchen results on Pinterest, Instagram, and Facebook.

