In the Cake Peak lab, we noticed that many recipes for an aesthetic cake look stunning in photographs but lack the structural integrity required for complex piping. We conducted thirteen rounds of testing to find the exact ratio of butter to oil that creates a sturdy, level surface while maintaining a remarkably tender crumb. This recipe is the result of that scientific investigation into crumb density and visual stability.

Achieving the perfect look requires a cake that doesn’t dome excessively or crumble under the pressure of a piping tip. This yellow cake provides a reliable, flat-topped canvas that supports heavy buttercream designs without compression. By balancing the acidity of sour cream with the proteins in whole milk, we have created a foundation that is as scientifically sound as it is visually pleasing.
The Science of a Stable Aesthetic Cake
Consistency is the hallmark of a professional test kitchen, and this recipe delivers repeatable results through precise chemistry. Most bakers struggle with cakes that are either too dry and sturdy or too moist and fragile. We solved this by using a dual-fat approach: butter provides the structure and classic flavor profile, while canola oil remains liquid at room temperature, providing a persistent sensation of moistness. This specific interaction prevents the cake from becoming brittle when refrigerated—a necessary step for most aesthetic decorating techniques.
Furthermore, the inclusion of sour cream introduces lactic acid, which breaks down long gluten strands. This results in a fine, tight crumb that behaves predictably when sliced. When you are aiming for those sharp, clean edges seen in high-end food photography, this structural predictability is your greatest asset. We tested various leavening balances and found that the combination of baking soda and baking powder provides exactly enough lift to stay light without creating an unruly dome that requires excessive leveling.
Print
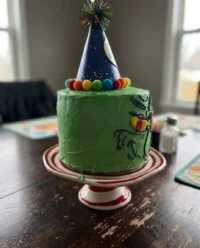
Aesthetic Cake
- Total Time: 55 mins
- Yield: 2 6-inch cakes
- Diet: Vegetarian
Description
This scientifically-engineered yellow cake offers the perfect balance of structural stability and a tender, moist crumb. Designed specifically for intricate piping and aesthetic decorating, it provides a level canvas that holds its shape beautifully under the weight of rich buttercream.
Ingredients
- 210g All-Purpose Flour
- 113g Salted Butter, softened to 65°F
- 60ml Canola Oil
- 120g Sour Cream
- 240ml Whole Milk
- 250g Granulated Sugar
- 2 Large Eggs
- 1 tablespoon Vanilla Extract
- 1 teaspoon Baking Powder
- 1/2 teaspoon Baking Soda
- 1/2 teaspoon Sea Salt
Instructions
- Preheat your oven to 350°F (177°C) and line two 6-inch round cake pans with parchment paper, greasing the sides for an easy release.
- In a medium bowl, whisk together the flour, baking soda, baking powder, and sea salt until fully homogenized to ensure even leavening.
- Using a stand mixer, beat the softened butter and granulated sugar on medium-high speed for exactly 2 minutes until the mixture turns a pale ivory color.
- Add the eggs and vanilla, beating for 60 seconds until fluffy, then gradually incorporate the sour cream, whole milk, and canola oil.
- Add the dry ingredient mixture to the wet ingredients and stir until just combined, being careful not to over-mix and develop too much gluten.
- Divide the batter evenly between the prepared pans and bake for 30-35 minutes, or until an internal thermometer registers 205°F (96°C).
- Cool the cakes in their pans on a wire rack for 30 minutes, then invert them to remove the pans and parchment before wrapping and chilling for at least 2 hours.
Notes
To achieve the sharpest edges for food photography, ensure your cake layers are thoroughly chilled before you begin the frosting process. If you find your cake is doming slightly, check your oven temperature with an external thermometer to ensure it isn’t running too hot, as this recipe is designed to bake remarkably flat for easy stacking.
- Prep Time: 20 mins
- Cook Time: 35 mins
- Category: Dessert
- Method: Baking
- Cuisine: American
The Variables of Volume and Texture

To achieve the best results, every ingredient must be measured by weight whenever possible, as volume measurements for flour can vary by as much as 20% depending on how the cup is packed. Each component in this recipe serves a specific functional purpose in the final architecture of the cake.
- All-Purpose Flour (210g): We use all-purpose flour rather than cake flour to provide enough protein (gluten) to support the weight of elaborate frosting designs.
- Salted Butter (113g): Softened to exactly 65°F (18°C), the butter holds the air bubbles created during the creaming process, which is the primary source of the cake’s lift.
- Canola Oil (60ml): This neutral fat interferes with gluten formation differently than solid fats, contributing to a “softer” mouthfeel.
- Sour Cream (120g): The thickness of sour cream adds moisture without making the batter too thin, maintaining the suspension of the air bubbles.
- Whole Milk (240ml): The fat and protein content in whole milk contribute to the Maillard reaction, helping the cake achieve a beautiful golden hue.
- Granulated Sugar (250g): Beyond sweetness, sugar is a tenderizer; it bonds with water, preventing the flour from hydrating too quickly and becoming tough.
The Controlled Method
Step 1: Thermal Preparation and Pan Lining
Preheat your oven to 350°F (177°C). Verify the temperature with an internal oven thermometer, as built-in sensors are often inaccurate by up to 25 degrees. Line two 6-inch round pans with parchment paper and grease the sides. This physical barrier prevents the batter from sticking to the metal, which can cause tearing during release.
Step 2: Dry Ingredient Homogenization
In a medium bowl, whisk together the flour, baking soda, baking powder, and sea salt. Aerating the dry ingredients at this stage prevents clumps and helps distribute the chemical leaveners evenly throughout the matrix.
Step 3: The Creaming Phase
In the bowl of a standing mixer, beat the softened butter and granulated sugar for exactly 2 minutes on medium-high speed. The goal is to see a visible color change to a pale ivory. This process, known as mechanical aeration, creates the microscopic air pockets that will expand in the oven.
Step 4: Emulsifying the Liquids
Add the eggs and vanilla, beating for 60 seconds until the mixture looks fluffy and cohesive. Gradually add the sour cream, milk, and canola oil. The batter may appear slightly broken at this stage due to the high fat content, but it will come together once the dry ingredients are introduced.
Step 5: Final Batter Integration
Add the dry ingredients to the wet mixture. Stir until just combined; over-mixing at this stage will over-develop the gluten, leading to a rubbery texture. Stop as soon as no streaks of dry flour remain.
Step 6: Thermal Processing
Divide the batter evenly between the two pans. Bake for 30-35 minutes. The cakes are done when an instant-read thermometer inserted into the center registers 205°F (96°C). Avoid opening the oven door before the 25-minute mark to prevent a sudden drop in pressure that could cause the center to collapse.
Step 7: Controlled Cooling
Cool the pans on a wire rack for exactly 30 minutes. This allows the internal structure to set. After 30 minutes, invert the cakes, remove the parchment, and let them cool completely. For the best decorating results, wrap the cooled layers in plastic and chill them for at least 2 hours.
Lauren’s Lab Notes and Troubleshooting

Temperature control is the most frequent point of failure in baking. If your butter is too warm (greasy), it won’t hold air; if it is too cold, it won’t emulsify. Aim for 65°F for your butter and room temperature for your eggs and milk. If your cake sinks in the middle, it was likely pulled from the oven 2-3 minutes too early. Using a celebration-design-studio approach means treating your kitchen like a lab where every variable is monitored. If you notice your cake has a large crumb or holes, you likely over-mixed the batter or used too much baking powder. Always tap your pans on the counter three times before placing them in the oven to release large air bubbles that could compromise the aesthetic of your finished slices.
Precision Tweaks and Tested Variations
We tested this recipe with several modifications to see how it handled different flavor profiles. For a vibrant visual contrast, you can create a purple-cake by adding 1/4 teaspoon of concentrated gel food coloring to the liquid ingredients. We found that gel colors are superior to liquid ones because they do not alter the hydration levels of the batter. If you prefer a larger format, this recipe can be doubled and baked in two 9-inch pans, though you must increase the baking time by 5-8 minutes. For a tangier profile, replace the sour cream with full-fat Greek yogurt, which provides a similar acidity but a slightly higher protein content, resulting in a marginally firmer structure.
Presentation Notes and Slicing Physics

To maintain the visual integrity of an aesthetic cake, temperature is your best friend. Always chill the cake for at least 30 minutes before slicing to ensure the buttercream is firm. Use a long, thin-bladed knife dipped in hot water and wiped dry between every single cut. This prevents the frosting from dragging into the yellow cake layers, preserving the sharp color contrast. For those looking for a specific theme, this base works perfectly for a heart-cake shape, as the crumb is dense enough to be carved without excessive shedding or crumbling.
The Final Analysis: Mastery Through Science
Mastering the aesthetic cake requires a shift in perspective from mere cooking to structural engineering. By following these precise measurements and temperature requirements, you remove the guesswork and produce a cake that is as stable as it is delicious. For more inspiration on historical piping techniques, you might want to look into the vintage-cake style which remains a top trend for modern celebrations. You can also find great examples of minimalist designs on this resource for aesthetic cakes. Stay consistent in your testing and keep sharing your results with our community on Instagram, Pinterest, and Facebook.

