In the test kitchen, we usually focus on the precise chemistry of from-scratch baking, but recently we tested a different hypothesis. Could we take standard grocery store components and construct a visually stunning “fake cake” that completely fools the eye? By applying strict temperature control and professional assembly techniques to readymade items, we achieved a bakery-level aesthetic without touching an oven.

This fake cake method relies on structural engineering and manipulation rather than raw baking science. Whether you are practicing your palette knife skills or simply pressed for time, this assembly technique yields reliable, striking results every single time.
The Science of Success
This method entirely eliminates the variables of oven temperature and leavening agents. By relying on pre-baked sponges and readymade frosting, your only focus becomes assembly and presentation. It is a brilliant way to master cake decorating mechanics without the time investment of baking from scratch.
Furthermore, this approach teaches fundamental texture manipulation. You will learn how mechanical agitation changes the viscosity of dense, tubbed frosting, making it light and spreadable. You will also practice thermal control by turning solid chocolate bars into a fluid, stable drip using precise heat and hydration.
Print
Fake Cake
- Total Time: 30 mins
- Yield: 8 servings
- Diet: Vegetarian
Description
Create a stunning, bakery-quality dessert without ever turning on the oven by using professional assembly techniques on store-bought components. This method focuses on structural engineering, texture manipulation, and thermal control to achieve a flawless aesthetic.
Ingredients
- 2 Ready-Made Raspberry Sponge Cakes (5-inch or 6-inch rounds)
- 400g Strawberry Flavour Frosting
- 2 Hershey’s Strawberries & Cream Bars
- 1 Strawberry Swiss Roll
- 2 to 4 teaspoons Warm Water
- Pink Wafers
- Sprinkle Mix
Instructions
- Set up your decorating station with a cake turntable, angled palette knife, and cake scraper.
- Decant the frosting into a mixing bowl and stir vigorously to incorporate air and soften the texture for better spreadability.
- Anchor the first sponge to a cake board with a dollop of frosting, then apply an even layer of frosting on top.
- Stack the second sponge layer, pipe frosting around the exterior, and use a scraper at a 45-degree angle to smooth the sides before chilling.
- Melt one and a half Hershey’s bars in 30-second intervals at 50% power, then stir in warm water until a fluid drip consistency is reached.
- Pour the ganache along the top edge of the chilled cake, using a spoon to push it over the sides for controlled drips.
- Finish by pressing sprinkles onto the base and arranging Swiss roll rounds, frosting swirls, and pink wafers on top.
Notes
To prevent the chocolate from seizing, ensure the water added to the melted bars is warm to the touch, approximately 100°F. If your frosting begins to tear or drag during the smoothing process, refrigerate the cake for 15 minutes to firm up the structure before making a final pass with the scraper.
- Prep Time: 30 mins
- Cook Time: 0 mins
- Category: Dessert
- Method: Assembly
- Cuisine: American
The Variables: What You’ll Need

- Ready-Made Raspberry Sponge Cakes: Two 5-inch or 6-inch rounds form our structural base. Choosing uniform, commercially baked sponges guarantees perfectly level stacking.
- Strawberry Flavour Frosting: One 400g tub. Straight from the shelf, this frosting is too stiff. We will use mechanical action to loosen its structure for smooth coating.
- Hershey’s Strawberries & Cream Bars: You need two bars to create the faux ganache drip. The cocoa butter and milk solids in these bars melt beautifully when exposed to gentle, controlled heat.
- Strawberry Swiss Roll: Sliced into rounds, this acts as a striking, architectural garnish for the top of the cake.
- Warm Water: Just 2 to 4 teaspoons. This specific temperature prevents the melted chocolate from seizing when adjusting the drip consistency.
- Pink Wafers & Sprinkle Mix: Essential for adding contrasting textures and masking any minor imperfections at the base.
The Method: Step-by-Step Assembly
Step 1: Prepare the Decorating Station
Set up your environment for efficiency before opening any ingredients. Equip your cake turntable, angled palette knife, cake scraper, cake board, and piping bag fitted with a small star nozzle. Having tools within reach prevents delays once the frosting is exposed to air.
Step 2: Frosting Agitation
Unbox the readymade cakes. Commercial frosting is dense right out of the container. Decant the 400g tub of strawberry frosting into a mixing bowl and stir vigorously to incorporate air. This mechanical agitation lightens the texture and increases spreadability.
Step 3: Base Construction
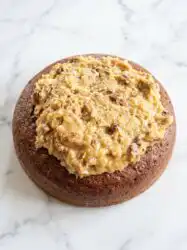
Smear a teaspoon-sized dollop of frosting in the exact center of the cake board to anchor your base. Place the first raspberry sponge layer on the board. Apply an even layer of your loosened strawberry frosting with the angled palette knife, creating a level foundation.
Step 4: Stacking and Smoothing
Stack the second sponge layer squarely on top. Pipe the remaining frosting around the sides and over the top. Hold your cake scraper at a strict 45-degree angle against the side and rotate the turntable to smooth the exterior. Transfer the cake to the refrigerator to chill and set the frosting structure.
Step 5: Formulating the Faux Ganache
While the cake chills, prepare the drip. Break one and a half Hershey’s Strawberries & Cream bars into a microwave-safe bowl. Heat in exact 30-second intervals at 50% power, stirring between each blast. Once melted, briskly stir in 2 to 4 teaspoons of warm water until you achieve a fluid, dripping consistency.
Step 6: Drip Application
Remove the chilled cake. Pour a tablespoon of your faux ganache along the top edge. Use the back of the spoon to gently push the chocolate over the sides, creating controlled drips. The chilled frosting will rapidly cool and set the drips in place.
Step 7: Final Structural Decoration
Press sprinkles around the base of the cake to conceal any uneven frosting lines. Slice the strawberry Swiss roll into even rounds. Drip the remaining ganache over these slices and arrange them symmetrically on top of the cake. Finish the architecture by piping frosting swirls and placing pink wafers.
Lauren’s Lab Notes for Flawless Execution

Temperature control is critical when making the faux ganache. If you add cold water to the melted Hershey bars, the sudden temperature drop will cause the cocoa butter to crystallize rapidly, seizing the mixture into a gritty paste. Always use water that feels warm to the touch (around 100°F/38°C). If your frosting feels too warm and begins to drag while smoothing, stop immediately. Chill the entire cake for 15 minutes before attempting a second pass with the scraper. For those looking to practice more advanced structural piping, try applying these smoothing techniques to our classic vintage cake design.
Tested Variations and Precision Tweaks
This assembly method is highly adaptable based on the commercial ingredients available in your area. We tested replacing the strawberry profile with a complete chocolate blackout version using readymade chocolate sponges, fudge icing, and a dark chocolate ganache drip. The assembly science remains identical. You can also manipulate the structural shape before frosting. Carefully carving the readymade sponges with a serrated knife allows you to practice shaping a heart cake without the stress of baking a custom layer from scratch.
Presentation and Slicing Mechanics

Because this cake utilizes commercial frosting, it boasts a highly stable shelf life at room temperature. You can confidently display it for 4 to 6 hours before serving without fear of structural collapse. When slicing, use a sharp, thin-bladed knife dipped in hot water and wiped clean between each cut. This melts through the solid Hershey drip and yields incredibly clean cross-sections. If you are preparing a multi-table dessert spread for a pet-friendly event, serve this visually striking centerpiece alongside our popular aesthetic dog cake.
The Final Analysis: Mastery Through Assembly
Baking is an applied science, but decorating is pure structural art. By removing the variables of oven spring and crumb hydration, this fake cake technique grants you the freedom to focus entirely on visual execution and palette knife mastery. Keep practicing your temperature control with the faux ganache, and watch your decorating skills advance rapidly. For more inspiration on pushing the boundaries of presentation, review our work at the Celebration Design Studio. If you want to learn how to construct permanent, non-edible display pieces, I highly recommend checking out this guide on how to make a fake cake. Share your completed test kitchen assemblies with us on Pinterest and tag your structural triumphs on Instagram.


