In our test kitchen, we performed extensive trials to determine the ideal crumb structure for this American Flag Cake, focusing on the specific gravity of the batter and its ability to support dense decorations. We discovered that combining heavy cream with Greek yogurt provides a unique acidic balance that tenderizes the gluten while maintaining enough structural integrity to hold four layers of cake. By monitoring the internal temperature of the sponge exactly to 208°F (98°C), we achieved a repeatable, moist result that resists the common pitfall of drying out during the decoration phase.

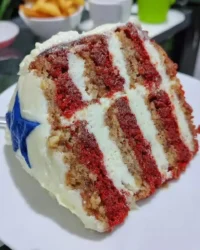
This design utilizes a precise smearing technique to recreate the stripes and stars of the American flag with Swiss meringue buttercream. The method relies on temperature control and specific piping bag pressures to create the ‘petal’ effect that characterizes this modern patriotic aesthetic. Our results show that this specific vanilla sponge recipe provides the perfect neutral base for the rich, silky frosting, making it the definitive choice for any celebratory occasion.
The Science of Structural Success
This recipe works because it prioritizes the chemical relationship between fats and proteins. We use 450g of unsalted butter to create a sturdy emulsion with the six large eggs, which creates a stable matrix for the 500g of cake flour. The cake flour is critical here; its lower protein content (approximately 7-9%) prevents the over-development of gluten, which would otherwise result in a bread-like texture rather than a fine, tender crumb.
Furthermore, the Swiss meringue buttercream is superior to standard American buttercream due to its molecular stability. By heating the egg whites and sugar to 150°F (65°C), we create a cooked syrup that, when whipped, forms a dense foam of denatured proteins. When the 1400g of butter is incorporated at the correct temperature, it creates a permanent emulsion that is significantly less sweet and much more stable under varied ambient temperatures. This stability is what allows the intricate smearing technique to hold its shape without melting or weeping.
Print
American Flag Cake
- Total Time: 3 hours
- Yield: 16 servings
- Diet: Vegetarian
Description
This technically-engineered American Flag Cake features a tender vanilla sponge supported by a stable, silky Swiss meringue buttercream. The meticulous design uses a modern smearing technique to create a striking patriotic centerpiece with professional-grade structural integrity.
Ingredients
- 500g cake flour
- 24g baking powder
- 1 tsp salt
- 450g unsalted butter, softened (for cake)
- 500g granulated sugar (for cake)
- 6 large eggs
- 360g heavy cream
- 250g Greek yogurt
- 2 vanilla pods or vanilla paste
- 425g fresh egg whites (for buttercream)
- 450g granulated sugar (for buttercream)
- 1400g unsalted butter, slightly cool (for buttercream)
- Red and blue gel food coloring
Instructions
- Preheat the oven to 350°F (177°C) and prepare two 8-inch cake tins by greasing and flouring them.
- Sift the cake flour, baking powder, and salt together twice in a large bowl to ensure aeration.
- Whisk the room-temperature heavy cream, Greek yogurt, and vanilla paste in a medium bowl until homogeneous.
- Cream 450g of butter with 500g of sugar on high speed for 5 minutes using a paddle attachment, then add eggs one at a time.
- On low speed, add the flour mixture in three parts, alternating with the liquid mixture in two parts, until just combined.
- Divide the batter between the pans and bake for 30-35 minutes until a skewer comes out clean; let cool completely.
- Whisk egg whites and 450g sugar over a simmering water bath until they reach 150°F (65°C).
- Whip the egg mixture on high speed until stiff, glossy, and cool, then switch to a paddle and gradually beat in 1400g of butter.
- Slice cooled cakes into four 1-inch layers, stack with frosting, apply a thin crumb coat, and refrigerate for 30 minutes.
- Divide the remaining buttercream into red, blue, and white; use piping tips and an offset spatula to create the smeared flag pattern.
Notes
For the most successful emulsion, ensure your butter for the buttercream is cool but not hard—ideally around 65°F. If the frosting appears to separate during the mixing process, continue beating; the friction will eventually bring the temperature to the point where the fats and proteins bond into a smooth, silky finish.
- Prep Time: 1 hour
- Cook Time: 35 mins
- Category: Dessert
- Method: Baking
- Cuisine: American
The Mathematical Variables

To achieve test kitchen results, every ingredient must be measured by weight (grams) rather than volume. This eliminates the 20% margin of error common with measuring cups. Here is why these specific variables matter:
- Cake Flour (500g): We specifically chose cake flour to minimize gluten formation. If you do not have it, our tested hack of replacing 2 tablespoons of each cup of flour with cornstarch works because the starch physically interferes with the protein bonds.
- Baking Powder (24g): This provides the chemical leavening needed to lift a relatively heavy batter. We tested several amounts and found that 24g provides the maximum lift without leaving a metallic aftertaste.
- Heavy Cream (360g) and Greek Yogurt (250g): This combination is our ‘moisture secret.’ The cream provides fat for a silky mouthfeel, while the yogurt provides acidity to activate the leavening and break down tough protein strands.
- Vanilla Pods/Paste: We use the seeds of 2 vanilla pods because the oils in the seeds provide a more complex flavor profile that survives the high heat of the oven better than alcohol-based extracts.
- Egg Whites (425g): In the buttercream, these provide the structure. We recommend using fresh whites rather than carton whites, as the pasteurization process in cartons can sometimes weaken the protein bonds, leading to a less stable meringue.
- Unsalted Butter (1850g total): Using unsalted butter allows us to control the exact salinity of the cake. Temperature is key here; it must be 65-68°F (18-20°C) for the best emulsion.
The Methodical Process
Step 1: Preparing the Foundations
Preheat your oven to exactly 350°F (177°C). Prepare two 8-inch cake tins by greasing them with butter and dusting with flour, tapping out the excess. In a large bowl, sift the cake flour, baking powder, and salt together twice. Sifting is not just about removing lumps; it aerates the flour, which contributes to the final crumb’s lightness.
Step 2: Liquid Component Integration
In a separate medium bowl, whisk together the heavy cream, Greek yogurt, and vanilla paste until the mixture is homogeneous. Ensure these ingredients are at room temperature (around 70°F or 21°C) to prevent the butter from curdling when they are added to the mixer later in the process.
Step 3: The Creaming Phase
Using a stand mixer fitted with the paddle attachment, beat the 450g of butter and 500g of sugar on high speed for exactly 5 minutes. The goal is to trap air in the fat crystals; the mixture should look significantly paler and fluffy. Add the eggs one at a time, allowing each to be fully incorporated before adding the next. This prevents the emulsion from breaking.
Step 4: Dry and Wet Alternation
Turn the mixer to the lowest speed. Add one-third of the flour mixture, followed by half of the yogurt/cream mixture. Repeat this, finishing with the final third of the flour. Stop the mixer the moment the last streaks of flour disappear. Overmixing at this stage will activate the gluten and make the cake tough. Divide the batter equally (weigh the pans for precision) and bake for 30-35 minutes or until a skewer returns clean.
Step 5: Swiss Meringue Base
While the cakes cool, combine egg whites and sugar in your clean stand mixer bowl. Place it over a simmering water bath (bain-marie). Whisk constantly until the mixture reaches 150°F (65°C) on an instant-read thermometer. This temperature is high enough to kill bacteria and dissolve the sugar crystals completely.
Step 6: Whipping the Meringue
Transfer the bowl to the mixer and whisk on high speed until the meringue is stiff, glossy, and the bowl is completely cool to the touch (usually 15-20 minutes). If the bowl is even slightly warm, the butter will melt upon contact. Switch to the paddle attachment and add the 1400g of butter one chunk at a time on medium speed. Continue beating until the buttercream is smooth and silky.
Step 7: Assembly and Crumb Coat
Level the cooled cakes and slice each into two 1-inch layers. Stack them with 3/4 cup of buttercream between each layer. Apply a thin crumb coat over the exterior and refrigerate for 20-30 minutes. This ‘locks’ the crumbs in place so they don’t migrate into your decorative final layer.
Step 8: Decorative Smearing
Color your buttercream into red, blue, and white. Use a star tip for the blue ‘stars’ section and a round tip for the red and white ‘stripes.’ Pipe a dot and use an offset spatula to smear it, creating a tail. Place the next dot on that tail and repeat. This creates the textured flag effect.
Testing Insights and Troubleshooting

Temperature control is the most frequent point of failure in this recipe. If your Swiss meringue buttercream looks curdled or ‘soupy’ after adding the butter, do not panic. This is a temperature mismatch. If it is too cold, the butter has not emulsified; if it is too warm, the butter has melted. To fix a cold, curdled frosting, remove 1/2 cup of the mixture, melt it in the microwave, and then slowly stream it back into the mixer while it is running. This raises the overall temperature just enough to allow the emulsion to form. If you want to perfect your overall approach to finishing cakes, our guide on cake-decorating offers deeper insights into technical precision. We also recommend checking out the method used in this classic version for more visual inspiration on the smear technique. Always make certain your palette knife is clean between smears to prevent color bleeding.
Precision Tweaks and Advanced Options
During our trials, we tested various flavor modifications to the base sponge. While the vanilla bean is classic, you can modify the flavor profile by substituting 50g of the heavy cream with a concentrated fruit puree. We found that a strawberry reduction works best because the acidity complements the Greek yogurt. If you are interested in fruit-forward cakes, you should try our fresh-strawberry-sheet-cake for a different moisture profile. Another tested variation involved swapping the vanilla paste for almond extract (1 tbsp), which provides a professional, bakery-style aroma. For those looking for a different aesthetic, you can apply these same techniques to a red-white-and-blue-cake but using a different piping tip for a rosetted flag look.
Presentation and Pairing Notes

When serving this cake, the temperature is the most important variable. For the best mouthfeel, the cake should be served at a temperature of approximately 65°F (18°C). If the cake is too cold, the butter in the buttercream will feel waxy rather than silky. Use a sharp, thin-bladed knife dipped in hot water and wiped dry between each cut to achieve clean slices that showcase the four distinct layers. This technique is similar to how we present our flag-cake during test kitchen demonstrations. Pairing the cake with fresh berries provides a necessary acidic contrast to the rich frosting, which helps cleanse the palate between bites.
Mastery Through Science
Achieving the perfect American Flag Cake is a matter of respecting the chemistry of the ingredients and maintaining strict temperature control. By following these precise measurements and methods, you guarantee a result that is both visually stunning and technically superior. We encourage you to keep testing these techniques in your own kitchen to gain a deeper understanding of how these variables interact. If you enjoyed this deep dive into baking science, please share your results with us. You can find more inspiration on our Pinterest and Instagram pages. For further reading on patriotic designs, view our red-white-and-blue-cake guide or follow us on Facebook and YouTube for more video tutorials.
