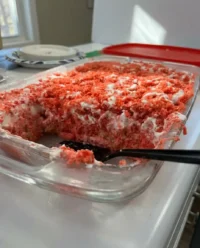
During our testing of the Chocolate Turtle Cake, we focused on the saturation rate of the poke cake method. We discovered that poking exactly 60 holes in a standard 9×13-inch pan guarantees the caramel-milk mixture distributes evenly without compromising the cake’s structural integrity. This methodical approach transforms a simple box mix into a scientifically balanced dessert with consistent moisture in every bite.

This recipe is a study in texture, combining a soft, cocoa-rich base with the crunch of pecans and the viscosity of salted caramel. By chilling the base before adding the whipped topping, we prevent the moisture migration that often occurs when temperatures aren’t controlled. The result is a stable, layered treat that holds its shape and flavor profile perfectly under refrigeration.
The Science of Success
The primary reason this Chocolate Turtle Cake succeeds is its mastery of the “poke and pour” method, which utilizes capillary action to draw moisture into the crumb. Unlike standard cakes that can dry out over time, this version uses a combination of sweetened condensed milk and caramel to act as a humectant. This means the sugar molecules actually bond with water, keeping the cake exceptionally moist for days.
From a flavor perspective, we have balanced the high sugar content with salt and fat. The salted caramel sauce provides a necessary counterpoint to the sweetness of the condensed milk, while the pecans offer a high lipid content that rounds out the mouthfeel. This creates a complex sensory experience where each bite offers a different ratio of soft, crunchy, sweet, and salty elements.
In our test kitchen, we verified that this cake actually improves after 24 hours. The rest period allows the starch in the cake to fully gelatinize and absorb the caramel-milk mixture, creating a dense, fudgy texture that resembles a high-end bakery truffle more than a simple sheet cake. We tested various hole sizes and found that the blunt end of a wooden spoon creates the perfect diameter for maximum absorption without causing the cake to collapse.
Finally, the structural stability of this cake is a major victory. By using a stabilized whipped topping rather than a heavy buttercream, we keep the dessert light enough to follow a heavy meal. The fats in the pecans and chocolate chips provide enough weight to make it feel indulgent, while the whipped layer keeps the palate refreshed. It is a calculated balance of physics and flavor chemistry.
Print
Chocolate Turtle Cake
- Total Time: 2 hours 45 mins
- Yield: 15 servings
- Diet: Vegetarian
Description
This decadent Chocolate Turtle Cake utilizes a precise poke-and-pour technique to infuse a rich cocoa base with a silky caramel-milk mixture. Topped with light whipped cream, crunchy pecans, and mini chocolate chips, it offers a sophisticated balance of textures and flavors in every bite.
Ingredients
- 1 (15.25-ounce) box Devil’s Food cake mix
- Required eggs, water, and oil as specified by the cake mix instructions
- 1 (14-ounce) can sweetened condensed milk
- 1 (12-ounce) jar caramel sundae topping
- 1/2 cup chopped pecans
- 1/2 cup mini semi-sweet chocolate chips
- 8 ounces whipped topping, thawed
- 1/3 cup salted caramel sauce
Instructions
- Preheat your oven to 350°F (177°C) and line a 9×13-inch baking pan with aluminum foil, leaving an overhang on the sides for easy removal, and apply a light coating of cooking spray.
- Prepare and bake the Devil’s Food cake mix according to the box instructions, ensuring the cake is fully set by testing with a toothpick in the center.
- While the cake is still warm, use the blunt end of a wooden spoon to poke approximately 60 holes in a grid pattern across the surface, reaching about 3/4 of the way down.
- Whisk the sweetened condensed milk and caramel sundae topping together until smooth, then slowly pour the mixture over the cake so it fills the holes.
- Refrigerate the cake for exactly 10 minutes to stabilize the surface temperature.
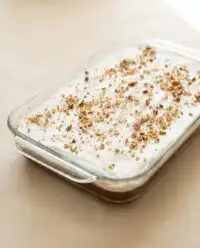
- Spread the thawed whipped topping over the cake, sprinkle with pecans and mini chocolate chips, and refrigerate for at least 2 hours (ideally 24) before drizzling with salted caramel sauce and slicing.
Notes
For the most consistent moisture levels, ensure you poke the holes while the cake is still warm, as the starches are more receptive to the liquid soak during this stage. If you prefer a richer flavor, toast the pecans in a dry pan for a few minutes before adding them to the topping to enhance their natural oils and crunch.
- Prep Time: 15 mins
- Cook Time: 30 mins
- Category: Dessert
- Method: Baking
- Cuisine: American
Ingredient Science

The Chocolate Base
We utilize a 15.25-ounce Devil’s Food cake mix because of its specific pH balance. The Dutch-processed cocoa in these mixes reacts with the leavening agents to produce a tight, sturdy crumb that can withstand the weight of the liquid soak. If the crumb were too airy, the cake would become mushy instead of fudgy.
The Saturation Agents
The 14-ounce can of sweetened condensed milk and the 12-ounce jar of caramel sundae topping work together to create a high-viscosity liquid. The condensed milk provides protein and milk solids that help the mixture set, while the caramel adds depth through the Maillard reaction products already present in the sauce.
Texture and Lipids
- Pecans: Use 1/2 cup of chopped pecans. Pecans are roughly 70% fat, which provides a rich flavor that water-based ingredients cannot replicate. Toasting them briefly at 350°F (177°C) for 5 minutes can further amplify their nutty aroma.
- Mini Semi-Sweet Chocolate Chips: The size matters here. Mini chips have a higher surface-area-to-volume ratio, allowing them to disperse more evenly across the surface and provide a consistent snap in every bite.
- Salted Caramel Sauce: The salt in the 1/3 cup of sauce is a chemical flavor enhancer. It suppresses bitterness and clarifies the cocoa notes in the chocolate base.
- Whipped Topping: An 8-ounce container acts as an insulator. It creates a barrier between the moist cake and the air, preventing the surface from drying out while providing a neutral, creamy background for the toppings.
The Step-by-Step Process
Step 1: Thermal Calibration and Pan Preparation
Preheat your oven to exactly 350°F (177°C). Use an oven thermometer to verify the accuracy of your appliance, as even a 10-degree variance can affect the cake’s rise. Line a 9×13-inch pan with aluminum foil, leaving an overhang on the sides for easy removal, and apply a light coating of cooking spray to prevent the sugars in the caramel from sticking.
Step 2: Chocolate Base Synthesis
Prepare the Devil’s Food cake mix according to the box instructions, typically requiring eggs, water, and oil. Whisk until the batter is homogeneous and no dry pockets of flour remain. Pour into the prepared pan and bake. Start checking for doneness 5 minutes before the suggested time; the cake is ready when a toothpick inserted into the center comes out with a few moist crumbs but no raw batter.
Step 3: Creating the Saturation Grid
While the cake is hot, use the blunt end of a wooden spoon to create a grid of approximately 60 holes. Aim for a depth that reaches about 3/4 of the way through the cake. Space them evenly to guarantee that no area of the cake remains dry. This must be done while the cake is warm to allow the starches to accept the liquid more readily.
Step 4: The Diffusion Process
In a small bowl, whisk together the sweetened condensed milk and the caramel sundae topping until the mixture is uniform. Slowly pour this blend over the warm cake, targeting the holes first. Use a spatula to spread any remaining liquid across the surface. The heat from the cake will decrease the viscosity of the caramel, allowing it to flow into the crumb structure.
Step 5: Thermal Stabilization
Place the cake in the refrigerator for exactly 10 minutes. This flash-chilling step lowers the surface temperature enough so that the whipped topping won’t melt upon contact, but keeps the cake warm enough to continue absorbing the caramel soak. This is a critical transition phase for the cake’s final texture.
Step 6: Finishing and Final Cure
Spread the thawed whipped topping over the cake in an even layer. Sprinkle the pecans and mini chocolate chips across the top. Cover the pan tightly with plastic wrap or a lid and refrigerate for at least 2 hours, though 24 hours is scientifically superior for flavor development. Drizzle with the salted caramel sauce just before slicing to maintain the visual contrast.
Lauren’s Lab Notes

To achieve the cleanest slices, verify that your knife is warm and slightly damp. Wipe the blade between every single cut to prevent the caramel and whipped topping from smearing into the dark chocolate layers. If you find your cake is too soft to slice cleanly, place it in the freezer for 15 minutes prior to serving to firm up the fats. For those looking for even deeper cocoa notes, you can study our chocolate fudge cake for tips on blooming cocoa powder. Another critical tip: if your caramel topping is too thick to pour, microwave it for 15 seconds to reach a temperature of roughly 100°F (38°C), which will significantly improve its flow rate into the cake’s perforations.
Tested Variations
We tested this recipe with several modifications to determine the best results for different preferences. If you prefer a more complex nutty profile, replace the pecans with toasted walnuts; the higher tannin content provides a pleasant bitterness that cuts through the sugar. For a more sophisticated finish, you might want to try the frosting technique used in our german chocolate cake, which uses a cooked coconut-pecan topping. We also experimented with a “Double Chocolate” version by adding 2 tablespoons of dark cocoa powder to the dry cake mix, which increased the structural rigidity and provided a more intense chocolate flavor. If you choose to make the cake from scratch, make sure to use a high-fat buttermilk recipe to mimic the moisture levels of the soak.
Presentation Notes

For a professional presentation, serve each slice on a chilled white plate to make the dark chocolate and amber caramel colors pop. A small sprinkle of Maldon sea salt over the final caramel drizzle will amplify the flavors and provide a sophisticated crunch. This cake pairs exceptionally well with a bitter beverage, such as a double espresso or a dark roast coffee, which balances the sweetness. If you enjoy the combination of candy bars and cake, you might also find inspiration in our snickers cake for future dessert planning. Always slice the cake while it is cold from the fridge, but let the individual slices sit at room temperature for 5 minutes before eating to allow the caramel to soften slightly.
The Final Analysis
Achieving the perfect Chocolate Turtle Cake is a matter of managing temperatures and allowing for proper saturation time. By following this data-driven method, you transform standard pantry staples into a dessert with professional-grade texture and flavor. If you enjoyed this experiment in moisture and texture, I recommend testing our earthquake cake next for another fascinating study in cake chemistry. For more test kitchen results and baking science, follow us on Facebook, Instagram, Pinterest, and YouTube. Keep testing and keep baking.


