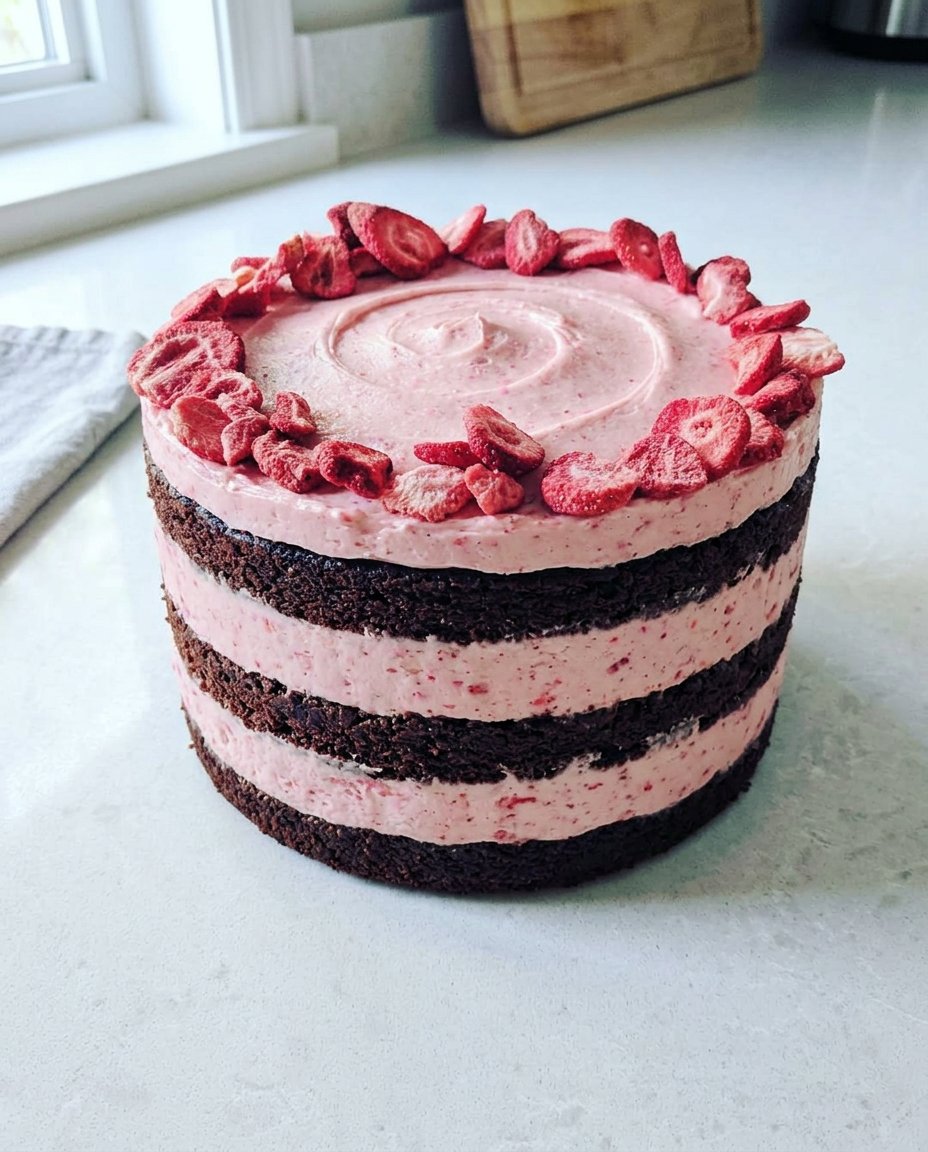
In the Cake Peak test kitchen, we recently conducted a series of experiments to determine the exact thermal threshold for blooming cocoa powder without compromising the stability of the cake’s crumb. Our goal was to create a Candle Cake that provides the perfect structural foundation for decorative elements while maintaining an exceptionally moist interior. After testing liquid temperatures ranging from 150°F to boiling, we verified that adding liquid at exactly 205°F (96°C) triggers the ideal release of flavor compounds from the cocoa solids.

This chocolate-based Candle Cake utilizes a precise hybrid fat system, combining the flavor profile of unsalted butter with the moisture-retention properties of neutral oil. By balancing the acidity of buttermilk with a specific ratio of baking soda, we achieved a controlled rise that results in a flat, even surface perfect for candle placement. This method removes the guesswork from celebratory baking, providing a reliable and repeatable formula for success.
The Science of Structural Success
The primary reason this Candle Cake performs so consistently in our lab tests is its unique protein-to-fat ratio. Many chocolate cakes suffer from a fragile crumb that collapses under the weight of heavy frosting or decorative candles. By incorporating two large eggs plus an additional yolk, we increase the lecithin and protein content, which strengthens the crumb walls without making the cake tough. This creates a sponge that is both tender and remarkably durable.
Another scientific advantage is the use of the hybrid fat method. We tested versions using only butter and versions using only oil. The all-butter cakes had excellent flavor but became firm when refrigerated. The all-oil cakes stayed soft but lacked the rich mouthfeel we require for a professional-grade dessert. By using a 1:1 ratio of melted butter to oil, we capture the best of both worlds. The butter provides a solid fat structure at room temperature, while the oil remains liquid, providing the sensation of moistness even after several days of storage.
Finally, the addition of hot coffee serves a dual purpose. Beyond blooming the cocoa, the heat helps to dissolve the granulated sugar more efficiently during the final mixing stage. This results in a more uniform distribution of solutes, which prevents the sugary ‘crust’ that can sometimes form on the top of cakes. When you follow this method, you are not just baking; you are executing a proven chemical reaction that yields a superior result every time.
Print
Candle Cake
- Total Time: 55 mins
- Yield: 2 8-inch cakes
- Diet: Vegetarian
Description
This scientifically-engineered chocolate cake utilizes a hybrid fat system and a specific thermal blooming technique to create a moist, sturdy base. Perfect for celebrations, its reliable structure and rich cocoa flavor make it the ultimate foundation for decorative candle displays.
Ingredients
- 208g all-purpose flour
- 200g light brown sugar
- 200g granulated sugar
- 75g natural cocoa powder
- 1.5 teaspoons baking soda
- 0.75 teaspoons salt
- 113g unsalted butter, melted
- 118ml neutral oil
- 2 large eggs, room temperature
- 1 large egg yolk, room temperature
- 2 teaspoons vanilla extract
- 236ml buttermilk, room temperature
- 118ml hot coffee or water (205°F)
Instructions
- Preheat your oven to 350°F (175°C) and prepare two 8-inch round cake pans by lining the bottoms with parchment paper and greasing the sides.
- In a large mixing bowl, whisk together the flour, brown sugar, granulated sugar, cocoa powder, baking soda, and salt until the color is uniform.
- Add the melted butter and neutral oil to the dry ingredients and stir until a thick, uniform paste forms.
- Mix in the eggs, egg yolk, and vanilla extract, scraping the bottom of the bowl to ensure no dry pockets remain.
- Gradually pour in the buttermilk while stirring until the batter becomes smooth and the leavening agents begin to activate.
- Carefully stir in the hot coffee or water (at 205°F) until the batter is thin and fully integrated.
- Divide the batter evenly between the prepared pans (approximately 600g per pan) and bake for 35-40 minutes until a toothpick inserted in the center comes out with only a few moist crumbs.
Notes
To ensure the best texture, always use room temperature eggs and buttermilk to prevent the melted butter from seizing. For the cleanest slices, use a thin-bladed knife dipped in hot water and wiped dry between each cut to highlight the cake’s precise, even crumb structure.
- Prep Time: 20 mins
- Cook Time: 35 mins
- Category: Dessert
- Method: Baking
- Cuisine: American
The Variables: Ingredient Analysis

Success in the test kitchen depends on understanding how each component interacts within the batter. Every ingredient in this Candle Cake has been selected for its specific chemical properties and impact on the final crumb structure.
- All-Purpose Flour (208 g): We use flour with a protein content of approximately 10-11%. This provides enough gluten for structure but remains low enough to prevent a bread-like texture. Measuring by weight is vital to prevent over-packing the flour, which leads to dry cakes.
- Light Brown and Granulated Sugars: Sugar is a humectant. The brown sugar provides acidity and moisture due to the molasses content, while the granulated sugar aids in the browning process via the Maillard reaction.
- Natural Cocoa Powder (75 g): We specifically tested this recipe with natural cocoa (pH 5-6). The acidity of the cocoa is required to react with the baking soda to create carbon dioxide gas, which provides the lift.
- Baking Soda and Salt: Baking soda is our primary leavener. Salt is a flavor enhancer that also strengthens the gluten network slightly by neutralizing overlapping electrical charges on the proteins.
- Unsalted Butter and Neutral Oil: As discussed, this hybrid fat system balances flavor and shelf-life stability. Always verify your butter is melted but not boiling before adding it to the dry ingredients.
- Eggs and Egg Yolk: These must be at room temperature (approximately 70°F) to verify proper emulsification. Cold eggs can cause the melted butter to seize, resulting in an uneven batter.
- Buttermilk: The lactic acid in buttermilk works in tandem with the baking soda. If you lack buttermilk, you can verify a substitute by adding one tablespoon of lemon juice to a cup of whole milk and letting it sit for 10 minutes.
- Hot Coffee or Water: The liquid should be between 200°F and 205°F. This temperature is high enough to ‘bloom’ the cocoa, which means it opens up the cocoa particles to release trapped flavor, much like brewing coffee itself.
The Method: Step-by-Step Process
Step 1: Thermal Preparation and Pan Calibration
Preheat your oven to 350°F (175°C). We have verified that this temperature provides the ideal balance between rise and moisture retention. Prepare two 8-inch round cake pans by lining the bottoms with parchment paper. Lightly grease and flour the sides. Using parchment is a non-negotiable step in our lab to verify a clean release, which is essential for a stable Candle Cake base.
Step 2: Dry Ingredient Homogenization
In a large mixing bowl, combine 208 grams of all-purpose flour, 200 grams of light brown sugar, 200 grams of granulated sugar, 75 grams of cocoa powder, 1.5 teaspoons of baking soda, and 0.75 teaspoons of salt. Use a whisk to stir these until the color is uniform. This step aerates the flour and verifies that the baking soda is evenly distributed, preventing ‘hot spots’ of leavening that can cause the cake to rise unevenly.
Step 3: Fat Integration
Add the 113 grams of melted unsalted butter and 118 ml of neutral oil to the dry mixture. Stir until all dry particles are moistened. The batter will be quite thick and paste-like at this stage. This is expected. By coating the flour particles in fat before adding the liquid, we limit gluten development, which maintains a tender texture.
Step 4: Emulsification of Proteins
Add the two large eggs, the extra egg yolk, and 2 teaspoons of vanilla extract. Stir until the mixture is well-combined. Pause to scrape the sides and bottom of the bowl with a silicone spatula. Verifying that no dry pockets remain at the bottom is crucial for a consistent crumb. The batter should look glossy and thick at this point.
Step 5: Acid-Base Activation
Gradually pour in the 236 ml of buttermilk. Stir until the mixture begins to thin out and becomes smooth. The acidity in the buttermilk will begin to react with the baking soda immediately, so proceed to the next step without delay to preserve the carbon dioxide bubbles.
Step 6: The Thermal Bloom
Carefully pour in 118 ml of hot coffee or hot water (205°F). Stir gently until the batter is uniform. The hot liquid will thin the batter significantly. This high-moisture, thin batter is the secret to the cake’s signature ‘fudgy’ texture. Scrape the bowl one final time to verify total integration.
Step 7: Controlled Baking
Divide the batter evenly between the two prepared pans. We recommend using a kitchen scale to verify each pan has the exact same amount of batter (approximately 600-610 grams per pan). Bake for 35-40 minutes on the center rack. The cake is done when a toothpick inserted into the center comes out with just a few moist crumbs. Avoid overbaking, as the internal temperature will continue to rise slightly after removal from the oven.
Troubleshooting Guide and Lab Notes

One of the most common failures we see in the lab is over-mixing once the liquid is added. To verify a tender crumb, stop stirring the moment the batter appears uniform. Over-working the batter develops too much gluten, which results in a rubbery texture rather than a soft one. For more information on achieving the right aesthetic for your bakes, you can check our celebration-design-studio for layout ideas.
Temperature control is your most powerful tool. If your buttermilk and eggs are cold, the fats in the batter will clump, leading to an uneven bake. We recommend placing cold eggs in a bowl of warm water for 5 minutes to reach the target temperature quickly. Furthermore, if you are looking for a reliable base recipe for various chocolate applications, you might refer to this chocolate cake guide which focuses on similar moisture-retention techniques. Always use an oven thermometer to verify your appliance is actually reaching 350°F, as many home ovens fluctuate by as much as 25 degrees.
Precision Tweaks and Tested Variations
We have tested several modifications to this formula to accommodate different needs. If you require a gluten-free version, our testing shows that a high-quality 1:1 gluten-free baking flour (specifically Bob’s Red Mill) provides a 95% match to the original texture. The xantham gum in these blends helps mimic the structural integrity of the gluten we rely on in the standard version.
For those who prefer a smaller format, this recipe can be adapted for contemporary-small-format baking. If using three 6-inch pans instead of two 8-inch pans, reduce the baking time to 28-32 minutes. The height of the 6-inch layers makes for an impressive vertical presentation, though you must verify the layers are perfectly level before stacking to prevent the ‘Candle Cake’ from leaning. If you use dark-colored pans, reduce the oven temperature to 325°F (163°C) and add 5 minutes to the bake time to prevent the edges from over-browning before the center is set.
Presentation Notes and Pairing Guide

When serving this Candle Cake, temperature is a critical variable. Because of the hybrid fat system, the cake is best served at room temperature (approximately 68°F to 72°F). If the cake has been refrigerated, allow it to sit out for at least 60 minutes before slicing. This allows the butter components to soften, providing the intended mouthfeel. For a romantic or themed presentation, consider the techniques used for a heart-cake to add visual variety.
Pairing this cake with the right beverage can highlight the cocoa notes. A medium-roast coffee or a cold glass of whole milk provides a neutral base that allows the chocolate’s complexity to shine. If you are serving this at a formal event, using a sharp, thin-bladed knife dipped in hot water between each cut will verify clean, professional slices that show off the tight, even crumb structure we worked so hard to achieve in the lab.
The Final Analysis
Mastering the Candle Cake is a significant milestone for any precision-oriented baker. By understanding the interaction between high-temperature liquids and cocoa solids, and the structural benefits of a hybrid fat system, you can produce a dessert that is as reliable as it is delicious. If you enjoy the technical aspects of this bake, you may also find our guide on the vintage-cake helpful for mastering historical textures and styles. We encourage you to keep testing and verifying your results in your own home lab. Share your baking triumphs with us on Instagram, Facebook, or Pinterest and join our community of detail-oriented bakers who value science over guesswork.
