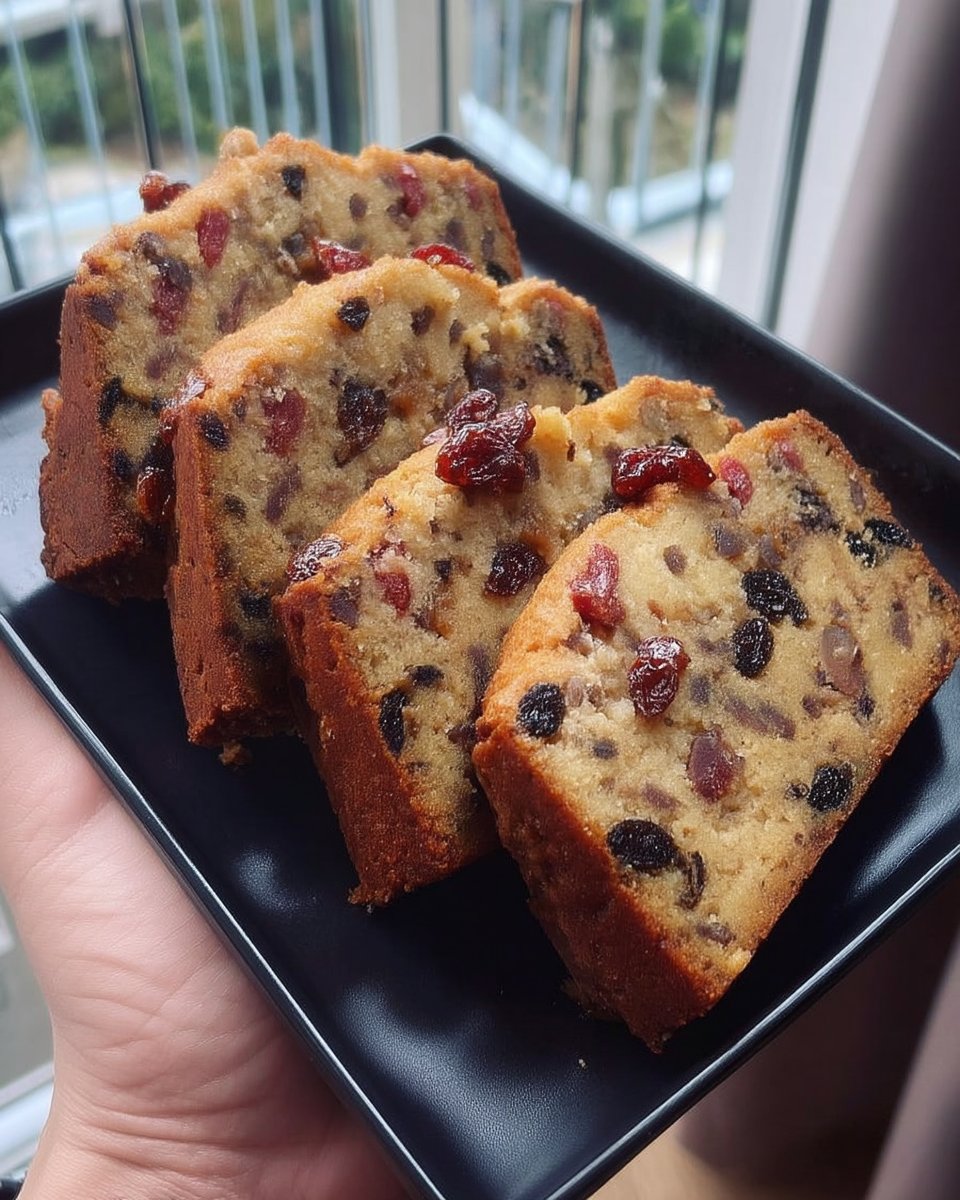
In the Cake Peak test kitchen, we performed several trials to solve the common issue of fruit distribution in dense holiday loaves. We found that the standard method of folding fruit directly into the batter often led to uneven results and soggy bottoms. Through our testing, we determined that a precise ratio of flour coating combined with a specific creaming duration is the only way to achieve a professional-grade fruit suspension in this Christmas Themed Cake.

This recipe focuses on a bright, citrus-heavy profile that deviates from the muddy flavors of poorly made fruitcakes. By utilizing orange juice as a primary hydrating agent, we achieve a vibrant crumb that complements the sweetness of the glacé cherries. Our goal was to create a reliable, repeatable method that yields a cake with structural integrity and a refined flavor profile that improves over time.
The Science of Structural Integrity
This recipe works because it respects the thermodynamic realities of long-duration baking. Most bakers struggle with fruitcakes because they bake them at too high a temperature, causing the sugars in the fruit to caramelize prematurely and turn bitter. By maintaining a steady 300°F (150°C) environment, we allow the heat to penetrate the dense batter slowly without drying out the exterior. This Christmas Themed Cake relies on the relationship between the acidity in the orange juice and the baking powder to create enough lift to support nearly 20 ounces of fruit.
We also prioritized moisture retention through the use of high-quality butter and sugar, which work together to create a tender crumb. Sugar is not just a sweetener in this context; it is a humectant that keeps the cake moist for days after baking. Because we avoid the use of harsh spices, the natural fruit flavors are allowed to shine through with clarity and precision. This is a reliable base recipe that you can count on for consistent results every single holiday season.
Print
Christmas Themed Cake
- Total Time: 2 hours 45 mins
- Yield: 1 loaf (12 servings)
Description
This dense and vibrantly flavored holiday loaf features golden raisins and glacé cherries hydrated with fresh orange juice. Our scientifically tested method ensures perfect fruit suspension and a moist, tender crumb that only improves with age.
Ingredients
- 1 cup (227g) unsalted butter, softened to 65°F
- 1 cup (200g) granulated white sugar
- 2 large eggs, room temperature
- 1/2 cup (120ml) orange juice
- 2 cups (240g) all-purpose flour
- 1 tsp baking powder
- 12 ounces (340g) golden raisins
- 8 ounces (225g) glacé cherries, halved
Instructions
- Preheat your oven to 300°F (150°C) and grease a 9×5-inch loaf pan, lining it with parchment paper for easy removal.
- In a stand mixer with a paddle attachment, cream the butter and sugar on medium speed for 3 minutes until light and fluffy.
- Incorporate the eggs one at a time, beating for 30 seconds after each addition to maintain a stable emulsion.
- Slowly pour in the orange juice while mixing on low speed until the batter becomes smooth.
- Sift the flour and baking powder together; set aside 1/3 cup of this mixture to toss with the raisins and cherries until they are thoroughly coated.
- Mix the remaining flour into the wet ingredients on the lowest speed until just combined, being careful not to overwork the gluten.
- Gently fold the flour-coated fruit into the batter using a rubber spatula to ensure even distribution.
- Transfer the batter to the pan and bake for approximately 2 hours and 15 minutes, or until an internal temperature of 205°F is reached.
- Allow the cake to cool in the pan for 20 minutes before moving it to a wire rack to cool completely.
Notes
To ensure a successful rise, always verify the potency of your baking powder in hot water before starting. For the cleanest slices and most developed flavor, wrap the cooled cake tightly and wait 24 hours before serving, which allows the internal moisture to redistribute perfectly.
- Prep Time: 30 mins
- Cook Time: 2 hours 15 mins
- Category: Dessert
- Method: Baking
- Cuisine: Holiday
Analyzing the Baking Variables

To achieve the results we observed in our testing, your ingredients must meet specific criteria. We recommend using a digital scale for the most accurate measurements, particularly for the fruit and flour. The variables of temperature and quality are paramount here.
- Unsalted Butter (1 cup / 227g): Ensure your butter is exactly 65°F (18°C). If it is too cold, the sugar will not properly aerate the fat; if it is too warm, the air cells will collapse, leading to a heavy, oily cake.
- Granulated White Sugar (1 cup / 200g): This provides the necessary structure and helps in the creaming process to create a stable emulsion.
- Large Eggs (2 units): Use room temperature eggs (approx. 70°F). Cold eggs will break the butter emulsion, resulting in a curdled batter and uneven texture.
- Orange Juice (1/2 cup / 120ml): Freshly squeezed is preferred. The citric acid helps to relax the gluten slightly, producing a more tender crumb.
- All-Purpose Flour (2 cups / 240g): We tested this with a protein content of 11.7%. Avoid cake flour, as it lacks the strength to support the heavy fruit.
- Baking Powder (1 tsp): This provides the chemical leavening needed to lift the dense inclusions.
- Golden Raisins (12 ounces / 340g): These offer a milder, more delicate sweetness compared to dark raisins.
- Glacé Cherries (8 ounces / 225g): We recommend rinsing these if they are in heavy syrup, then drying them thoroughly before use.
Understanding how these ingredients interact is the key to success. The flour provides the framework, while the fats and sugars ensure the cake remains palatable even after several days of storage.
The Step-by-Step Method
Step 1: Thermal Calibration and Pan Prep
Preheat your oven to exactly 300°F (150°C). Our tests showed that even a 25-degree variance can ruin the fruit suspension. Grease a 9×5-inch loaf pan thoroughly. Line it with parchment paper, leaving a 1-inch overhang on the long sides. This allows you to lift the cake out without disturbing its delicate structure after the long bake.
Step 2: Mechanical Aeration
In a stand mixer fitted with the paddle attachment, beat the softened butter and sugar. Perform this step for exactly 3 minutes on medium speed. You are looking for a light, fluffy texture that has increased in volume. This mechanical aeration is what provides the initial lift before the chemical leaveners take over in the oven.
Step 3: Emulsifying the Liquids
Add the eggs one at a time. It is vital to beat each egg for 30 seconds before adding the next. This ensures a stable emulsion of fat and water. If the batter looks broken or curdled, your eggs were likely too cold. Once the eggs are incorporated, slowly pour in the orange juice while mixing on low speed until the mixture is smooth.
Step 4: The Fruit Suspension Technique
Sift the all-purpose flour and baking powder together into a separate bowl. Take 1/3 cup of this mixture and place it in a bowl with the raisins and halved cherries. Toss them until every piece of fruit is completely coated in a thin layer of flour. This increases the surface friction of the fruit, preventing it from sinking through the batter during the early stages of baking.
Step 5: Final Batter Integration
Add the remaining flour mixture to the wet ingredients. Mix on the lowest speed until just a few streaks of flour remain. Do not overmix, as this will develop too much gluten and result in a tough, rubbery cake. Gently fold in the floured raisins and cherries using a large rubber spatula until they are evenly distributed throughout the batter.
Step 6: The Low and Slow Bake
Transfer the batter to the prepared loaf pan and smooth the top. Bake in the center of the oven for approximately 2 hours and 15 minutes. At the 2-hour mark, begin testing with a wooden skewer. The cake is done when the skewer comes out clean and the internal temperature reaches 205°F (96°C). Cool the cake in the pan for 20 minutes before transferring it to a wire rack to cool completely.
Lauren’s Lab Notes

One of the most important factors in a successful Christmas Themed Cake is the internal temperature. While many recipes rely on visual cues, we found that using an instant-read thermometer is the only way to verify the center is fully set without over-baking the edges. If the top begins to brown too quickly after the 90-minute mark, tent the pan loosely with aluminum foil to protect the surface while the internal temperature continues to rise.
Another critical insight from our testing: do not cut the cake immediately. The structure needs at least 24 hours to stabilize, and the flavors actually intensify as the moisture redistributes. For more on handling fruit-heavy bakes, you can see our guide on chocolate-fruit-cake. For further technical troubleshooting on holiday bakes, you can also consult external resources like these Christmas cake FAQs. Always ensure your baking powder is fresh by dropping a half-teaspoon into hot water; if it doesn’t bubble vigorously, it will not provide the lift you need.
Precision Tweaks and Advanced Options
While this version is citrus-forward, we tested several modifications for those who prefer a different flavor profile. If you wish to incorporate nuts, we found that adding 4 ounces of toasted pecans provides an excellent textural contrast without compromising the cake’s structural integrity. Simply reduce the raisin count by 2 ounces to maintain the correct fruit-to-batter ratio.
For those interested in aesthetic modifications, our celebration-design-studio offers insights into how different pan shapes can affect baking times. If you choose to bake this in mini-loaf pans, reduce the baking time to 45–55 minutes. We also tested an alcohol-brushed version; once the cake is cool, you can brush the exterior with 2 tablespoons of brandy or orange liqueur before wrapping it. This doesn’t just add flavor—it acts as a preservative by lowering the water activity on the surface of the cake.
Presentation and Pairing Notes

To achieve the cleanest slices, use a long serrated knife and a gentle sawing motion. This prevents the knife from crushing the delicate fruit inclusions. We recommend serving the cake at a precise room temperature of 70°F (21°C) to allow the butter-based crumb to soften properly. If the cake is served cold, the fat remains firm and the flavor profile will seem muted.
This cake pairs beautifully with a sharp cheddar cheese, a classic combination that balances the sugar with salt and fat. For a more traditional presentation, you might look at our vintage-cake styling tips, which emphasize simple, elegant garnishes like a light dusting of powdered sugar or a sprig of fresh holly. Avoid heavy frostings, as the cake is already quite rich and dense.
Mastery Through Science
Baking a Christmas Themed Cake is an exercise in patience and precision. By controlling your ingredient temperatures and following our verified fruit-suspension technique, you ensure a result that is both visually stunning and technically sound. Remember that the long, slow bake is a necessity, not a suggestion, as it allows for the gradual heat transfer required for such a dense batter.
If you enjoy mastering these technical holiday bakes, you should also try our recipe for raspberry-white-chocolate-cake. We are constantly testing new methods in the lab to make your baking more predictable and successful. Follow our latest experiments and share your results with us on Facebook, Instagram, and Pinterest. Happy baking!

