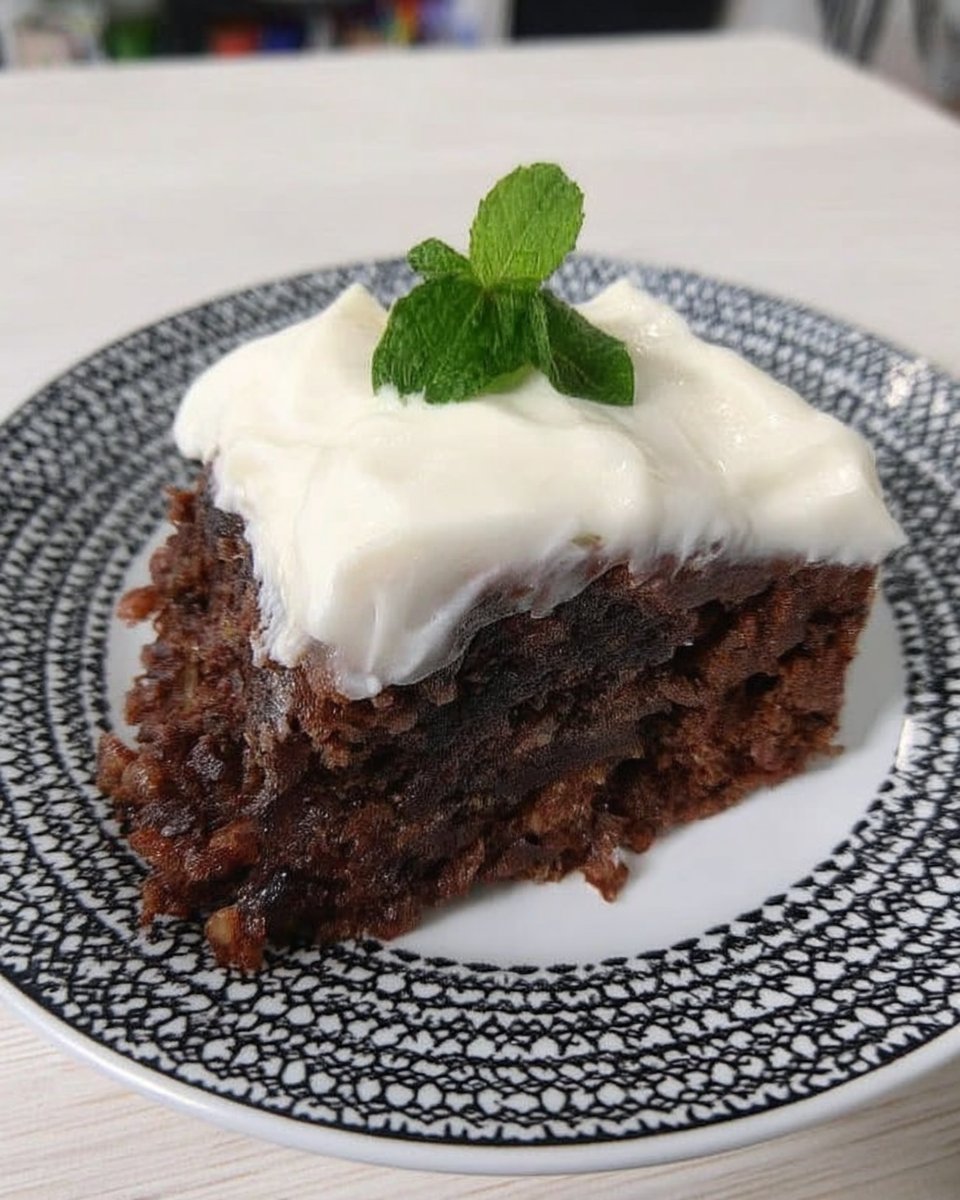
Down in Virginia, we knew that a Sunday afternoon wasn’t complete without a grand cake sitting on the sideboard, waiting to be shared after a long family meal. My mama always said that the most beautiful bakes are the ones that tell a story, and this Fault Line Cake is a modern classic that carries that Southern spirit of storytelling into every slice.

This design might look like it belongs in a professional pastry shop, but it is truly a labor of love that any home baker can master with a bit of patience. It features a tender, golden yellow cake base smothered in a silky Nutella Swiss meringue buttercream that creates a perfect crumb and a flavor that feels like a warm hug.
Why You Will Love This Fault Line Cake
There is something truly magical about a Fault Line Cake that captures the imagination of everyone who sees it. It strikes that perfect balance between professional artistry and home-baked comfort, making it a winner for any special gathering. The visual appeal comes from the intentional gap in the frosting, revealing a hidden layer of beauty—whether that be sprinkles, fruit, or a different shade of buttercream—that looks like a gemstone hidden within a rock.
Beyond the stunning appearance, the flavor profile is a nostalgic dream. The yellow cake is rich with butter and buttermilk, offering a moist, tight crumb that stands up beautifully to the weight of the frosting. We use both granulated and light brown sugar to give the cake a deep, caramelized undertone that pairs perfectly with the hazelnut notes in the Nutella. It is a sophisticated take on the classic birthday flavors we all grew up with in the South.
Texture is where this recipe really shines. The Swiss meringue buttercream is a revelation compared to standard American frosting; it is buttery, light, and remarkably smooth. When you fold in the Nutella, it creates a frosting that is not overly sweet but is incredibly decadent. This cake brings people together, sparking wonder and joy before you even pick up the cake knife to serve the first piece.
Print
Fault Line Cake
- Total Time: 1 hour 30 mins
- Yield: 12 servings
- Diet: Vegetarian
Description
A stunning three-layer yellow cake featuring a rich Nutella Swiss meringue buttercream and a modern fault line design. This Southern-inspired dessert combines a tender, buttery crumb with professional-level artistry for a truly memorable celebration centerpiece.
Ingredients
- 3 cups cake flour
- 2 teaspoons baking powder
- 1 teaspoon kosher salt
- 1.5 cups unsalted butter, room temperature
- 1.5 cups granulated sugar
- 0.5 cup light brown sugar
- 4 large eggs, room temperature
- 0.25 cup canola oil
- 1 cup buttermilk
- 2 teaspoons pure vanilla extract
- 5 large egg whites
- 1.5 cups granulated sugar (for meringue)
- 0.25 teaspoon cream of tartar
- 1.5 cups unsalted butter, cubed and room temperature (for frosting)
- 0.5 cup Nutella
- 0.5 cup decorative sprinkles
Instructions
- Preheat your oven to 350°F and position the rack in the center; grease three 8-inch cake pans and line the bottoms with parchment paper.
- In a medium bowl, whisk together the cake flour, baking powder, and kosher salt until well combined and free of lumps.
- In a stand mixer fitted with the paddle attachment, beat the room temperature butter, granulated sugar, and light brown sugar for 3 to 4 minutes until light and fluffy.
- Reduce the speed to low and add the eggs one at a time, followed by the canola oil, buttermilk, and vanilla extract, beating until the mixture is smooth.
- Gradually add the dry ingredients to the wet mixture on low speed until just combined, then divide the batter evenly among the three prepared pans.
- Bake for 40 to 45 minutes, or until a skewer inserted into the center comes out with moist crumbs, then let cakes cool completely on a wire rack.
- To make the frosting, whisk egg whites, sugar, salt, and cream of tartar over a pot of simmering water until the mixture reaches 160°F.
- Transfer to a stand mixer and whisk on high for 8 to 10 minutes until stiff, glossy peaks form and the bowl is cool to the touch.
- Switch to the paddle attachment, add butter cubes a few at a time on low speed, then increase speed and beat until silky before folding in the Nutella.
- Stack the cooled cake layers with buttercream between them, apply a thin crumb coat, and chill for 30 minutes.
- Apply a band of sprinkles around the center of the cake, then pipe thick layers of Nutella buttercream above and below the band, smoothing with a bench scraper while keeping the edges jagged to reveal the fault line.
Notes
To ensure the best structural integrity for the fault line, make sure your cake layers are completely level before stacking. If they have domes, trim them with a serrated knife so the buttercream sits flat and the fault looks intentional and clean. Chilling the cake after the crumb coat is a vital step that prevents the weight of the thick outer buttercream layers from sliding off.
- Prep Time: 45 mins
- Cook Time: 45 mins
- Category: Dessert
- Method: Baking
- Cuisine: American
The Foundation of Your Masterpiece

To create a masterpiece like this, we start with high-quality ingredients that form the backbone of Southern baking. Every element serves a purpose, from the specific fat content in the butter to the protein levels in the cake flour. Here is a breakdown of what makes this cake so special:
- Cake Flour: This is vital for achieving that delicate, tender crumb Jesse is known for. It has a lower protein content than all-purpose flour, which prevents the cake from becoming tough.
- Unsalted Butter: Using unsalted butter lets us control the salt level perfectly. Make sure it is at room temperature so it creams beautifully with the sugars.
- Buttermilk: This adds a subtle tang and works with the baking powder to create a light, airy rise. It is a staple in my kitchen for a reason.
- Large Eggs: These provide structure and richness. Having them at room temperature is a must to keep the batter from curdling during the mixing process.
- Nutella: This creamy hazelnut spread is the star of our frosting. It adds a nutty depth and a lovely toasted color to the Swiss meringue buttercream.
- Egg Whites and Cream of Tartar: These are the base for our meringue. The cream of tartar stabilizes the whites, helping them hold those stiff, glossy peaks.
Using pure vanilla extract and kosher salt helps round out the flavors, making sure every bite is seasoned to perfection. When you gather these items, you are not just making a dessert; you are preparing a celebration.
How to Make Your Fault Line Cake
Step 1: Prep Your Pans and Oven
Start by positioning your oven rack in the center and preheating to 350°F. This creates the most even heat distribution for your layers. Generously spray three 8-inch cake pans with cooking spray and line the bottoms with parchment paper. Spray the parchment as well to make sure your cakes release without any fuss. Taking this extra time now saves a lot of heartache later when it is time to turn the cakes out.
Step 2: Whisk the Dry Ingredients
In a medium bowl, whisk together your cake flour, baking powder, and kosher salt. Sifting or whisking thoroughly is important to remove any lumps and to make sure the leavening agent is distributed evenly throughout the flour. Set this bowl aside while you work on the creamed base.
Step 3: Cream the Butter and Sugars
In the bowl of a stand mixer fitted with the paddle attachment, combine the room temperature butter, granulated sugar, and light brown sugar. Beat these on medium speed for about 3 to 4 minutes. You are looking for a mixture that is light, fluffy, and has roughly doubled in volume. Use a rubber spatula to scrape down the sides frequently so every bit is incorporated.
Step 4: Incorporate Eggs and Liquids
Reduce the mixer speed to low and add the eggs one at a time. Do not rush this; wait until each egg is fully combined before adding the next. Once the eggs are in, slowly pour in the canola oil, buttermilk, and vanilla extract. Beat until the mixture is smooth, which should take another 3 to 4 minutes. The batter might look a little thin at this point, but that is perfectly normal for this style of yellow cake.
Step 5: Finish the Batter and Bake
Gradually add the dry ingredients to the wet mixture with the mixer on low. Mix until just combined, then give it one last 30-second beat on low to make sure everything is cohesive. Divide the batter evenly among your three prepared pans. Bake for 40 to 45 minutes, or until a skewer inserted into the center comes out with just a few moist crumbs. Let the cakes cool completely on a wire rack before you even think about frosting them.
Step 6: Prepare the Meringue Base
For the frosting, whisk the egg whites, sugar, salt, and cream of tartar in a heatproof bowl over a pot of simmering water. Whisk constantly until the mixture hits 160°F on a candy thermometer. This process cooks the egg whites safely and dissolves the sugar completely. Once it reaches temperature, move it to the stand mixer and whisk on high for 8 to 10 minutes until stiff, glossy peaks form and the bowl feels cool to the touch.
Step 7: Finish the Nutella Buttercream
Switch to the paddle attachment and add the butter cubes a few at a time while mixing on low. It might look curdled for a moment, but keep going! Once the butter is in, increase the speed to medium-high and beat until it is silky. Finally, add the Nutella and mix until the frosting is creamy and a beautiful light cocoa color. This is the silk that will clothe your cake.
Step 8: Assemble the Fault Line Design
Stack your layers with a generous amount of buttercream in between. Apply a thin crumb coat to the entire cake and chill for 30 minutes. To create the fault line, apply a thick band of sprinkles or a different colored frosting around the center of the cake. Then, pipe a very thick layer of the Nutella buttercream on the top third and bottom third of the cake, leaving the middle recessed. Smooth the top and bottom with a bench scraper, but let the edges of the frosting remain jagged and natural over the middle section to create that stunning “fault” look.
Secrets to Success

Working with Swiss meringue buttercream requires a bit of a steady hand and an eye for temperature. If your buttercream feels too soft while you are trying to create the jagged edges, do not hesitate to pop the whole cake back into the fridge for 15 minutes. A chilled cake is much easier to work with when you are trying to achieve that specific architectural look. If you find the buttercream is separating, it usually just means the butter was a bit too cold; keep beating it, and the friction will eventually bring it back together into a smooth emulsion.
When it comes to the design, I always recommend checking out our celebration design studio for inspiration on color palettes and textures. For the most realistic fault line, avoid making the edges too straight. The beauty is in the imperfection. You can also use a bit of edible gold leaf or gold luster dust mixed with vodka to paint the ragged edges of the frosting. This adds a touch of Southern elegance that truly makes the cake pop. For a deeper look at the technical aspects of this trend, you can see how others handle the fault line cake tutorial to see different ways of layering the center.
Classic Twists and Flavor Options
While the Nutella and yellow cake combination is a personal favorite, the beauty of this technique is its versatility. You could easily swap the yellow cake for a rich chocolate sponge and use a bright white vanilla buttercream for the exterior to create a high-contrast look. If you are feeling a bit nostalgic, you might try a vintage cake approach by using pastel colors and adding small piped rosettes within the fault line for a more traditional Southern feel.
Another wonderful variation is a Lemon-Blueberry fault line. Use a lemon-infused cake batter and fill the center fault area with fresh blueberries or a thick blueberry jam covered in clear sanding sugar. The bright yellow and deep blue create a stunning visual that is perfect for summer garden parties. You can even experiment with the height of the cake; a taller, four-layer cake provides more “real estate” for the fault line to travel around the sides, making the effect even more dramatic.
At the Table

When it is time to serve this beauty, I like to use a long, thin knife dipped in hot water and wiped dry between every single cut. This ensures that the fault line remains crisp and doesn’t get smeared by the Nutella buttercream. Because this cake is so rich and visually striking, it is often best served as a centerpiece for a dessert table. It pairs beautifully with a glass of cold milk or a strong cup of coffee, which helps balance the hazelnut sweetness of the frosting.
If you are hosting a larger gathering, you might consider making a contemporary small format version of this cake as well to offer different flavor profiles. This cake is a natural conversation starter, so place it somewhere where folks can admire the detail before you slice into it. It is the perfect choice for birthdays, anniversaries, or even a fancy Sunday social where you want to show a little extra love to your guests.
The Final Slice
Baking a Fault Line Cake is about more than just following a recipe; it is about the joy of creating something that makes people stop and smile. This cake represents the best of Southern baking—taking a classic, reliable yellow cake and dressing it up with professional technique and a whole lot of heart. Whether you are a seasoned pro or just starting your baking journey, I hope this recipe brings a bit of that Cake Peak magic into your kitchen. If you enjoyed this project, you might also love trying our lemon rainbow cake for another colorful challenge.
I would love to see your beautiful creations! Please share your photos with our community and let us know how your family enjoyed the hidden treasures within your fault line. Keep baking with love, and remember that every cake is a celebration of the people you share it with.
Follow us for more baking inspiration:

