During our testing of multi-layered sponge cakes, we discovered that the secret to a perfect Slice Cake lies in the precise density of the génoise. We trialed four different folding techniques to verify the sponge remained light enough to melt but sturdy enough to support the Italian meringue buttercream. Our data showed that reaching exactly 43°C (109°F) during the initial egg whisking phase was the critical variable for repeatable success.

This triple-threat dessert combines vanilla, raspberry, and lemon layers into a visually striking and technically sophisticated treat. By using a divided traybake method, you achieve three distinct flavors without baking three separate cakes. It is a masterclass in efficiency and precision engineering for the detail-oriented home baker.
The Science of Success
This Slice Cake succeeds because it balances three distinct flavor profiles within a singular, cohesive structure. The génoise method relies on physical aeration rather than chemical leaveners, which results in a fine, tight crumb that holds its shape beautifully when sliced. By using an Italian meringue buttercream, we provide a stable, temperature-resistant filling that acts as a structural adhesive between the delicate layers.
The aesthetic appeal of the feathered fondant is backed by logic; the high sugar content provides a crisp contrast to the buttery interior. This recipe eliminates the guesswork often associated with multi-colored cakes by using a single batter base. We have calibrated the ratios to make sure the raspberry and lemon extracts do not compromise the protein structure of the eggs.
Print
Slice Cake
- Total Time: 55 mins
- Yield: 6 slices
- Diet: Vegetarian
Description
This sophisticated three-layer Slice Cake features delicate vanilla, raspberry, and lemon sponges bonded with luxurious Italian meringue buttercream. Utilizing precise thermal techniques and a classic génoise method, it delivers professional results with a beautiful feathered fondant finish.
Ingredients
- 3 large eggs, at room temperature
- 120g caster sugar
- 120g plain flour, sifted
- 60g unsalted butter, melted and cooled
- 1 tsp vanilla extract
- 1 tsp raspberry flavoring
- Pink food coloring gel
- Grated zest of 1 lemon
- Yellow food coloring gel
- 100g granulated sugar
- 3 tbsp water
- 1 large egg white
- 150g unsalted butter, softened and cubed
- 200g fondant icing sugar
- 1.5–2 tbsp water
Instructions
- Preheat oven to 190°C (170°C fan) and divide a 33 x 25cm tin into three equal sections using folded parchment paper.
- Whisk eggs and caster sugar over a pan of simmering water until the temperature reaches exactly 43°C (109°F).
- Transfer the mixture to a stand mixer and whisk on high speed until it reaches the ribbon stage and is thick and pale.
- Prepare three sets of ingredients: 40g flour and 20g flavored butter (vanilla, raspberry/pink, and lemon/yellow) for each layer.
- Divide the egg mixture by weight into three portions and gently fold in the corresponding flour and butter using a metal spoon.
- Pour each batter into its section and bake for 12–15 minutes until the tops spring back; cool on a wire rack.
- Boil 100g sugar and 3 tbsp water to 121°C (250°F) while whisking one egg white to soft peaks.
- Slowly stream the hot syrup into the egg white while whisking on high until the bowl is cool to the touch.
- Add the softened butter cube by cube to the meringue, whisking constantly until the buttercream is smooth and glossy.
- Trim sponges to equal size, stack with buttercream layers (vanilla, raspberry, lemon), and refrigerate for 20 minutes.
- Mix fondant sugar and water to a thick consistency, coloring a quarter pink, then spread white icing over the top.
- Pipe pink lines across the white icing and drag a cocktail stick through to feather, then slice into six portions.
Notes
Ensure all equipment used for the meringue is completely grease-free, as even a trace of fat can prevent the egg whites from reaching their full volume. For the most professional finish, chill the assembled cake thoroughly before icing to provide a firm, stable surface for the fondant application.
- Prep Time: 40 mins
- Cook Time: 15 mins
- Category: Dessert
- Method: Baking
- Cuisine: British
Analyzing the Variables

Success in the test kitchen depends on understanding how your ingredients interact under specific conditions. Every component in this Slice Cake has been selected for its chemical properties and contribution to the final structural analysis.
- Large Eggs (Room Temp): Eggs are the primary leavening agent here. They must be at room temperature to allow the protein bonds to stretch effectively during whisking.
- Caster Sugar: We use caster sugar because its fine crystals dissolve rapidly at 43°C, preventing graininess in the sponge and creating a stable meringue.
- Unsalted Butter: This provides fat for a tender crumb. By melting and cooling it, we allow it to incorporate into the batter without deflating the air bubbles we worked hard to create.
- Plain Flour: A lower protein content than bread flour is essential to prevent excess gluten development, which would make the cake tough rather than light.
- Italian Meringue Components: The combination of sugar syrup at 121°C and egg whites creates a cooked foam that is significantly more stable than French meringue.
- Natural Flavorings: Using concentrated extracts rather than juices prevents adding excess acid or liquid, which can destabilize the génoise emulsion.
The Methodical Process
Step 1: Prep Your Ingredients and Equipment
Fold the foiled parchment to divide the 33 x 25cm cake tin into three even sections, each measuring 20 x 10cm. The parchment side should face upwards to prevent sticking. Heat the oven to 190°C (170°C fan/375°F). This high temperature is necessary to set the génoise structure quickly before the air bubbles can escape.
Step 2: Thermal Management of Eggs
Place the eggs and sugar into a bowl set over a pan of gently simmering water. Whisk slowly until the sugar has fully dissolved and the mixture reaches exactly 43°C (109°F) on your sugar thermometer. This specific temperature lowers the surface tension of the egg proteins, allowing for maximum volume during the next stage.
Step 3: Achieving the Ribbon Stage
Transfer the mixture to a stand mixer fitted with a whisk attachment. Whisk on high speed until the mixture is thick, mousse-like, and pale. When you lift the whisk, the batter should leave a “ribbon” trail that remains visible on the surface for at least 3 seconds. Weigh the total mixture and record this number for precise division.
Step 4: Flavor Calibration
Divide the sifted flour into three small bowls (40g each). Divide the melted butter into three separate bowls (20g each). Stir the vanilla into the first butter bowl, the raspberry flavoring and pink gel into the second, and the lemon zest and yellow gel into the third. Separating these now prevents over-mixing later.
Step 5: The Delicate Fold
Divide the whisked egg mixture into three equal portions by weight. Working with one portion at a time, sift one bowl of flour over the eggs and fold gently using a large metal spoon. Use a figure-eight motion to preserve the aeration. Add the flavored butter and fold just until combined; speed is essential to prevent the mixture from collapsing.
Step 6: Controlled Baking
Repeat the folding process for the remaining two flavors. Pour each mixture into its designated section of the prepared tin. Bake for 12–15 minutes. The cakes are done when the tops spring back instantly when pressed lightly. Cool in the tin for 5 minutes before transferring to a wire rack to stop the residual cooking process.
Step 7: Sugar Syrup Precision
For the buttercream, combine 100g sugar with 3 tablespoons of water in a small pan. Heat gently until the sugar dissolves. Meanwhile, whisk the egg white to soft peaks in a clean, grease-free mixer bowl. Once dissolved, boil the syrup rapidly until it hits 121°C (250°F). This is the ‘hard ball’ stage, which produces the most stable meringue.
Step 8: Meringue Emulsification
With the mixer on full speed, pour the hot syrup onto the egg whites in a thin, steady stream. Avoid hitting the whisk directly to prevent splattering. Continue whisking until the bowl feels cool to the touch. This can take up to 10 minutes; the meringue must be at room temperature before adding fat.
Step 9: Butter Integration
Gradually add the softened butter, one small cube at a time, whisking thoroughly after each addition. If the mixture looks curdled, the butter was too cold; keep whisking. If it looks soup-like, the meringue was too hot; chill the bowl for 5 minutes and then resume whisking until smooth and thick.
Step 10: Structural Assembly
Trim the cooled sponges so they are mathematically identical in size and height. Spread half of the buttercream over the vanilla sponge, then place the raspberry sponge on top. Spread the remaining buttercream over the raspberry layer and top with the lemon sponge. Verify the stack is level and refrigerate for 20 minutes to set the structure.
Step 11: Fondant Viscosity
Sift the fondant icing sugar and add 1.5 to 2 tablespoons of water. The goal is a stiff, dropping consistency that holds its shape but can be smoothed. Color one quarter of it pink and place it in a piping bag with a writing nozzle. The white fondant should be used immediately to prevent a crust from forming.
Step 12: Precision Feathering and Slicing
Spread the white icing over the top lemon layer. Quickly pipe pink lines across the width, spaced 1cm apart. Drag a cocktail stick through the lines in alternating directions to create the feathered pattern. Once set, use a hot, dry knife to cut the cake into six even slices for a professional finish.
Lauren’s Lab Notes

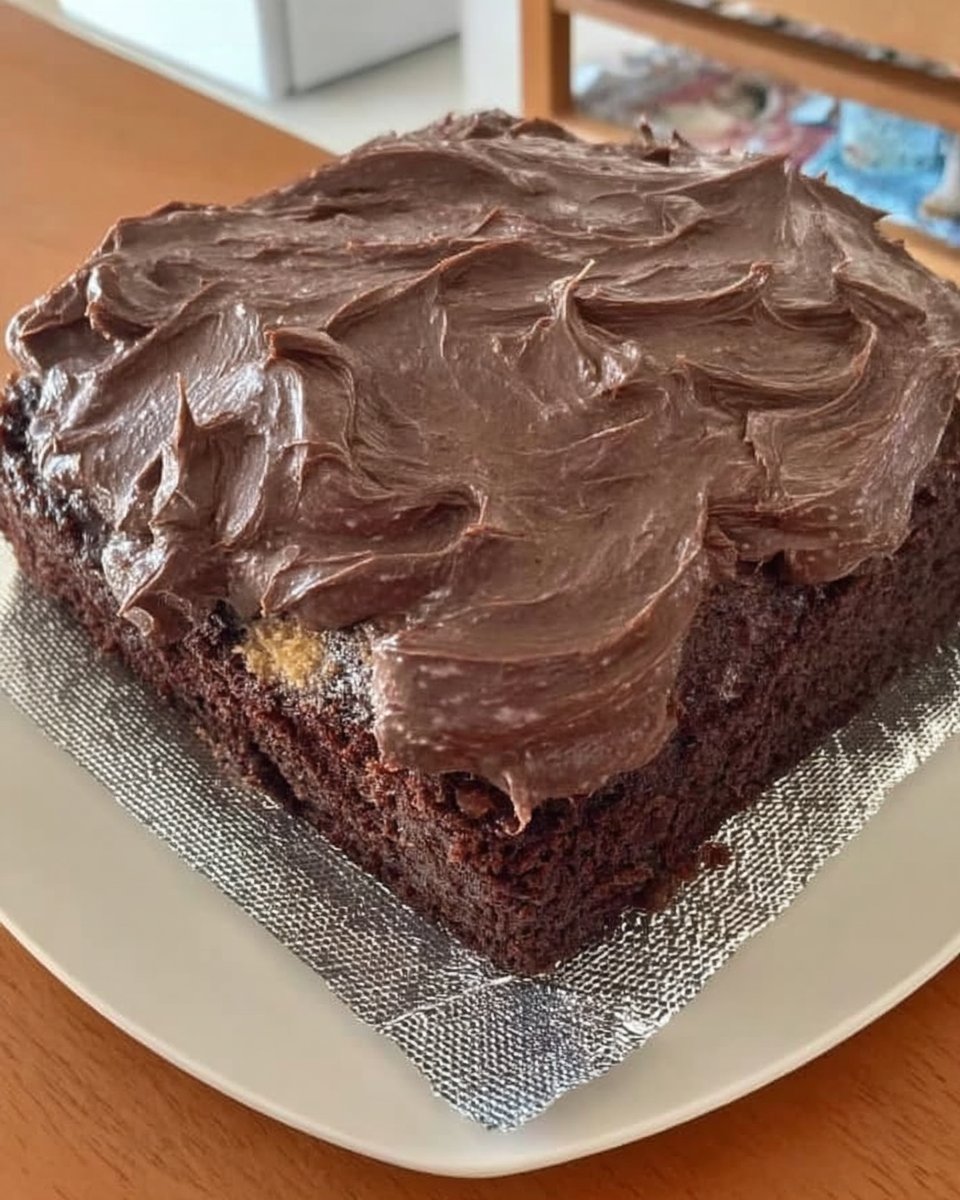
The most common failure in a Slice Cake is the collapse of the génoise batter. To prevent this, make sure your butter is cooled to approximately 30°C before folding it in; if it is too hot, it will instantly pop the air bubbles in the egg foam. If your buttercream breaks during the butter addition, do not panic. Simply continue whisking on high speed; the emulsion will eventually stabilize as the temperatures of the fat and protein equalize. For those looking to master other classic bases, comparing this technique to our yellow cake with chocolate frosting reveals how different fat incorporation methods affect crumb density.
Precision Tweaks
While the Neapolitan trio is classic, our test kitchen has verified several successful flavor modifications. For a deeper profile, you can substitute the lemon zest with 10g of high-quality cocoa powder in the third layer, though you must reduce the flour by 10g in that specific bowl to maintain the correct dry-to-wet ratio. If you prefer a nuttier texture, replace 20% of the plain flour with finely ground almond flour. For more inspiration on traditional flavor profiles, examine our old fashioned chocolate cake which utilizes a completely different leavening chemistry for a heavier, moister result.
Presentation and Pairing Guide

To achieve the cleanest aesthetic, chill the Slice Cake for at least two hours before cutting. Use a long serrated knife dipped in hot water and wiped dry between every single cut; this melts the fondant slightly to prevent cracking and keeps the buttercream layers distinct. These slices pair remarkably well with a tart fruit coulis or a light Earl Grey tea. If you enjoy the bright notes of the lemon layer in this recipe, you might also appreciate the technical simplicity of our lemon yogurt cake, which uses acidity to achieve a different type of crumb tenderization.
The Final Analysis
Mastering the Slice Cake is a significant milestone for any baker who values precision and technical skill. By controlling the temperature of the eggs and the sugar syrup, you have moved beyond simple mixing into the realm of true pastry science. This recipe demonstrates that when the variables are managed correctly, the result is both visually stunning and structurally sound. For those who want to continue their education in cake textures, our blueberry coffee cake offers a fascinating look at how fruit moisture impacts bake times. For more technical demonstrations and community testing results, visit Cookpad.
Join our community of precision bakers on Pinterest, Instagram, and Facebook to share your results and troubleshooting triumphs.
