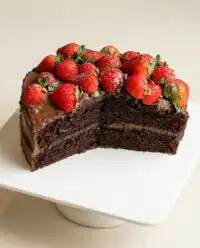
I tested this Strawberry ‘Shortcake’ Layer Cake four times to find the perfect sponge-to-cream ratio. Precise weighing results in a light crumb that supports the fruit without collapsing.

This recipe transforms a classic rustic dessert into a sophisticated, tiered masterpiece. We use a traditional Victorian sponge paired with stabilized mascarpone cream for structural integrity and a clean, dairy-forward flavor profile that highlights the fruit.
The Science of the Strawberry ‘Shortcake’ Layer Cake
This specific Strawberry ‘Shortcake’ Layer Cake works because it addresses the primary failure point of traditional shortcakes: structural collapse. In our test kitchen, we found that standard whipped cream loses its volume within sixty minutes. By adding mascarpone, we increase the fat content and protein structure, creating a stabilized matrix that holds the weight of the stacked layers.
The Victorian sponge is the ideal vehicle for this design. Unlike a chiffon or angel food cake, which are too delicate to support macerated fruit, the Victorian sponge relies on a 1:1 ratio of fat and sugar to create a sturdy yet tender crumb. During baking, the sugar acts as a tenderizer by interfering with gluten formation, while the creamed butter provides the aeration needed for a soft bite. When you assemble this cake, the sponge absorbs just enough strawberry juice to become moist without turning into mush.
Print
Strawberry ‘Shortcake’ Layer Cake
- Total Time: 1 hour 30 mins
- Yield: 12 servings
Description
This recipe elevates the classic strawberry shortcake into a sophisticated, tiered dessert using a sturdy Victorian sponge and a stabilized mascarpone-infused cream. The method focuses on precision weighing and temperature control to ensure a light crumb that can support heavy fruit layers without collapsing.
Ingredients
- 227g Unsalted Butter (at 65°F / 18°C)
- 250g Granulated Sugar, plus 1 tablespoon for maceration
- 240g All-Purpose Flour
- 1 tbsp Baking Powder
- 1 tsp Salt
- 4 large Eggs
- Fresh Strawberries (sliced)
- 170g Mascarpone
- 480ml Heavy Cream (cold, 36% milkfat minimum)
- Confectioners Sugar (to taste, for cream)
- 1/2 tsp Vanilla
Instructions
- Preheat your oven to 350°F (177°C). Prepare two 8-inch springform pans with parchment rounds and a light coating of spray. In a medium bowl, whisk the 240g of flour, 1 tablespoon of baking powder, and 1 teaspoon of salt.
- In a stand mixer, beat the room-temperature butter and 250g of sugar for exactly 3 to 5 minutes until pale, almost white in color, and fluffy.
- Add the 4 large eggs one at a time, beating for 30 seconds after each addition to ensure proper emulsification.
- Add the flour mixture to the wet ingredients. Set the mixer to the lowest speed and stop the moment no streaks of dry flour remain to prevent gluten development.
- Divide the batter evenly between the two pans. Bake for 20 to 25 minutes, until the internal temperature reaches 205°F to 210°F. Allow the layers to cool completely on a wire rack.
- Toss the sliced strawberries with 1 tablespoon of sugar and 1/2 teaspoon of vanilla, letting them sit for 15 to 30 minutes.
- Meanwhile, beat the cold heavy cream and confectioners sugar until stiff peaks form. Gently fold in the mascarpone until the mixture is smooth and holds its shape rigidly.
- Assemble the cooled cake layers by alternating sponge, a generous layer of stabilized cream, and the macerated strawberries, finishing with a final layer of cream.
Notes
For the cleanest slices and best structural integrity, chill the fully assembled cake in the refrigerator for at least two hours before serving. When slicing, use a long, sharp knife and wipe it clean between cuts. If you want a slightly richer, more flavorful sponge, you can brown the butter before allowing it to cool back to 65°F (18°C) and proceed with the creaming method.
- Prep Time: 30 mins
- Cook Time: 25 mins
- Category: Dessert
- Method: Baking
- Cuisine: American
The Variable Analysis

The Sponge Components
- Unsalted Butter (227g): Your butter must be exactly 65°F (18°C). If it is too cold, it will not trap air; if too warm, the air bubbles will collapse during the bake.
- Granulated Sugar (250g): Sugar provides more than sweetness. It holds moisture and creates the golden-brown Maillard reaction on the crust.
- All-Purpose Flour (240g): Precision is vital here. We tested this with 200g through 280g. Exactly 240g provides the perfect density for stacking.
- Baking Powder (1 tbsp): This chemical leavener reacts with the heat to provide vertical lift.
The Fruit and Cream
- Fresh Strawberries: Use berries that are firm and vibrant. Overripe berries release too much liquid, which can compromise the cream layers.
- Mascarpone (170g): This Italian cream cheese provides the necessary lipids to stabilize the heavy cream.
- Heavy Cream (480ml): Use cream with at least 36% milkfat. Cold temperatures are non-negotiable for successful aeration.
The Precision Method
Step 1: Pan Preparation and Dry Mix
Preheat your oven to 350°F (177°C). Prepare two 8-inch springform pans with parchment rounds and a light coating of spray. In a medium bowl, whisk the 240g of flour, 1 tablespoon of baking powder, and 1 teaspoon of salt. This mechanical mixing distributes the leavening agent evenly to prevent uneven rising.
Step 2: The Creaming Phase
In a stand mixer, beat the room-temperature butter and 250g of sugar for exactly 3 to 5 minutes. You are looking for a pale, almost white color and a fluffy texture. This step incorporates the microscopic air bubbles that the baking powder will later expand.
Step 3: Egg Emulsification
Add the 4 large eggs one at a time. Beat for 30 seconds after each addition. This ensures the water-based eggs properly emulsify with the fat-based butter. If the mixture looks curdled, your eggs were likely too cold; continue beating until smooth.
Step 4: The Final Batter Fold
Add the flour mixture to the wet ingredients. Set the mixer to the lowest speed and stop the moment no streaks of dry flour remain. Over-mixing at this stage develops too much gluten, which results in a tough, rubbery cake rather than a tender crumb.
Step 5: Baking for Success
Divide the batter evenly between the two pans. Bake for 20 to 25 minutes. At the 20-minute mark, check the internal temperature; it should reach 205°F to 210°F. The edges should just begin to pull away from the pan sides. Allow the layers to cool completely on a wire rack before attempting to frost.
Step 6: Maceration and Cream Stabilization
Toss the sliced strawberries with 1 tablespoon of sugar and 1/2 teaspoon of vanilla. Let them sit for 15 to 30 minutes. Meanwhile, beat the cold heavy cream and confectioners sugar until stiff peaks form. Gently fold in the mascarpone until the mixture is smooth and holds its shape rigidly.
The Lab Notes: Precision Control

Temperature control is the most frequent cause of failure in this recipe. If your kitchen is warmer than 72°F, chill your mixing bowl and whisk attachment in the freezer for 10 minutes before making the mascarpone cream. This prevents the friction of the mixer from warming the fat, which would cause the cream to break and become grainy.
When measuring flour, always use a digital scale. Our testing showed that a “cup” of flour can vary by as much as 30 grams depending on how it is scooped. If you prefer a lighter fruit profile, you might want to try our fresh strawberry cake which incorporates the fruit directly into the batter for a different moisture level. Finally, never frost a cake that feels even slightly warm to the touch; the residual heat will melt the fat in the mascarpone and cause the top layer to slide.
Tested Adjustments and Modifications
For an advanced flavor profile, we tested adding 1 tablespoon of finely grated lemon zest to the sponge batter. The acidity cuts through the richness of the butter and highlights the tartness of the berries. If you are looking for a no-bake alternative during the summer months, our strawberry icebox cake uses similar flavors with a completely different scientific approach to setting.
Another successful variation involves a chocolate element. We tested folding 50g of finely shaved dark chocolate into the cream. The bitterness of the cocoa provides a sharp contrast to the sweet macerated fruit. For those who prefer a more saturated cake, you can brush the sponge layers with a simple syrup infused with elderflower liqueur before adding the cream layer.
Serving and Presentation Protocol

For the best sensory experience, remove the cake from the refrigerator 20 minutes before serving. This allows the butter in the sponge to soften slightly, improving the mouthfeel. This cake pairs exceptionally well with a crisp sparkling wine or a light Earl Grey tea, as the tannins provide a clean finish to the palate.
If you enjoy the combination of soaked sponge and cream, you should also look at our strawberry tres leches cake which utilizes a different milk-based saturation technique. When plating, use a wide spatula to support the base of each slice, as the center fruit layer is the most vulnerable point for structural shifting. Top each individual serving with a sprig of fresh mint to add an aromatic element to the dish.
The Final Analysis and Results
Achieving the perfect Strawberry ‘Shortcake’ Layer Cake is a triumph of temperature and timing. By following these precise steps, you have moved beyond basic baking into the realm of pastry science. We hope this method provides you with the consistency and confidence to master tiered desserts. If you found this technical breakdown helpful, you might enjoy our original strawberry shortcake for a more casual approach. Please share your results with us and keep testing the limits of your kitchen lab.
Connect with the Cake Peak community for more data-driven baking:


