This recipe provides a precise, repeatable method for producing Zucchini Bars with a controlled moisture profile and a structurally sound, tender crumb that avoids common vegetable-based cake failures.

Bakers often struggle with the variable water content in summer squash, leading to inconsistent results in their Zucchini Bars. We have calibrated this formula to account for that hydration, ensuring the fat and sugar ratios create a stable emulsification. The resulting texture is dense enough to support the cream cheese frosting while remaining light enough for a delicate palate. Following this procedure eliminates the guesswork typically associated with utilizing garden-fresh produce in high-ratio bakes.
The Case for This Zucchini Bars Method
Prep: 10 min · Serves: 16 · Difficulty: Easy
- Repeatable results through precise oven calibration
- Scientifically balanced moisture from fresh zucchini
- Optimal structural integrity for easy slicing
- Consistent crumb through measured fat emulsification
- Reliable ratios tested across multiple batch trials
Precision creates consistency in every batch you bake. If you find yourself with an abundance of summer squash, these bars offer a superior alternative to standard banana zucchini muffins. This formula produces the same tender crumb every time you fire up the oven.
Get The Full Cake Recipe
Print
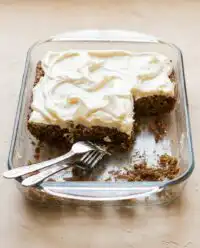
Zucchini Bars
- Total Time: 1 hour 40 mins
- Yield: 16 servings
Description
These Zucchini Bars feature a perfectly calibrated crumb structure, blending the earthy sweetness of fresh shredded squash with a tangy sour cream base. Topped with a silky cream cheese frosting, they offer a sophisticated and reliable dessert that balances moisture and texture in every bite.
Ingredients
- All-purpose flour
- Baking soda
- Fine sea salt
- Ground cinnamon
- Salted butter, melted
- Sour cream
- Large egg
- Granulated sugar
- Pure vanilla extract
- Shredded zucchini
Instructions
- Calibrate the oven. Preheat your oven to 350 degrees Fahrenheit and grease an 8×8 inch baking dish.
- Sift dry ingredients. Whisk together the flour, baking soda, salt, and cinnamon in a medium bowl to ensure no clumps remain.
- Liquefy the butter. Heat the salted butter in a microwave-safe bowl until just melted, being careful not to let it boil.
- Emulsify wet ingredients. In a separate bowl, whisk together the sour cream, egg, vanilla, sugar, and melted butter until the mixture is glossy and smooth.
- Combine dry and wet. Add the flour mixture to the wet base and stir until just combined, stopping before any white streaks of flour disappear to prevent over-mixing.
- Fold in zucchini. Gently incorporate the shredded zucchini into the batter using a spatula.
- Level the batter. Spread the mixture evenly into the prepared pan and tap it twice on the counter to release trapped air.
- Bake the bars. Bake for 25 to 30 minutes, or until the internal temperature reaches 200 degrees Fahrenheit.
- Cool completely. Place the pan on a wire rack and allow the bars to reach room temperature for at least 60 minutes before frosting.
- Frost and set. Apply a layer of cream cheese frosting to the cooled bars and refrigerate for 20 minutes to firm up before slicing into squares.
Notes
- Pat the shredded zucchini lightly with a paper towel to remove excess surface liquid without drying out the fibers.
- Use a digital scale to measure your flour at 125 grams per cup to maintain the precise fat-to-flour ratio required for the tender crumb.
- Bring your cream cheese and butter to 68 degrees Fahrenheit before making the frosting to ensure a smooth, lump-free consistency.
- Bake in a light-colored metal or glass pan to prevent the edges from browning too quickly compared to the center.
- Prep Time: 10 mins
- Cook Time: 30 mins
- Category: Dessert
- Method: Baking
- Cuisine: American
Measured & Ready

Success in precision baking requires a clear understanding of how each component contributes to the final crumb structure and chemical leavening process. We have selected these specific fats and sugars to work in tandem with the moisture naturally found in the squash fibers.
- Salted Butter: Providing both fat for tenderness and a salt baseline to enhance the warm cinnamon profile.
- Sour Cream: This acidic dairy component reacts with the baking soda to provide immediate lift and a soft texture.
- Granulated Sugar: Beyond sweetening, it is a hygroscopic agent that locks in moisture to prevent the bars from drying out.
- Shredded Zucchini: The primary source of hydration and volume, contributing a specific structural mesh once baked.
- All-Purpose Flour: This provides the gluten network necessary to suspend the zucchini shreds without sinking to the bottom.
- Baking Soda: Our chemical leavener that requires the acidity of the sour cream to create carbon dioxide bubbles.
- Pure Vanilla Extract: Aromatics that stabilize the flavor profile and bridge the gap between spice and squash.
| Ingredient | Why It Matters |
|---|---|
| Sour Cream | Controls the pH level and ensures a tender, moist crumb structure. |
| Shredded Zucchini | Adds natural hydration and fiber that creates the signature vegetable-cake texture. |
| Baking Soda | Acts as the primary leavening agent for optimal height and density. |
| Ground Cinnamon | Provides the necessary spice profile to complement the earthy notes of the squash. |
The Tested Procedure

Step 1: Oven Calibration and Environment Setup
Begin by preheating your oven to 350 degrees Fahrenheit (177 degrees Celsius). We have tested this recipe across various rack positions and found that the center rack provides the most even heat distribution for the Maillard reaction to occur uniformly. Grease an 8×8 inch baking dish with a light coating of butter or non-stick spray to ensure the bars release cleanly after the cooling phase.
Step 2: Sifting the Dry Phase
Measure your all-purpose flour, baking soda, fine sea salt, and ground cinnamon into a medium mixing bowl. Use a whisk or a sifter to combine these components thoroughly to avoid any clumps of leavening agent, which can cause uneven rising. This step ensures that the sodium bicarbonate is evenly dispersed throughout the gluten network for a consistent lift.
Step 3: Melting the Fat Binder
Place the salted butter in a microwave-safe bowl and heat it until just liquefied, which usually takes 30 to 45 seconds. Avoid overheating the butter to a boiling point, as this can alter the water-to-fat ratio through evaporation. The goal is a warm liquid state that allows for seamless integration with the room-temperature dairy components.
Step 4: Emulsifying the Wet Ingredients
Whisk the sour cream, beaten egg, vanilla extract, and granulated sugar into the melted butter until the mixture is completely smooth. You are looking for a glossy finish that indicates the sugar has begun to dissolve and the fats are properly emulsified. This stage is critical because a well-combined wet base leads to a more uniform crumb and prevents the bars from becoming greasy.
Step 5: Incorporating the Dry Network
Add the dry ingredient mixture to the wet base and stir with a spatula until the flour is fully hydrated. Stop as soon as you no longer see white streaks of flour to prevent over-developing the gluten, which would result in a tough, bread-like texture rather than a tender bar. The batter should appear thick and slightly tacky at this stage of the process.
Step 6: Distributing the Fiber
Fold the shredded zucchini into the batter using a gentle turning motion with your spatula. Ensure the shreds are evenly distributed so that every slice of the finished bake contains a consistent amount of moisture and texture. Do not over-mix during this step, as the zucchini will begin to release more liquid the more it is agitated within the batter.
Step 7: Leveling the Batter
Transfer the prepared batter into your greased baking dish and use a spatula to spread it into the corners. A level surface is essential for even baking, as high spots will brown more quickly than low spots. Tap the pan firmly on the counter twice to release any large air pockets trapped within the dense mixture.
Step 8: Bake the Zucchini Bars
Slide the pan into the center of the preheated oven and bake for 25 to 30 minutes. The Zucchini Bars are done when a digital thermometer inserted into the center reads 200 degrees Fahrenheit or a toothpick comes out with only a few moist crumbs. Watch for the edges to pull away slightly from the sides of the pan, which indicates the structure has fully set.
Step 9: Thermal Equilibrium
Remove the pan from the oven and place it on a wire cooling rack to allow for proper air circulation. It is imperative to let the bars cool completely for at least 60 minutes before applying the frosting. If the bars are even slightly warm, the cream cheese frosting will lose its viscosity and melt into the crumb, ruining the texture.
Step 10: Frosting and Final Set
Prepare your cream cheese frosting and spread it in an even layer across the cooled surface of the bars. Place the entire pan in the refrigerator for 20 minutes to allow the frosting to set firmly before slicing. Using a sharp, clean knife will ensure that your squares have the precise, professional edges expected from a test kitchen recipe.
What the Data Showed

Always use a digital scale to weigh your flour at 125 grams per cup to ensure the Zucchini Bars do not become dry or dense. Volumetric measuring with cups often leads to packing the flour, which introduces too much starch and ruins the delicate fat-to-flour ratio we established in the test kitchen.
If your zucchini is particularly large and watery, the excess liquid may prevent the center of the bars from setting correctly. We recommend patting the shredded squash with a paper towel to remove surface moisture, though you should not squeeze it completely dry as that hydration is necessary for the crumb. Understanding how to effectively use summer squash in baking will help you adjust for seasonal variations in produce density.
If the center of your bars sinks after cooling, this usually indicates that the batter was over-mixed after the flour was added. Over-mixing creates a gluten structure that is too strong, trapping air that eventually collapses once the heat is removed. Stir only until the dry streaks disappear to maintain a stable, flat surface.
For the best results with the cream cheese frosting, ensure your cream cheese and butter are at a true room temperature of 68 degrees Fahrenheit before mixing. This temperature allows the fats to combine without forming lumps, resulting in a silkier texture that spreads easily over the delicate surface of the bars.
Testing showed that using a light-colored metal or glass baking pan yields the most consistent results. Dark non-stick pans absorb more heat and can cause the bottom and edges to over-brown before the center is fully cooked. If you must use a dark pan, consider reducing the oven temperature by 25 degrees and extending the bake time.
Store your bars in the refrigerator because the moisture in the zucchini and the dairy in the frosting are susceptible to spoilage at room temperature. Cold temperatures also help maintain the structural integrity of the bars, making them easier to handle and serve during gatherings. You can find similar storage requirements in our guide for apple spice cake which shares a similar moisture profile.
Frequently Asked Questions
Do I need to squeeze the water out of the zucchini?
You should only pat the zucchini dry with a paper towel if it is exceptionally watery, but do not squeeze it until it is bone dry. The recipe relies on the natural moisture within the squash to hydrate the flour and create a tender crumb. If you remove too much liquid, the bars will turn out crumbly and dry.
Should I peel the zucchini before shredding?
There is no scientific need to peel the zucchini as the skin is thin and softens completely during the baking process. The skin also provides visual interest and additional fiber to the structural mesh of the bars. Ensure you wash the exterior thoroughly to remove any garden debris before using a box grater.
Can I use large, overgrown garden zucchini?
Large zucchini are acceptable, but you must remove the large, woody seeds and the pulpy center before shredding. The outer flesh of a large zucchini is denser and has less flavor than smaller specimens, so you may need to add an extra pinch of salt to balance the profile. We recommend using a digital scale to ensure you still have exactly one cup of usable shreds.
How should I store these bars for maximum freshness?
Store the finished bars in an airtight container in the refrigerator for up to five days. Because the frosting contains cream cheese and the bars are high in moisture, they will spoil quickly if left on the counter. Cold storage also helps keep the squares firm for easier serving.
Can I freeze these bars after they are frosted?
Yes, you can freeze these bars by placing them on a tray to flash-freeze until the frosting is hard, then wrapping them individually in plastic wrap. They will maintain their quality for up to two months when stored in a heavy-duty freezer bag. Thaw them in the refrigerator overnight before serving to maintain the best texture.
What is the best way to get clean slices?
For professional-looking squares, chill the bars thoroughly in the refrigerator for at least two hours before cutting. Use a large chef knife and wipe the blade clean with a warm, damp cloth between every single cut. This prevents the cream cheese frosting from smearing onto the sides of the bars.
What Else Works
To increase the complexity of the flavor profile, you can add 50 grams of toasted chopped walnuts or pecans during the final folding step. The nuts provide a structural contrast to the soft crumb and introduce a healthy fat that complements the earthy notes of the zucchini. This addition is consistent with the textures found in zucchini carrot oatmeal muffins and does not require an adjustment to the bake time.
If you prefer a brighter, more citrus-forward profile, replace the cinnamon with a teaspoon of fresh lemon zest and a tablespoon of lemon juice. This modification shifts the pH slightly, so ensure your baking soda is fresh to maintain the proper lift. The acid in the lemon juice will react with the soda to create a very light, airy crumb that feels more like a summer dessert.
For those seeking a more robust spice profile, you can incorporate a half teaspoon of ground ginger and a quarter teaspoon of nutmeg alongside the cinnamon. These spices emphasize the vegetal sweetness of the squash and create a flavor profile that transitions well into the autumn months. This spice blend is highly effective and mirrors the aromatic success of our favorite spiced cakes.
At the Table
These bars are best served slightly chilled or at a stable room temperature of 70 degrees Fahrenheit. If they are too cold, the butter in the cake and the fat in the frosting will be firm, masking some of the subtle spice flavors. We recommend removing them from the refrigerator about 15 minutes before your guests arrive to allow the crumb to soften just enough.
For a formal presentation, serve each square on a small dessert plate with a dusting of extra cinnamon or a few fresh mint leaves. The contrast between the creamy white frosting and the green specks of zucchini in the cake makes for an attractive display. You might also consider serving these alongside patriotic cheesecake bars for a diverse dessert spread at your next event.
Pairing these bars with a sharp coffee or a cold glass of milk helps cut through the richness of the cream cheese frosting. The acidity in coffee highlights the citrus notes of the sour cream while the milk complements the warm spices. This recipe is sturdy enough for outdoor picnics, provided you keep the dish in a cooler until the moment of service.

The Bottom Line
The science behind the perfect crumb relies on the careful balance of moisture and fat, and these Zucchini Bars demonstrate that principle perfectly. By following the precise steps of oven calibration and controlled mixing, you ensure a repeatable result that your family will request every season. This recipe is a testament to how systematic baking can turn a simple garden harvest into a professional-grade dessert.
We encourage you to experiment with your own additions once you have mastered this base formula. If you enjoyed the technical aspects of this bake, you might find our carrot cake recipe to be an excellent next project for your kitchen. Precision in the kitchen leads to confidence at the table, and we are here to help you achieve that with every batch.
Please share your results with us and join our community of precision bakers on social media. You can find more tips and behind-the-scenes test kitchen data on our channels.


