Come on into my kitchen, pull up a chair, and let us talk about a birthday tradition that is as sweet as a summer afternoon on the porch.

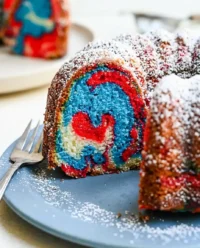
This Smash Cake Made from Watermelon is the perfect way to celebrate your little one’s first big milestone without a mountain of sugar. I have spent years perfecting a crumb that is tender enough for tiny hands while holding its shape for those precious photos. It combines the soulful warmth of a Southern kitchen with the professional technique needed for a beautiful presentation. Every layer of this treat is designed to offer that gentle, soft bite that makes a baby’s first taste of cake a memory to cherish forever.
Why This Smash Cake Made from Watermelon Earns Its Place
Prep: 60 min · Serves: 6 · Difficulty: Medium
- A crumb so tender it melts.
- Wholesome alternative to traditional sugary treats.
- Bright colors that pop in photos.
- Simple method for a professional result.
- Southern charm in every single bite.
This smash cake is the recipe my family requests for every first birthday celebration because it brings folks together beautifully.
Love is the most important ingredient.
Get The Full Cake Recipe
Print
Smash Cake Made from Watermelon
- Total Time: 85 mins
- Yield: 6 servings
- Diet: Vegetarian
Description
Create a festive and baby-friendly birthday milestone with this delightful watermelon-inspired smash cake. Featuring layers of tender, vibrant cake and smooth buttercream, this wholesome treat is designed for little hands to explore and enjoy.
Ingredients
- Butter
- All-purpose flour
- Baking powder
- Milk
- Vanilla extract
- Sugar
- Eggs
- Gel food coloring (green, pink, black)
- Powdered sugar
Instructions
- Preheat and prep. Preheat your oven to 350 degrees and grease three small pans with butter and flour.
- Cream the butter. Beat room-temperature butter and sugar together for five minutes until the mixture is fluffy and pale.
- Mix dry ingredients. Whisk flour and baking powder in a separate bowl until fully combined.
- Combine batter ingredients. Add eggs and vanilla to the butter mixture, then alternate adding dry ingredients and milk until smooth.
- Color the batter. Tint one-third of the batter green and the remaining two-thirds pink using gel food coloring.
- Prepare the pans. Pour green batter into one pan and pink batter into the other two, tapping firmly to release air bubbles.
- Bake and cool. Bake for 25 minutes, then cool in pans for ten minutes before transferring to a wire rack.
- Trim the layers. Level the domed tops and trim the browned edges once the cakes are firm from the freezer.
- Prepare the frosting. Beat butter with powdered sugar, milk, and vanilla until light, airy, and spreadable.
- Assemble and decorate. Stack the layers with frosting in between, then pipe pink swirls and add black icing seeds to complete the look.
Notes
- Use room temperature eggs to ensure the batter emulsifies properly and rises effectively.
- Measure flour by spooning it into the cup rather than scooping directly to avoid a dense, dry cake.
- Chill the baked layers in the freezer for one hour before trimming to achieve sharp, professional edges.
- Dip your knife in hot water and wipe dry between slices for a perfectly clean presentation.
- Gel food coloring is essential to maintain the structural integrity of your batter compared to liquid dyes.
- Prep Time: 60 mins
- Cook Time: 25 mins
- Category: Dessert
- Method: Baking
- Cuisine: Southern
The Building Blocks

We start with a few humble pantry staples to create something truly magical for your baby’s big day. Each component plays a specific role in ensuring the texture is soft enough for a first taste while remaining sturdy enough for little fingers to explore. Choosing high-quality ingredients ensures the flavor is as clean and honest as the celebration itself.
- Butter: This provides the essential fat for a rich flavor and a soft, yielding texture.
- Flour: All-purpose flour gives us the structure needed to hold the weight of the frosting.
- Baking Powder: This is our leavening agent that creates a gentle, airy rise.
- Milk: It adds necessary moisture and helps create a smooth, pourable batter.
- Vanilla Extract: A classic Southern flavor that provides a warm, inviting aroma.
- Sugar: Just enough to sweeten the day without being overwhelming for a little one.
- Food Coloring: Gel colors work best to achieve those cheerful watermelon-inspired shades.
| Ingredient | Why It Matters |
|---|---|
| Butter | Creates a soft, velvety crumb structure |
| Baking Powder | Ensures the cake is light and airy |
| Milk | Keeps the layers moist and tender |
| Vanilla | Adds a comforting, nostalgic aroma |
Walking Through the Bake

Step 1: Creaming the Base
Start by preheating your oven to 350 degrees and greasing your three small pans with a bit of butter and flour. In a large bowl, cream together your room-temperature butter and sugar until the mixture looks pale yellow and fluffy. This process usually takes about five minutes with a hand mixer to ensure you have incorporated enough air for a light texture. When the mixture clings to the side of the bowl in soft peaks, you know you have achieved the right consistency.
Step 2: Mixing the Dry Ingredients
In a separate medium bowl, whisk together your flour and baking powder until they are fully combined. I prefer to sift my flour when making a cake for a baby to ensure there are no lumps that might disrupt the delicate crumb. This step is vital because even distribution of the baking powder means your layers will rise evenly in the oven. You should see a uniform, powdery texture that feels light to the touch before moving on to the next phase.
Step 3: Integrating the Batter
Slowly add your eggs and vanilla extract to the creamed butter, mixing well after each addition to keep the emulsion stable. Alternate between adding your dry ingredients and the milk, starting and ending with the flour mixture. This traditional method prevents the batter from curdling and ensures a smooth, silky finish that pours easily into your pans. You are looking for a batter that falls off the spoon in a steady, thick ribbon without any visible streaks of flour.
Step 4: Coloring Your Smash Cake Made from Watermelon
Separate about one-third of your batter into a smaller bowl and add a few drops of green gel food coloring. Stir it gently until the color is uniform, resembling the deep, lush green of a summer watermelon rind. To the remaining two-thirds of the batter, add pink food coloring until you reach a bright, cheerful shade that looks like the sweet fruit inside. Using gel rather than liquid coloring helps maintain the integrity of the batter while providing a much more vivid and beautiful result.
Step 5: Preparing the Pans
Pour the green batter into one of your prepared five-inch pans and divide the pink batter between the other two pans. Tap the pans firmly on the counter a few times to release any trapped air bubbles that could cause holes in the finished cake. This ensures that every slice has that perfect crumb we are aiming for, with no large gaps or uneven sections. Your pans should be filled about two-thirds of the way to allow plenty of room for the cake to rise without spilling over.
Step 6: Baking and Cooling
Slide your pans into the center of the oven and bake for about twenty-five minutes, or until the centers spring back when lightly touched. You can also insert a wooden tester; if it comes out clean with just a few moist crumbs, the cakes are ready to be removed. Allow them to sit in the pans for ten minutes before turning them out onto a wire rack to cool completely. I find that wrapping the cooled cakes in plastic and letting them rest in the freezer for an hour makes them much easier to handle.
Step 7: Trimming for Precision
Once the cakes are firm from the freezer, use a long serrated knife to carefully trim the domed tops until they are perfectly flat. You also want to trim the outer edges of each layer to remove the browned bits and reveal the bright green and pink colors inside. This step is what separates a home-style bake from a professional-looking centerpiece, giving you those clean lines that look so beautiful in photos. Take your time with this, as a level cake is the foundation of a stable and successful assembly.
Step 8: Preparing the Buttercream
In your clean mixing bowl, beat the remaining butter until it is smooth and creamy before slowly adding your powdered sugar. Add a splash of milk and your vanilla, then continue beating until the frosting is light, airy, and holds its shape on a spatula. If the icing feels too soft, you can add a bit more sugar or let it chill in the refrigerator for a few minutes. You want a consistency that is easy to pipe but firm enough to stay exactly where you put it on the cake.
Step 9: Frosting and Decorating
Place your green layer on a cake board and spread a generous amount of pink frosting over the top to act as the filling. Stack your pink layers on top, ensuring everything is centered and straight before you begin the final decoration. Use a piping bag fitted with a star tip to create beautiful swirls of pink frosting across the top and sides of the cake. This textured look is very forgiving for beginners and provides a wonderful sensory experience for a baby during their first smash session.
Step 10: Seeding the Watermelon
Mix a small amount of black food coloring into a portion of your remaining frosting to create the ‘seeds’ for your watermelon theme. Use a small round tip or a plastic bag with a tiny corner snipped off to place small dots of black icing across the pink swirls. I like to use a toothpick to gently shape these dots so they look just like real seeds while remaining completely safe for a baby to eat. Wipe your tools frequently during this process to ensure the black icing stays precisely where you want it without smearing.
What I’ve Learned the Hard Way

When working with fresh fruit baking techniques or themes, temperature is your most important ally in the kitchen. If your butter is too cold, it will not cream properly with the sugar, leading to a dense and heavy cake rather than the light crumb we desire.
If your buttercream starts to look curdled or grainy, here is why and how to fix it: this usually happens when your milk or butter are different temperatures. Simply continue beating the mixture at a high speed for several minutes, or gently warm the bottom of the bowl with a warm cloth to help the fats emulsify properly.
I always recommend using gel-based food coloring for this project because liquid colors can thin out your batter and affect the final rise. You can find high-quality watermelon themed birthday celebration inspiration to see how different shades of pink and green can change the entire look of your party table.
To get the cleanest cuts when you eventually slice into the cake, use a knife dipped in hot water and wiped dry between every single pass. This prevents the frosting from sticking to the blade and ensures the beautiful green and pink layers remain distinct and sharp.
Always measure your flour by spooning it into the measuring cup and leveling it off with a knife rather than scooping directly from the bag. Scooping packs the flour down, which can lead to using up to twenty percent more than the recipe requires, resulting in a dry and crumbly cake.
Make sure your eggs are at room temperature before you begin mixing them into your creamed butter and sugar. Cold eggs can cause the butter to seize up and clump, which ruins the smooth texture of your batter and prevents the cake from rising as high as it should.
Frequently Asked Questions
How to make a watermelon cake for a baby?
To make a cake that looks like a watermelon for a baby, start by coloring your batter with food-safe gel colors to represent the rind and the fruit. Use three small pans to create manageable layers that are easy for a little one to handle. Stick to a simple vanilla buttercream for the decoration, using black icing dots to safely represent the seeds without using hard candies or small hazards.
What is watermelon smash?
A watermelon smash is a fun birthday tradition where a baby is given a watermelon-themed cake or a carved real watermelon to play with and eat. It provides a wonderful sensory experience for the child and a great photo opportunity for the parents. Using a cake instead of real fruit allows for a more traditional birthday feel while keeping the theme intact.
What is a smash cake made of?
A smash cake is typically made from a soft sponge or butter cake base that is easy for a baby to break apart with their hands. It is often covered in a generous layer of soft frosting that makes the ‘smashing’ part of the tradition more messy and fun. The ingredients are usually kept simple to ensure they are gentle on a young child’s digestive system.
How to make a cake with a watermelon?
While some people carve an actual watermelon into a cake shape, this recipe uses traditional cake batter to mimic the look of the fruit. By layering green cake on the bottom and pink cake on top, you create a visual representation of a watermelon slice. This method provides the familiar texture of a birthday treat while staying true to the refreshing summer theme.
Can I make this cake ahead of time and freeze it?
Yes, you can certainly bake the cake layers up to a week in advance, wrap them tightly in plastic, and store them in the freezer. Freezing the layers actually makes the trimming and frosting process much easier because the cake is firmer and produces fewer crumbs. Just be sure to let the fully decorated cake thaw in the refrigerator for several hours before the party starts.
What if my baby has a dairy sensitivity?
You can easily adapt this recipe by substituting the butter with a high-quality plant-based baking stick and using almond or oat milk in place of dairy milk. Ensure your chosen substitutes are suitable for baking to maintain the structure of the cake. The results will still be tender and delicious, allowing every child to enjoy their special first birthday treat safely.
Ways to Switch It Up
If you want a taller and more dramatic look for your photos, you can easily create a two layer smash cake by doubling the pink batter recipe. This allows you to stack more layers while keeping the footprint small enough for a high chair tray, which is often the best place for a baby to enjoy their first taste.
For families who prefer to avoid food coloring, you can use natural powders like beet root for the pink sections and matcha or spinach powder for the green base. While the colors may be slightly more muted, the earthy tones offer a beautiful, rustic Southern appeal that fits perfectly with an outdoor garden party or a reunion under the shade trees.
Another wonderful option is to add miniature chocolate chips to the pink batter before baking to act as the seeds inside the cake. Just be sure to use the tiny chips so they do not pose a choking hazard for the little one, and remember that they will sink to the bottom if the batter is too thin.
Pairing & Presentation
Serving this cake Southern-style means placing it on a vintage birthday cake stand that has been passed down through your family. I like to surround the base of the stand with real slices of cold watermelon to reinforce the theme and provide a healthy snack for the adult guests. This creates a beautiful centerpiece that feels both professional and deeply personal for your child’s big day.
For the best photos, set the cake in a well-lit area near a window about thirty minutes before the smashing begins. This allows the buttercream to soften slightly so that it is easier for the baby to dig in and get messy. Have a few damp, warm washcloths nearby to help with the cleanup, as the pink and green frosting can be quite colorful once it gets on little cheeks and fingers.
Pair the cake with some cold sweet tea for the adults and perhaps some fresh fruit skewers to keep the summer theme going. The goal is to create an atmosphere of front-porch hospitality where every guest feels like part of the family. Whether you are in a backyard or a church hall, the sight of a happy baby enjoying their first cake is sure to bring a smile to everyone’s face.

The Last Word
Creating a memory like this for your child is one of the greatest joys of being a parent and a baker. This cake with fruit theme is more than just a recipe; it is a way to celebrate a beautiful new life with something made by hand and heart. I hope you find as much happiness in the baking as your little one finds in the smashing.
Please share your beautiful creations with our community and let us know how your celebration turned out. There is nothing I love more than seeing these cakes bring families together for such a special milestone. From my kitchen to yours, may your day be filled with laughter and plenty of sweet moments.


