Growing up in the heart of Virginia, birthday celebrations were always marked by the sweet aroma of butter and sugar wafting through our home. My mama believed that a homemade cake was the ultimate way to show someone they were cherished, and she never missed a chance to create something special. This Minion Cake is a modern tribute to those childhood memories, combining that classic Southern love for a moist, tender crumb with a playful design that brings folks together around the table.

Creating this whimsical dessert is all about finding that perfect balance between professional precision and home-baked heart. We use a rich chocolate base paired with a velvety Nutella filling to make sure every bite is just as delicious as the cake is cute. It is a reliable recipe that has become a favorite for family gatherings, proving that you are never too old to enjoy a bit of edible sunshine on your plate.
Why This Minion Cake is a Southern Winner
There is something truly joyful about a cake that makes people smile before they even take their first bite. This recipe isn’t just about the looks; it is about the deep, chocolatey goodness and the unmistakable quality of a cake made from scratch. Y’all are going to love the way the moist crumb melts in your mouth, a hallmark of the Southern baking traditions I hold dear.
What makes this a real winner is the combination of textures. The thick, creamy butter frosting provides a beautiful canvas for the decorations, while the hidden layer of Nutella adds a surprising depth of flavor. It is a celebration cake that feels both nostalgic and fresh, perfect for making memories that will last long after the final crumbs are gone.
Print
Minion Cake
- Total Time: 1 hour 25 mins
- Yield: 12 servings
- Diet: Vegetarian
Description
This festive Minion Cake features a rich, moist chocolate base layered with a creamy Nutella filling and decorated with vibrant vanilla buttercream. It is a whimsical dessert that combines classic Southern baking traditions with a playful character design, making it the perfect centerpiece for any celebration.
Ingredients
- 2 cups all-purpose flour
- 1 teaspoon baking powder
- 1/2 teaspoon salt
- 1 cup unsalted butter, softened
- 2 cups granulated sugar
- 4 large eggs
- 2 teaspoons vanilla extract
- 3/4 cup Dutch-processed cocoa powder
- 1 cup whole milk
- 1/2 cup Nutella
- 3 sticks unsalted butter, softened (for frosting)
- 5 cups powdered sugar
- 1 tablespoon vanilla extract
- Yellow and blue gel food coloring
- White and chocolate melts
- Chocolate kisses
- Circular cookies
- Silver sprinkles
Instructions
- Preheat your oven to 350 degrees F and line a 9×13 inch pan with foil, ensuring there is enough overhang to lift the cake out later.
- Whisk together the flour, baking powder, and salt in a medium bowl until combined.
- In a stand mixer, cream the softened butter and sugar for five minutes until the mixture is pale and fluffy.
- Add the eggs one at a time, followed by the vanilla extract and cocoa powder, mixing until smooth.
- Alternately add the flour mixture and milk to the batter in three parts, beginning and ending with the flour.
- Pour the batter into the prepared pan and bake for 35 to 40 minutes, or until a toothpick comes out clean.
- Allow the cake to cool completely on a wire rack before lifting it out and cutting it lengthwise into two long rectangles.
- Prepare the frosting by beating 3 sticks of butter with powdered sugar and vanilla until it holds a stiff peak.
- Mix one cup of the white frosting with the Nutella and spread it generously between the two cake layers before stacking them.
- Tint the remaining frosting yellow and blue; cover the cake in a yellow base coat and use the blue for the overalls at the bottom.
- Apply the final details using chocolate kisses for buttons, cookies for eyes, and melted chocolate for the goggles and smile.
Notes
To ensure a perfectly smooth finish, allow your cake to chill in the refrigerator for at least 30 minutes after applying a thin crumb coat. This extra step prevents any dark chocolate crumbs from showing through your bright yellow frosting and creates a much cleaner surface for your character details.
- Prep Time: 45 mins
- Cook Time: 40 mins
- Category: Dessert
- Method: Baking
- Cuisine: American
The Foundation of a Perfect Party Cake

To get that signature Jesse Daniel Wiley crumb, we start with high-quality pantry staples that work together to create magic in the oven. Using room temperature butter and eggs is a non-negotiable step in my kitchen because it allows the batter to emulsify perfectly, resulting in a cake that is light yet substantial.
- Unsalted Butter: The backbone of both our cake and frosting, providing that rich, Southern flavor we all crave.
- Dutch-Processed Cocoa Powder: This gives our chocolate layers a deep, dark color and a smooth taste that isn’t too acidic.
- Nutella: A secret weapon for the filling that adds a nutty, chocolatey richness that pairs beautifully with the vanilla frosting.
- Gel Food Coloring: I always recommend gel over liquid for the yellow and blue shades to keep the frosting consistency thick and easy to work with.
- White and Chocolate Melts: These are essential for crafting the iconic Minion eye and goggles with a clean, professional finish.
Investing in a good set of silver sprinkles will also add that extra sparkle to the goggles, making the character really pop against the bright yellow frosting.
How to Create Your Own Minion Masterpiece
Step 1: Prep and Cream the Base
Start by preheating your oven to 350 degrees and lining your 9 x 13 pan with foil, making sure there is enough overhang to lift the cake out later. In a medium bowl, whisk together your flour, baking powder, and salt to remove any lumps. In your large stand mixer, cream the softened butter and sugar together for at least five minutes until the mixture is pale and fluffy—this is where we build the structure for that perfect crumb.
Step 2: Incorporate the Eggs and Flavor
Add your eggs one at a time, making sure to beat well after each addition so the batter stays smooth. Stir in the vanilla extract, and then mix in the cocoa powder until the color is deep and consistent. This slow, deliberate process is what I learned in culinary school to keep the batter from breaking, ensuring a moist final product.
Step 3: The Alternating Method
To maintain the best texture, add one-third of your flour mixture to the butter, followed by half of the milk. Repeat this process, ending with the final third of the flour. This alternating technique prevents the gluten from over-developing, which is the secret to a cake that is tender rather than tough. Pour the batter into your prepared pan and bake for 35 to 40 minutes until a toothpick comes out clean.
Step 4: Cooling and Shaping
Let the cake cool completely on a wire rack before you even think about frosting it. Once it is cool to the touch, use the foil handles to lift it out and cut it lengthwise down the middle. This gives us two long rectangles that we will stack to create the tall, cylindrical shape that defines our favorite yellow characters.
Step 5: Whip Up the Frosting
Beat your remaining three sticks of butter until they are smooth as silk. Gradually add the powdered sugar a half-cup at a time, mixing on low so you don’t end up in a sugar cloud. Once the frosting is thick and holds a peak, stir in the vanilla. Take out one cup of this white frosting and mix it with the Nutella to create your rich filling.
Step 6: Assembly and Base Coat
Spread that Nutella frosting generously between your two cake layers and stack them on a sturdy cake board. Set aside a small amount of white frosting and a cup of blue frosting, then tint the rest a vibrant, sunny yellow. Cover the entire cake in a smooth layer of yellow frosting, using an offset spatula to get those edges nice and crisp.
Step 7: Adding the Signature Details
Use your blue frosting to create the overalls on the bottom fourth of the cake, drawing a little scoop line first to guide your hand. Place the chocolate kisses as buttons on the pants. For the eye, frost a circular cookie with white frosting and top it with an upside-down chocolate kiss. Surround it with a ring of melted white chocolate and silver sprinkles to create the goggle effect.
Step 8: Final Touches
Use your melted chocolate melts to pipe the goggle strap around the head and outline the blue overalls for a clean, cartoon-like appearance. Add a little half-smile on one side of the face to give your Minion some personality. Let the cake set in a cool spot so the decorations stay perfectly in place for the big reveal.
Jesse’s Secrets for a Professional Finish

One of the most important moves you can make is to crumb coat your cake. After you stack the layers with the Nutella filling, spread a very thin layer of yellow frosting over the entire cake and pop it in the fridge for 20 minutes. This traps any stray crumbs and makes your final layer of frosting look smooth and professional. For more advice on creating beautiful party centerpieces, check out our celebration-design-studio for inspiration.
Another tip is to use a warm spatula when smoothing the final layer of yellow frosting. Dip your metal spatula in hot water, wipe it dry, and then glide it over the frosting. The slight heat helps melt the butter in the frosting just enough to create a glass-like finish that looks like it came straight from a bakery.
Classic Twists for Every Occasion
While the chocolate and Nutella combination is a crowd-pleaser, you can easily adapt this recipe to suit different tastes. If you prefer a lighter flavor, you can use our yellow-cake-chocolate-frosting as a base and simply swap the chocolate frosting for the colored vanilla version. It provides a classic, buttery taste that reminds me of the cakes at Virginia church potlucks.
For a summer celebration, consider adding a hint of lemon zest to the yellow frosting. This brightness cuts through the sweetness of the powdered sugar beautifully. You can also experiment with different Minion expressions by changing the shape of the piped chocolate mouth or adding two eyes instead of one for a different character look.
Serving Your Creation at the Table

This cake is a showstopper, so I always recommend presenting it on a simple white cake stand to let the colors really shine. When it is time to slice into it, use a sharp, thin knife dipped in warm water to get clean cuts through the layers and decorations. If you are looking for another fun party project, you might enjoy our lemon-rainbow-cake for your next big gathering.
I love serving this with a big pitcher of cold sweet tea or a scoop of vanilla bean ice cream. Since it is a rich cake, small slices usually do the trick, allowing everyone to enjoy the blend of chocolate and Nutella without it being too heavy. It is the perfect centerpiece for a birthday party where the goal is simply to bring folks together for a good time.
Bringing the Celebration Together
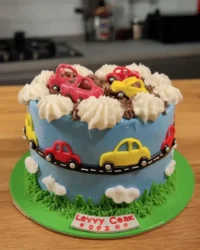
Baking this Minion Cake is such a wonderful way to bring a bit of Southern hospitality and joy into your home. It reminds us that the best part of any celebration is the love and care we put into the food we share with our family and friends. If you enjoyed this project, you might also want to try your hand at our car-cake for another themed adventure. For more decorating ideas, you can find great Minion Cake Inspiration from fellow bakers. Don’t forget to share your creations with our community on Pinterest, Instagram, and Facebook. Keep baking with heart, y’all!
