There is something truly grounding about the scent of dark cocoa blooming in hot water on a quiet Tuesday morning in the farmhouse. I remember watching my grandmother carefully sift her flour into a weathered wooden bowl, her hands steady and sure, proving that the most decadent treats often come from the simplest pantry staples. This Chocolate Truffle Cake is a tribute to those moments, where honest ingredients like farm-fresh sour cream and high-quality chocolate come together to create something far greater than the sum of its parts.

This particular recipe is a labor of love that rewards the patient baker with a texture that is both sturdy and ethereal. We start with a moist, dark base that has just enough crumb to support a thick, cloud-like layer of whipped chocolate ganache, all finished with a glossy glaze that catches the morning light. It is a cake designed for lingering at the table, sharing stories, and savoring the deep, natural bitterness of real cocoa balanced by a touch of sweetness.
A Celebration of Deep Cocoa and Rustic Texture
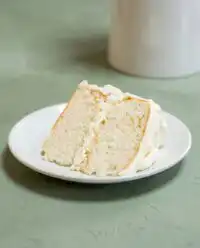
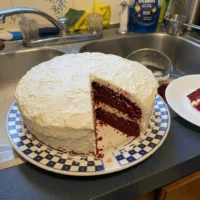
You will fall in love with this cake because it refuses to be just another sugary dessert; it is an experience in chocolate density and farmhouse charm. The base is an incredibly moist fudge cake that relies on sunflower oil and full-fat sour cream for a richness that stays fresh for days on the counter. Unlike over-refined cakes, this one embraces its rustic nature, with a slightly domed top that we level off to reveal a tight, dark crumb perfect for soaking up a bit of the truffle topping.
The whipped truffle layer is where the real magic happens, transforming heavy whipping cream and dark chocolate into a mousse that feels like silk on the tongue. It provides a cooling contrast to the dense cake below, making every bite feel balanced rather than heavy. Whether you are celebrating a harvest milestone or simply want to treat your family to something special, this cake brings a touch of professional grace to the warmth of your home kitchen.
Print
Chocolate Truffle Cake
- Total Time: 3 hours 30 mins
- Yield: 12 servings
- Diet: Vegetarian
Description
This decadent Chocolate Truffle Cake features a moist, dark fudge base topped with a cloud-like whipped chocolate ganache and a sleek glossy glaze. It is an elegant, farmhouse-style dessert that perfectly balances rich cocoa intensity with the tang of fresh sour cream.
Ingredients
- 1 ½ cups all-purpose flour
- ¾ cup Dutch-process cocoa powder
- 1 teaspoon baking powder
- 1 teaspoon baking soda
- 1 cup granulated sugar
- ½ teaspoon salt
- ½ cup sunflower oil
- 2 large eggs, well-beaten
- ½ cup full-fat sour cream
- 1 teaspoon vanilla extract
- ½ cup hot water
- 12 ounces dark chocolate (55-60%), chopped and divided
- 1 ½ cups heavy whipping cream (35%), divided
- 2 tablespoons honey or light corn syrup, divided
- 1 tablespoon cocoa powder
Instructions
- Preheat oven to 350°F (175°C) and grease a 9-inch round springform pan with parchment paper on the bottom.
- In a medium bowl, sift together flour, Dutch-process cocoa, baking powder, and baking soda; whisk in granulated sugar and salt.
- Whisk in sunflower oil, eggs, sour cream, and vanilla until thick, then slowly stir in hot water until the batter is smooth.
- Pour batter into the pan and bake for 20-25 minutes or until a skewer comes out clean; cool completely on a wire rack.
- Remove the cake from the pan, level the top with a serrated knife, and place it back into the springform pan.
- Prepare ganache by heating 1/2 cup cream and 1 tablespoon honey until simmering, then pouring over 6 ounces of chopped chocolate; whisk until smooth and let cool.
- In a chilled bowl, whip 1 cup of heavy cream and 1 tablespoon of cocoa powder to soft peaks, then gently fold into the cooled ganache.
- Spread the whipped truffle filling over the leveled cake and refrigerate for at least 2 hours to set.
- Melt the remaining chocolate, cream, and honey to create a glaze; pour over the chilled cake and return to the refrigerator until ready to serve.
Notes
To achieve the cleanest slices, use a sharp knife dipped in hot water and wiped dry between each cut. Ensure the ganache base is fully at room temperature before folding in the whipped cream to avoid deflating the mixture, which maintains the signature airy truffle texture.
- Prep Time: 30 mins
- Cook Time: 25 mins
- Category: Dessert
- Method: Baking
- Cuisine: American
From the Farmhouse Pantry

To achieve the best results, I always suggest looking for the freshest dairy you can find at your local market. High-quality fats are the backbone of this recipe, providing both the structure and the mouthfeel that define a true truffle experience.
- Dark Chocolate (55-60%): Choose a chocolate you enjoy eating on its own. The cocoa solids here provide the structural integrity for the truffle layer.
- Dutch-Process Cocoa Powder: This gives the cake its deep, almost black color and a smooth, mellow flavor that lacks the sharp acidity of natural cocoa.
- Full-Fat Sour Cream: This is my secret for a moist crumb. It adds a slight tang that cuts through the richness of the chocolate.
- Hot Water: Adding water just off the boil “blooms” the cocoa powder, releasing its full aromatic potential before it even hits the oven.
- Sunflower Oil: Unlike butter, oil keeps this cake incredibly soft even when it is served chilled from the icebox.
- Heavy Whipping Cream (35%): Look for a cream with high fat content to ensure your whipped truffle layer holds its peaks beautifully.
The Process of Crafting Perfection
Step 1: Prepare the Hearth
Preheat your oven to 350°F (175°C). Take a 9-inch round springform pan and line the bottom with a circle of parchment paper. I like to lightly grease the sides with a bit of softened butter to help the cake release cleanly once it has cooled. This preparation is the foundation of a successful bake.
Step 2: Whisk the Dry Ingredients
Into a medium-sized bowl, sift together your all-purpose flour, Dutch cocoa powder, baking powder, and baking soda. Sifting is a small step that makes a world of difference in the final texture. Whisk in the granulated sugar and a pinch of salt until the mixture is a uniform, sandy brown.
Step 3: Combine the Wet Elements
Add the sunflower oil, well-beaten eggs, full-fat sour cream, and vanilla extract to the dry mix. Begin whisking gently; the batter will be quite thick and stubborn at first. This is normal. Slowly pour in the hot water and continue whisking until the batter transforms into a smooth, pourable liquid that smells intensely of chocolate.
Step 4: The Initial Bake
Pour the batter into your prepared pan. Place it in the center of the oven and bake for 20 to 25 minutes. You will know it is ready when a wooden skewer comes out clean. If the top domes or cracks slightly, do not worry—that is just the rustic character of a good fudge cake. Let it cool completely on a wire rack right in the pan.
Step 5: Level and Reset
Once the cake is cool, remove it from the pan and peel away the parchment. Using a long serrated knife, carefully trim the domed top to create a flat, even surface. Return the cake to the springform pan. For a professional look, you can line the inside of the pan with a strip of parchment paper to help the truffle layer release with smooth edges.
Step 6: Melt the Ganache Base
Place your chopped dark chocolate in a bowl. Heat a half-cup of heavy cream and your honey (or corn syrup) in a small saucepan until it just begins to simmer. Pour the hot cream over the chocolate and let it sit for two minutes before whisking into a glossy, dark pool of ganache. Let this sit until it reaches room temperature.
Step 7: Whip and Fold
In a separate chilled bowl, whip the remaining cup of heavy cream with a tablespoon of cocoa powder until you reach soft, pillowy peaks. Gently fold a third of this whipped cream into the cooled ganache to lighten it, then fold in the rest. Work slowly to keep the air in the mixture; this creates that signature truffle lightness.
Step 8: Assemble and Chill
Spoon the whipped truffle filling over your leveled cake and smooth the top with an offset spatula. Place the whole pan in the refrigerator for at least two hours. This setting time allows the fats to firm up, creating a stable middle layer.
Step 9: The Final Glaze
Combine the remaining chopped chocolate, cream, and honey in a bowl and melt until smooth. Let the glaze cool for about 15 minutes so it is fluid but not hot. Pour it over the chilled cake, tilting the pan to let it run to the edges. Return to the fridge until you are ready to serve.
Farmhouse Wisdom for the Best Results

One of the most important things to remember when working with chocolate is temperature. Make sure your ganache base has cooled completely to room temperature before you attempt to fold in the whipped cream. If the ganache is even slightly warm, it will deflate the air you worked so hard to whisk into the cream, resulting in a dense rather than fluffy layer. For those looking to master the science of these transformations, understanding chocolate alchemy can help you troubleshoot any issues with seizing or graininess. Also, always use a hot knife to slice your cake—simply dip your blade in boiling water and wipe it dry between every single cut to get those clean, sharp edges you see in professional bakeries. You can also find more technical advice on similar structures at Scientifically Sweet.
Simple Swaps and Seasonal Twists
While this dark chocolate version is a classic, you can easily adapt it to the seasons. In the height of summer, I love to press fresh raspberries into the truffle layer before it sets, adding a tart burst of fruit that cuts through the richness. If you prefer a lighter, more airy base, you might consider swapping the fudge cake for a devils food cake texture, which uses more leavening for a traditional sponge feel. For an autumn harvest twist, try adding a teaspoon of espresso powder to the hot water step; it won’t make the cake taste like coffee, but it will make the chocolate taste even deeper and more robust. You can also sprinkle coarse sea salt over the final glaze for a modern, savory-sweet balance that guests always rave about.
At the Farmhouse Table

I find that this cake is best served with a simple dollop of unsweetened whipped cream or a small scoop of vanilla bean ice cream to balance the intensity of the dark chocolate. If you are hosting a gathering, place the cake on a rustic wooden board and surround it with seasonal berries or edible flowers for a beautiful, unstudied look. For those who enjoy a bit of crunch with their soft desserts, serving a slice alongside a few crushed hazelnuts can provide a wonderful contrast, much like the textures found in a ferrero rocher cake. Always let the cake sit at room temperature for about 30 minutes before serving if you prefer a softer, more fudge-like consistency, or serve it straight from the fridge if you enjoy a firm, truffle-candy feel.
The Honest Joy of Home Baking
Baking a cake like this is a reminder that taking our time in the kitchen is a gift we give to ourselves and our loved ones. There is no need for perfection; even if the glaze has a few bubbles or the edges are a bit soft, the flavor of real, honest ingredients will always shine through. If you find yourself craving something with a slightly different crumb but the same deep flavor, I highly recommend trying our chocolate fudge cake for your next weekend project. I would love to see how your rustic creations turn out, so please share your photos with us on Instagram, Pinterest, or Facebook. Happy baking, and may your kitchen always be filled with the warmth of melting chocolate.


