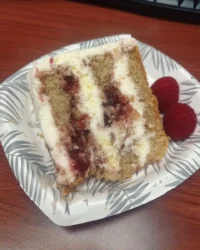
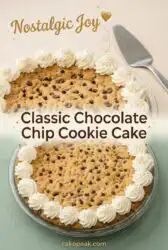
A warm slice reveals a golden outer edge with a center so tender it nearly melts on your fork, smelling of rich vanilla and sweet melted chocolate.

Baking for a crowd always calls for something special, and this homemade Classic Chocolate Chip Cookie Cake brings the comforting warmth of a traditional Sunday dinner right to your table. Unlike store-bought versions that can feel stiff and overly sweet, this recipe delivers a soft, buttery crumb that holds its shape beautifully while staying incredibly rich. It is the kind of dessert that gathers folks around the counter before it even has time to cool completely. When you bring this cake out on a well-worn stand, you are offering a slice of real Southern hospitality.
There is a quiet joy in watching the butter and sugar come together in the bowl, transforming into a pale, creamy foundation. Many home bakers struggle with cookie cakes that turn out either too dry like a stale biscuit or too greasy in the center. I spent years adjusting the flour ratios and testing various baking times to find the sweet spot that guarantees a dense, chewy texture. This recipe is the culmination of those kitchen trials, built on Southern soul and professional technique.
You do not need any fancy equipment or hard-to-find ingredients to make this show-stopping dessert. With just a simple springform pan and a handful of pantry staples, you can create a treat that rivals any professional bakery. The golden edges provide a satisfying bite, while the center remains incredibly soft and loaded with pockets of melted chocolate. It is a reliable favorite that will make you the star of any school bake sale or backyard gathering.
Why You’ll Bake This One Again
Prep: 15 min · Serves: 12 · Difficulty: Easy
- A tender crumb that melts on your fork.
- Rich brown sugar adds a deep caramel tone.
- Mini chocolate chips guarantee chocolate in every single bite.
- Simple pantry staples make this dessert incredibly approachable.
- Creamy buttercream frosting makes every slice feel like a celebration.
This is the recipe my family requests every single time we gather under the shade trees.
When you need a dessert that bridges the gap between casual comfort and celebration, a homemade cookie cake is the answer. It combines the ease of a cookie with the festive joy of a decorated cake, making sure every guest goes home happy.
There is something wonderful about a dessert that looks like it took hours but comes together in under an hour. You get the familiar comfort of a chocolate chip cookie but in a beautiful, sliceable format that feels special. It is perfect for birthdays, potlucks, or just a sweet finish to a family meal.
Our recipe uses simple techniques that anyone can master, from creaming the butter to piping the final border. You will love how easy it is to customize with different frosting colors or fun toppings to suit any occasion. It is a versatile addition to your recipe box that you will return to year after year.
Get The Full Cake Recipe
Print
Classic Chocolate Chip Cookie Cake
- Total Time: 45 mins
- Yield: 12 servings
- Diet: Vegetarian
Description
This decadent cookie cake features a buttery, tender crumb packed with mini chocolate chips for a rich, bakery-style experience at home. Perfect for any celebration, it combines a soft, chewy center with crisp golden edges for the ultimate sliceable dessert.
Ingredients
- Very soft butter
- Brown sugar
- White sugar
- Whole egg
- Egg yolk
- All-purpose flour
- Cornstarch
- Baking soda
- Salt
- Pure vanilla extract
- Mini chocolate chips
Instructions
- Cream the sugars. Combine the very soft butter, brown sugar, and white sugar in a large mixing bowl and beat for two to three minutes until light and fluffy.
- Add wet ingredients. Mix the vanilla, egg, and extra egg yolk in a small cup, then pour into the butter mixture and beat until fully combined.
- Whisk dry ingredients. In a separate bowl, stir together the flour, cornstarch, salt, and baking soda until evenly distributed.
- Form the dough. Gradually add the dry ingredients to the wet mixture on low speed, mixing only until a cohesive dough forms to avoid over-working.
- Fold in chips. Scatter the mini chocolate chips over the dough and gently fold them in using a rubber spatula until evenly distributed.
- Chill the dough. Press the dough into a parchment-lined ten-inch springform pan and freeze for fifteen minutes while preheating the oven to 350°F.
- Bake the cake. Bake on the center rack for thirty minutes, covering the top with foil if the edges brown too quickly.
- Cool and decorate. Allow the cake to cool completely in the pan before releasing the ring and piping decorative buttercream swirls around the edges.
Notes
- Ensure your butter is soft to the touch but not melted to prevent the cake from spreading or sinking.
- Use a kitchen scale or the spoon-and-level method to measure your flour to avoid a dry or crumbly texture.
- Adding an extra egg yolk is the key to achieving a dense, chewy, and rich center that stays moist for days.
- Pressing a handful of extra chocolate chips into the top of the raw dough creates a professional bakery aesthetic.
- Prep Time: 15 mins
- Cook Time: 30 mins
- Category: Dessert
- Method: Baking
- Cuisine: American
Your Ingredient Lineup

Gathering the right components is the first step toward baking a masterpiece with a golden crumb and rich flavor. Each item plays a specific role in keeping this bake wonderfully soft and structurally sound. Let us look at what makes this recipe turn out beautifully every single time.
- Very Soft Butter: Using butter that is almost melting ensures a rich, buttery flavor and creates a tender crumb that holds its shape beautifully. It blends smoothly with the sugars, creating a velvety texture that is crucial for a soft, dense bite.
- Brown Sugar: This ingredient introduces moisture and a deep caramel warmth, which is essential for that signature chewiness. The molasses in the brown sugar reacts with the baking soda to give the cake a lovely, even rise.
- White Sugar: While brown sugar provides chew, white sugar helps create those beautifully golden, crisp edges. It balances the moisture in the dough, making sure the cake has the perfect structure once cooled.
- Egg and Egg Yolk: The whole egg provides structure and rise, while the extra yolk adds fat and richness. This combination keeps the cake from becoming dry or crumbly, maintaining a soft texture for days.
- All-Purpose Flour: Our structural backbone, providing just enough gluten to hold the heavy chocolate chips. It is important to measure it carefully so the dough remains tender rather than tough.
- Cornstarch: This is my secret ingredient for keeping the crumb incredibly soft and delicate. It breaks up the gluten network slightly, giving the cake a melt-in-your-mouth quality that everyone loves.
- Mini Chocolate Chips: Regular chips are too heavy and sink to the bottom, but mini chips distribute beautifully. They ensure you get rich chocolate in every single forkful without overwhelming the delicate dough.
- Vanilla Extract: A generous splash of pure vanilla extract rounds out the sweetness and highlights the buttery notes. It gives the cake that nostalgic, fresh-baked aroma that draws everyone into the kitchen.
| Ingredient | Why It Matters |
|---|---|
| Very Soft Butter | Creates a rich flavor and a tender, soft texture. |
| Brown Sugar | Adds moisture and a deep caramel tone to the dough. |
| White Sugar | Helps create golden, crisp edges and balances moisture. |
| Egg Yolk | Provides extra richness and prevents the bake from drying. |
| Cornstarch | Softens the flour proteins for an incredibly tender crumb. |
| Mini Chocolate Chips | Guarantees even chocolate distribution in every slice. |
From Bowl to Cake Stand

Step 1: Cream the Butter and Sugars
Combine the very soft butter, brown sugar, and white sugar in a large mixing bowl. Beat the mixture steadily with your mixer for two to three minutes until it looks smooth, pale, and thoroughly combined. You will know it is ready when the sugar granules begin to dissolve into the butter, creating a soft, light base for your dough. This step is essential because it builds the foundational texture of your cookie cake.
Step 2: Add the Wet Ingredients
Mix the pure vanilla extract with the whole egg and the extra egg yolk in a small cup. Pour this golden liquid into your creamed butter mixture and beat for another one to two minutes until fully combined. The batter should look smooth, even, and slightly ribbon-like as it falls from the beaters. Taking your time here makes sure the fat and moisture emulsify beautifully.
Step 3: Whisk the Dry Ingredients Together
In a separate medium bowl, stir together the all-purpose flour, cornstarch, salt, and baking soda. Use a wire whisk to distribute the dry ingredients evenly, breaking up any small lumps in the flour. This simple step makes sure that the leavening agents are spread throughout the dough, preventing uneven rising. It only takes a minute but makes a world of difference in the final bake.
Step 4: Mix to Form the Classic Chocolate Chip Cookie Cake Dough
Gradually add your whisked dry ingredients to the wet mixture while running your mixer on a low speed. Stop mixing the moment the flour is fully incorporated and a cohesive, thick dough forms in the bowl. Over-mixing at this stage can activate the gluten too much, making the final cake tough instead of tender. Keep your touch light to preserve that delicate, soft crumb.
Step 5: Fold in the Mini Chocolate Chips
Scatter the mini chocolate chips over the thick dough and fold them in gently using a sturdy rubber spatula. Work the spatula from the bottom of the bowl upward until the sweet pockets of chocolate are evenly distributed. The dough should look speckled and rich, ready for the baking pan. Be careful not to over-work the dough during this step to keep the butter cool.
Step 6: Press Into the Pan and Chill
Press the cookie dough firmly and evenly into a ten-inch springform pan lined with a parchment paper circle. Use your fingers or the flat bottom of a measuring cup to create a smooth, flat surface. Slide the pan into the freezer for fifteen minutes to chill while your oven preheats to 350°F. Chilling the dough solidifies the fat, which helps the cake bake evenly and retain its moisture.
Step 7: Bake to Golden Perfection
Bake the cake on the center rack of your oven for approximately thirty minutes, keeping a close eye on the progress. At twenty-five minutes, check the top; if the edges are deep golden and the center is set, cover it loosely with aluminum foil. This prevents the top from over-browning while the center finishes baking. The sweet aroma of toasted brown sugar and chocolate will fill your entire home.
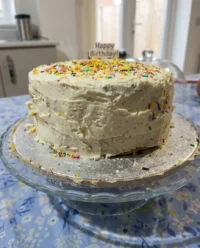
Step 8: Cool and Decorate
Let the cake cool completely in the springform pan before releasing the outer ring to prevent any cracking. Once cool, use a piping bag fitted with a decorative star tip to pipe sweet buttercream swirls around the border. You can add colorful sprinkles or custom writing to make this dessert truly special for your family gathering. It is now ready to be transferred to your favorite serving platter.
Southern Baker’s Secrets

If your cookie cake edges rise too high and the center sinks drastically, your butter was likely too hot or completely melted when you began mixing. To avoid this, make sure your butter is soft to the touch but not liquid, as liquid fat changes how the dough expands in the oven. Room-temperature butter should yield slightly to gentle pressure without losing its shape.
To achieve a truly chewy cookie cake texture, never skip adding that extra egg yolk to the wet ingredients. The extra fat from the yolk provides moisture and richness that keeps the center soft, even a few days after baking. It is a simple professional baker’s trick that makes a huge difference in the final product.
Measuring your flour properly is the single most important detail for a tender crumb. Always spoon your flour into the measuring cup and level it off with a flat knife instead of scooping directly from the bag, which packs too much flour into the recipe. Too much flour will result in a dry, crumbly cake that is hard to slice.
For the best visual appeal, press a few extra mini chocolate chips directly into the top of the dough right before it goes into the oven. This creates a beautiful, professional finish with visible pockets of melted chocolate on the surface. It makes the final dessert look just like it came from a high-end bakery.
Should you wish to read more about the science of baking cookies in a cake pan, you can read this guide on the science of baking cookie cakes to understand how pan size affects heat distribution. It explains how different pan materials can alter your baking times and final texture.
Using parchment paper is essential for a clean release from your springform pan. Cut a circle to fit the exact bottom of your pan, which guarantees you can transfer the dessert to a cake stand without any sticking or tearing. It saves you from the heartbreak of a broken cake after all your hard work.
Frequently Asked Questions
What is the difference between cookie and cookie cake?
A classic cookie is baked in small, individual portions on a flat sheet, resulting in crispy edges all around. A cookie cake is baked as one large disk in a pan, which traps moisture and creates an incredibly soft, chewy center that is perfect for slicing and decorating with frosting. It offers the best of both worlds with a crisp edge and a tender center.
Can I make a cookie cake with a normal cookie recipe?
Yes, you can use a standard recipe, but you may need to adjust the flour and leavening agents to prevent it from rising too much or turning dry. This specific recipe is specially formulated with extra moisture and cornstarch to make sure it stays wonderfully tender when baked in a cake pan. Standard cookie dough often spreads too thin or becomes too dry in a deep pan.
How should I store left-over cookie cake?
Keep any remaining slices in an airtight container at room temperature for up to three days. To keep the sliced edges from drying out, you can press a piece of plastic wrap directly against the cut surfaces of the cake. This helps preserve the moisture and keeps the crumb soft for your next treat.
Can I freeze this dessert for later?
Yes, you can freeze the un-iced cake by wrapping it tightly in plastic wrap and aluminum foil for up to three months. When you are ready to serve, thaw it at room temperature overnight before adding your buttercream decoration. This is a wonderful way to prepare for busy holiday gatherings in advance.
Is cookie cake just a large cookie?
While they share similar ingredients, the baking method and pan size make a cookie cake much softer and denser than individual cookies. The deep sides of the pan protect the dough from drying out, leaving you with a texture that is closer to a rich blondie. It is designed to be eaten with a fork rather than held in your hand.
What makes cookies cakey vs chewy?
The ratio of moisture, fat, and flour determines the final texture of your bake. A high proportion of white sugar and whole eggs creates a cakier crumb, while using mostly brown sugar, soft butter, and extra egg yolks yields a dense, chewy texture. Cornstarch also plays a key role by keeping the flour proteins soft.
What is the best pan to use if I do not have a springform pan?
You can use a standard nine-inch or ten-inch round cake pan lined with parchment paper that extends up the sides like a sling. This allows you to lift the cooled cake out easily without breaking the delicate golden crust. A well-greased pie dish can also work, though it may be harder to remove the first slice cleanly.
Family Twists & Variations
For a rich chocolate version, you can substitute a half-cup of the all-purpose flour with high-quality cocoa powder. This simple change turns the base into a deep cocoa dough, creating a chocolate chocolate chip masterpiece that pairs beautifully with a glass of cold milk. If you love deep cocoa flavors, you might also enjoy my signature chocolate cake recipe for your next gathering. It is an excellent way to satisfy the serious chocolate lovers in your family.
You can easily swap the mini chocolate chips for white chocolate chips and dried cranberries to create a festive holiday dessert. This combination brings a lovely balance of sweet and tart flavors, making it a wonderful addition to your Christmas dessert table or family reunion. The red and white colors look beautiful against the golden cookie base, adding a touch of festive cheer to your holiday spread.
To add a classic Southern crunch, fold a half-cup of toasted, chopped pecans or walnuts into the dough along with the mini chocolate chips. The nutty flavor complements the brown sugar base beautifully, giving the dessert a texture reminiscent of old-fashioned pecan pralines. Toasting the nuts first in a dry skillet for a few minutes will bring out their rich oils and enhance the overall aroma of the cake.
Serve It Southern-Style
When it is time to bring this beautiful dessert to the table, presentation is everything. I love sliding this cake onto a milk glass cake stand that has been passed down through generations, letting the golden edges catch the light. It looks beautiful alongside a pitcher of sweet tea sweating in mason jars, perfect for a warm afternoon on the front porch with friends. This simple touch makes any ordinary day feel like a special family reunion.
To offer your guests a truly memorable treat, serve warm slices with a generous scoop of homemade vanilla bean ice cream. The warm chocolate chips melt into the cold cream, creating a delightful contrast of textures and temperatures. If you are hosting a larger gathering, you can display this cookie cake next to a slice of homemade chocolate cake to give your guests a variety of rich options. It ensures that everyone at your table finds a sweet treat they love.
For casual Sunday dinners, simply slice the cake into neat wedges and let folks eat them with their hands. It is a relaxed, comforting way to enjoy a sweet treat that feels both celebratory and completely unpretentious. No matter how you choose to serve it, this dessert is sure to bring smiles and warmth to your table. It is the kind of baking that brings folks together and keeps them talking long after the last crumb is gone.

From My Kitchen to Yours
Baking is all about bringing people together around the table to share stories and create sweet memories. This simple cookie cake is more than just a sweet treat; it is a warm invitation to slow down and enjoy the company of those you love. I hope this recipe becomes a staple in your home, bringing comfort and joy to every birthday, holiday, and Sunday dinner. There is truly nothing better than sharing a slice of home-baked love with the people who matter most.
If you are looking for more comforting sweets to share with your family, try baking an easy chocolate cake for your next gathering. There is nothing quite like the smell of a warm cake baking in the oven to make a house feel like a home. It is a simple way to practice front-porch hospitality every single day.
I would love to see how your cookie cake turns out and how you choose to decorate it. Please share your baking photos with me and join our warm community of home bakers by following us on Pinterest and Facebook. Let us keep baking beautiful desserts that bring our families closer together, one delicious slice at a time.
