Growing up in Virginia, Sunday dinners ended with cakes that stood tall and proud. My grandmother’s secret was a filling so light it felt like a cloud, bringing the whole family to the table.

This Vanilla Mousse Cake Filling is the backbone of a truly special dessert. It offers a stable, airy texture and a deep aromatic sweetness that makes every layer shine with professional quality and Southern soul.
Peak Flavor and Texture
There is something truly magical about the way a light, airy filling interacts with a dense, buttery cake. This Vanilla Mousse Cake Filling provides that signature Southern hospitality in every bite, offering a balance that keeps your guests coming back for seconds. Most folks struggle with fillings that are either too heavy or too runny, but this recipe hits the mark for stability and silkiness.
When we talk about a perfect cake, we are talking about the harmony between the crumb and the cream. This mousse acts as a plush cushion between layers, ensuring that even the most delicate sponge feels supported. It is the kind of recipe that turns a simple weekend bake into a family treasure, much like the ones I remember from our neighborhood gatherings in Virginia.
What makes this a winner is the depth of the vanilla. We aren’t just looking for sweetness; we are looking for that complex, floral note that only high-quality vanilla can provide. By using both extract and paste, we achieve a speckled, gourmet look and a flavor profile that resonates through the entire dessert. It is reliable, tested, and guaranteed to hold its shape under pressure.
This Vanilla Mousse Cake Filling is also incredibly versatile for different cake sizes and shapes. Whether you are working on a massive celebration cake or a few sweet cupcakes, the structure remains consistent. The addition of cream cheese provides just enough tang to keep the sweetness from being overwhelming, creating a sophisticated palate that appeals to both children and adults. Love is the most important ingredient here, and you can taste it in the lightness of the whipped peaks.
Print
Vanilla Mousse Cake Filling
- Total Time: 40 mins (includes chill time)
- Yield: Filling for 2-3 cake layers (approx. 14 servings)
Description
This recipe delivers a remarkably light yet stable vanilla mousse, perfect for layering tall cakes without fear of collapsing or bulging. It combines cold heavy cream and softened cream cheese for a rich, airy texture. The use of both vanilla extract and paste ensures a deep, complex flavor and a professional, speckled appearance.
Ingredients
- 1 packet (or 1 tablespoon) Gelatin powder
- 3 tablespoons cold water
- 8 ounces Cream Cheese, softened
- 1/2 cup Granulated Sugar
- 1 teaspoon Pure Vanilla Extract
- 1 teaspoon Vanilla Bean Paste
- Pinch of salt (optional)
- 1 1/2 cups Cold Heavy Whipping Cream
- 1/4 cup Powdered Sugar
- 2 tablespoons White Chocolate, melted and cooled (optional)
Instructions
- Begin by sprinkling your gelatin powder over three tablespoons of cold water in a small bowl. Let it sit for about 5 to 10 minutes until it becomes thick and hydrated.
- In a large mixing bowl, beat your softened cream cheese until it is completely smooth and free of lumps. Gradually add the granulated sugar, continuing to mix until the texture is creamy.
- Add the pure vanilla extract and the vanilla bean paste to your cream cheese mixture. If using a pinch of salt, add it now. Mix until the fragrance of the vanilla is prominent and the mixture is evenly speckled with bean seeds.
- Heat your bloomed gelatin in the microwave for 10 to 15 seconds until it is liquid but not boiling. While the mixer is running on low, slowly pour the liquid gelatin into the cream cheese base.
- In a separate, chilled bowl, whip the cold heavy cream with the powdered sugar. Start on low and increase the speed until soft peaks form. Be careful not to over-whip it into butter.
- Using a large rubber spatula, gently fold a third of the whipped cream into the cream cheese base to lighten it. Then, add the remaining whipped cream in two batches, using slow, sweeping motions.
- Place the bowl in the refrigerator for about 20 to 30 minutes before you plan to use it. This short rest allows the filling to firm up slightly, making it much easier to spread evenly between your cake layers.
Notes
If you plan to prepare this filling ahead of time, store it in an airtight container in the refrigerator for up to 3 days. If it becomes too stiff, let it sit at room temperature for 5 minutes and stir gently before using. Remember that the quality of your vanilla dramatically impacts the final flavor, so opt for high-quality pure extract and paste.
- Prep Time: 15 mins
- Cook Time: 5 mins
- Category: Dessert
- Method: No-Bake/Whipping
- Cuisine: Southern American
The Foundation of Excellence

Creating the perfect Vanilla Mousse Cake Filling starts with high-quality ingredients sourced with care. In a Southern kitchen, we believe that the quality of your butter, cream, and vanilla dictates the success of your bake. This recipe relies on a few key components that work together to create a stable yet melt-in-the-mouth experience.
- Heavy Whipping Cream: This must be very cold to achieve the volume and stiffness required for a mousse. It provides the airy lift that makes this filling so ethereal.
- Cream Cheese: Ensure this is softened to room temperature before you begin. It acts as a stabilizing agent and provides a rich, velvety mouthfeel that standard whipped cream lacks.
- Granulated and Powdered Sugar: We use a combination to ensure the sugar dissolves perfectly into the cheese while providing structure to the whipped cream.
- Pure Vanilla Extract and Vanilla Bean Paste: Using both ensures a multi-dimensional vanilla flavor. The paste adds those beautiful black specks that signify a truly professional bake.
- Gelatin Powder: This is the secret to a Vanilla Mousse Cake Filling that doesn’t bulge out from the sides of your cake. It provides the structural integrity needed for tall layers.
- White Chocolate (Optional): If you choose to add this, it provides a subtle richness and even more stability once chilled.
Working with these ingredients requires a bit of patience and precision. For example, blooming the gelatin in cold water is a non-negotiable step that allows the protein to hydrate properly. When these components are combined with a gentle touch, they form a filling that is both light as a feather and strong as a mountain.
How to Make It
Step 1: Bloom the Gelatin
Begin by sprinkling your gelatin powder over three tablespoons of cold water in a small bowl. Let it sit for about 5 to 10 minutes until it becomes thick and hydrated. This step is vital for ensuring your Vanilla Mousse Cake Filling has a smooth texture without any gritty bits.
Step 2: Prepare the Cream Cheese Base
In a large mixing bowl, beat your softened cream cheese until it is completely smooth and free of lumps. Gradually add the granulated sugar, continuing to mix until the texture is creamy. This base provides the stability and depth of flavor that defines Jesse’s signature cakes.
Step 3: Incorporate the Vanilla Flavors
Add the pure vanilla extract and the vanilla bean paste to your cream cheese mixture. If you are using a pinch of salt to balance the sweetness, add it now. Mix until the fragrance of the vanilla is prominent and the mixture is evenly speckled with bean seeds.
Step 4: Melt and Add the Gelatin
Heat your bloomed gelatin in the microwave for 10 to 15 seconds until it is liquid but not boiling. While the mixer is running on low, slowly pour the liquid gelatin into the cream cheese base. This prevents the gelatin from setting too quickly and creating clumps in your Vanilla Mousse Cake Filling.
Step 5: Whip the Heavy Cream
In a separate, chilled bowl, whip the cold heavy cream with the powdered sugar. Start on low and increase the speed until soft peaks form. You want the cream to be light and fluffy, but be careful not to over-whip it into butter.
Step 6: Fold Gently Together
Using a large rubber spatula, gently fold a third of the whipped cream into the cream cheese base to lighten it. Then, add the remaining whipped cream in two batches, using slow, sweeping motions. This preserves the air you worked so hard to whip in, keeping the mousse airy.
Step 7: Chill to Set
Place the bowl in the refrigerator for about 20 to 30 minutes before you plan to use it. This short rest allows the Vanilla Mousse Cake Filling to firm up slightly, making it much easier to spread evenly between your cake layers.
Jesse’s Secrets to Success

Achieving the perfect crumb and a stable filling is all about temperature control. Always make sure your cream cheese is truly at room temperature before mixing, or you will end up with tiny lumps that are impossible to remove later. Conversely, your heavy cream must be ice-cold to reach its full volume. If your kitchen is particularly warm, I often recommend chilling your mixing bowl and whisk attachment in the freezer for ten minutes before you start whipping.
For those looking to pair this with a reliable base, I highly recommend using my vanilla cake recipe. The density of that cake provides the perfect anchor for this light mousse. Another pro move is to apply a very thin layer of jam or simple syrup to your cake layers before adding the mousse. This helps the Vanilla Mousse Cake Filling bond to the cake and keeps everything moist for days.
If you find your mousse is setting too quickly while you are working, simply give it a very gentle stir with a spatula. Avoid over-mixing at this stage, as you don’t want to lose that precious air. You can also refer to the techniques found at Emma’s Cake Studio for more visual guidance on achieving the right consistency.
Classic Southern Twists
While a classic vanilla is hard to beat, there are several ways to make this Vanilla Mousse Cake Filling your own. For a bright, summery feel, you can fold in two teaspoons of fresh lemon zest and a tablespoon of lemon juice during the flavoring step. This pairs beautifully with a light sponge for a church potluck or a garden party. If you are a fan of richer flavors, adding two tablespoons of melted and cooled white chocolate into the cream cheese base creates a decadent profile.
For the chocolate lovers in the family, you might want to try a chocolate mousse cake instead. However, if you want to keep the vanilla base, try adding crushed toasted pecans or a swirl of salted caramel for a truly Southern flair. Another favorite in my house is the addition of fresh, finely diced strawberries folded in at the very end. This turns the recipe into a fruit-filled delight that reminds me of our summer reunions in Virginia.
Celebration Time at the Table

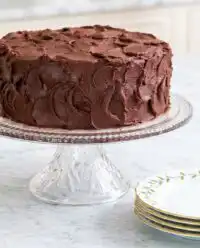
Serving a cake filled with this Vanilla Mousse Cake Filling is all about the presentation. For a truly spectacular look, serve your cake on a glass stand so guests can see the clean, white layers of mousse between the sponge. I love serving this alongside a tall glass of cold sweet tea or a robust cup of coffee. The lightness of the mousse makes it a perfect ending to a heavy Sunday dinner of fried chicken and biscuits.
If you are making a fruit-forward dessert, this filling is the perfect companion for a strawberry vanilla cake. The vanilla notes complement the tartness of the berries perfectly. For a special touch, garnish the top of your cake with fresh edible flowers or a few extra vanilla beans to hint at the flavors inside. Always use a sharp, warm knife to cut your slices; this ensures the mousse stays perfectly intact and doesn’t smudge against the cake layers, keeping that professional look we all strive for in the kitchen.
The Final Slice
Creating a Vanilla Mousse Cake Filling is a simple way to bring a touch of professional Southern baking into your own home. It is about more than just sugar and cream; it is about the joy of sharing something handmade and heartfelt with the people you love. Whether you are celebrating a birthday, a wedding, or just a quiet Sunday, this filling will make your dessert the talk of the table. For a truly classic experience, pair it with my classic vanilla butter cake and watch your family’s faces light up. Keep baking and keep sharing that Southern warmth. For more inspiration and to share your own creations, follow us on Pinterest, Instagram, and Facebook.
