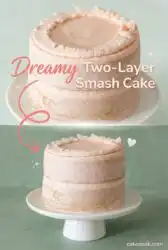
We tested three different baking temperatures in the Cake Peak test kitchen to find the exact ratio that produces a sturdy but tender Two-Layer Smash Cake.

Success for a first birthday celebration depends entirely on a cake that looks professional while remaining soft enough for small hands to pull apart. This formula uses sour cream and egg whites to create a bright white crumb that provides a clean backdrop for photography. Through our testing, we found that six-inch pans provide the ideal height-to-stability ratio for active toddlers. You will achieve repeatable results by following these precise weight-based measurements and temperature requirements.
Why This Two-Layer Smash Cake Works
Prep: 40 min · Serves: 12 · Difficulty: Medium
- Superior crumb structure for messy photos
- Stable stacking with lightweight buttercream layers
- Consistent rise using professional baking strips
- High-contrast colors for beautiful birthday memories
- Predictable results through weight-based ingredient measuring
This method guarantees a reliable smash cake that holds its shape until the exact moment the celebration begins.
Get The Full Cake Recipe
Print
Two-Layer Smash Cake
- Total Time: 1 hour 20 mins
- Yield: 12 servings
- Diet: Vegetarian
Description
This professional-grade Two-Layer Smash Cake is designed for a perfect first birthday celebration, featuring a bright white crumb and a stable structure that is soft enough for toddlers. Using weight-based measurements and precision baking techniques, this recipe delivers consistent results that are as beautiful in photos as they are delicious.
Ingredients
- 426 grams all-purpose flour
- 456 grams granulated sugar
- 6 large egg whites
- Sour cream
- Milk
- Vanilla bean paste
- Baking powder
- Baking soda
- Kosher salt
- 352 grams unsalted butter
- 565 grams confectioners sugar
- Strained strawberry preserves
- Matcha powder
- Gel food coloring
Instructions
- Prepare oven and pans. Heat your oven to 350°F (175°C) and grease and flour four 6-inch cake pans while soaking fabric baking strips in water for 15 minutes.
- Sift dry ingredients. Weigh and sift the flour, sugar, baking powder, baking soda, and kosher salt twice into a large bowl to aerate and combine.
- Whisk wet ingredients. Combine room-temperature sour cream, milk, egg whites, and vanilla bean paste in a separate vessel until the mixture is uniform and frothy.
- Integrate the batter. Pour the liquid mixture into the dry ingredients and whisk by hand until fully hydrated, being careful not to overmix.
- Bake the layers. Distribute the batter evenly into the prepared pans, secure the damp baking strips, and bake for 35 to 40 minutes until the internal temperature reaches 210°F.
- Prepare the buttercream. Cream the room-temperature butter for 5 minutes until pale, then gradually incorporate the sifted confectioners sugar until light and airy.
- Color the frosting. Reserve one cup of white buttercream for accents, then stir strained strawberry preserves and matcha powder into the main batch for flavor and color.
- Assemble the cake. Layer the cooled cakes with strawberry buttercream, apply a thin crumb coat, chill for 30 minutes, and finish with the remaining frosting and floral details.
Notes
- Allow all refrigerated ingredients to sit at room temperature for at least one hour before mixing to ensure a stable emulsion.
- Use a digital kitchen scale for all measurements to ensure the cake retains its structural integrity for stacking.
- Cool the cakes in their pans for exactly 10 minutes before inverting onto a wire rack to prevent the crust from becoming soggy.
- Keep a metal bench scraper slightly warmed with hot water to achieve a smooth, glass-like finish on your final layer of buttercream.
- Prep Time: 40 mins
- Cook Time: 40 mins
- Category: Dessert
- Method: Baking
- Cuisine: American
The Working Components

To achieve a cake that is both tender and structurally sound, we utilize specific ingredients that balance moisture with protein. Accuracy is paramount, so we recommend using a digital scale to measure the 426 grams of all-purpose flour and 456 grams of granulated sugar. These components work together to build a foundation that can withstand the weight of decorative buttercream flowers.
- Egg Whites: Using six large whites instead of whole eggs removes the yellow tint from the yolk, resulting in a clean, white cake base.
- Sour Cream: This adds necessary acidity to react with the baking soda while providing a thick, creamy fat source for a moist texture.
- Vanilla Bean Paste: We include this for visual appeal and a concentrated flavor profile that stands up to the sweetness of the frosting.
- Matcha Powder: This natural ingredient provides a stable, earthy green pigment for the decorative leaves without thinning the buttercream.
- Strawberry Preserves: Straining these preserves is a critical step to prevent fruit chunks from clogging your piping tips during assembly.
- Unsalted Butter: Using 352 grams of butter at room temperature allows for proper aeration during the initial mixing phase.
| Ingredient | Why It Matters |
|---|---|
| All-Purpose Flour | Provides the gluten structure needed for a 6-inch vertical stack. |
| Sour Cream | Lowers the pH of the batter to create a tender, soft-to-the-touch crumb. |
| Egg Whites | Eliminates fats and pigments from yolks to keep the cake interior bright white. |
| Baking Powder | Provides the primary lift and creates micro-air pockets within the batter. |
| Matcha Powder | Offers a natural colorant that maintains the thickness of the floral details. |
How to Bake It, Precisely

Step 1: Prepare the Equipment and Environment
Heat your oven to 350°F (175°C) and verify the temperature with an internal thermometer for accuracy. Grease and flour four 6-inch cake pans, then submerge your fabric baking strips in cool water for at least 15 minutes. These strips prevent the edges from setting too quickly, which eliminates the domed top common in small-diameter cakes.
Step 2: Sift and Combine Dry Ingredients
Place a large mixing bowl on your scale and weigh out the flour, sugar, baking powder, baking soda, and kosher salt. Sift these ingredients together twice to break up clumps and introduce air into the mixture. Whisk the dry components for 45 seconds to distribute the leavening agents evenly throughout the flour base.
Step 3: Emulsify the Wet Components
In a separate vessel, whisk together the room-temperature sour cream, milk, egg whites, and vanilla components until no streaks remain. If you see small flecks of butter, continue whisking as these will integrate once they meet the dry ingredients. The mixture should appear uniform and slightly frothy before you move to the next stage of the process.
Step 4: Integrate the Two-Layer Smash Cake Batter
Pour the liquid mixture into the dry ingredients and whisk by hand until the flour is fully hydrated. Avoid using a high-speed electric mixer here, as over-developing the gluten will result in a tough, bread-like texture. A few small lumps are acceptable and will dissolve during the baking process as the sugar melts.
Step 5: Distribute and Bake for Structure
Secure the damp baking strips around the outside of your pans to regulate the heat transfer. Weigh the batter into each pan to verify that each layer is identical in volume and height. Bake for 35 to 40 minutes, or until the center registers 210°F on an instant-read thermometer and the surface springs back when touched.
Step 6: Aerate the American Buttercream
Cream the 565 grams of room-temperature butter in a stand mixer for a full 5 minutes until it appears nearly white. Gradually add the sifted confectioners sugar in two batches, mixing on low speed to prevent a sugar cloud. This extended creaming time creates the stable air pockets required for intricate piping work.
Step 7: Color and Prep for Decoration
Separate one cup of white buttercream for the green leaves and rose accents before adding the strained strawberry preserves to the main batch. Use the matcha powder for the green portions and a drop of gel coloring for the pink tones. Transfer each color to a piping bag fitted with the appropriate tips for the floral design.
Step 8: Final Assembly and Finishing
Place the first cooled layer on a cake board and pipe a level layer of strawberry buttercream across the surface. Repeat this for the second layer, then apply a thin crumb coat to the entire exterior to trap loose particles. After chilling for 30 minutes, apply the final smooth coat and pipe the floral wreath around the top edge.
What the Data Showed

Precision creates consistency in the test kitchen. We found that the temperature of your dairy ingredients dictates the final emulsion of the batter. If your milk or sour cream is too cold, the fats in the butter will seize, leading to an uneven crumb. Always pull your ingredients from the refrigerator 60 minutes before you begin mixing.
If your cake centers sink after removal from the oven, here is why and how to fix it. This failure usually indicates that the leavening agents were expired or the oven door was opened too early, causing a sudden temperature drop. Always check the expiration date on your baking powder and wait until the 30-minute mark before checking for doneness.
Using a digital scale is the only way to guarantee a repeatable result. Volume measurements for flour can vary by as much as 20% depending on how tightly it is packed into the cup. Weighing your ingredients in grams eliminates this variable and ensures your classic vanilla bean layer cake base is never dry.
We tested different cooling methods and found that leaving the cakes in the pans for exactly 10 minutes is optimal. This allows the structure to firm up slightly without the steam turning the crust soggy. After 10 minutes, invert the cakes onto a wire rack to finish cooling completely before you attempt to level or frost them.
For the smoothest buttercream finish, use a metal bench scraper that has been dipped in hot water and wiped dry. The residual heat from the metal slightly melts the outer layer of fats, creating a glass-like surface. You can learn more about how to make smash cakes for babies to understand the importance of texture for photography sessions.
If your buttercream feels too soft to hold the rose shapes, it is likely too warm from the heat of your hands. Place the piping bag in the refrigerator for 5 to 8 minutes to firm up the fats. This step restores the structural integrity of the frosting without making it too stiff to squeeze through the tip.
Frequently Asked Questions
Can I make the cake layers in advance and freeze them?
Yes, these layers freeze exceptionally well due to the high fat content from the sour cream. Wrap the completely cooled cakes in two layers of plastic wrap and one layer of foil. They will maintain their moisture and structure for up to three months if stored in a deep freezer.
What is the best way to transport a two-layer cake safely?
Place the finished cake on a non-slip mat inside a sturdy cardboard cake box. Keep the vehicle’s interior cool and place the box on a flat surface like the floorboard rather than a tilted car seat. The internal buttercream layers act as a buffer, but excessive heat will cause the stack to shift.
How do I ensure the cake is soft enough for a baby to smash?
The inclusion of sour cream and liquid fats ensures the crumb stays tender even after refrigeration. Avoid over-baking the layers, as every extra minute in the oven removes moisture that contributes to the ‘smash-ability’ of the cake. A properly baked cake will yield easily to the pressure of a small hand.
Why is my American buttercream coming out grainy?
Graininess is usually the result of using sugar that was not finely sifted or failing to cream the butter long enough. The butter must be fully aerated to allow the sugar crystals to dissolve into the fat molecules. If the texture is still off, add one teaspoon of heavy cream and whip on high speed for 60 seconds.
Can I use 8-inch pans instead of 6-inch pans for this recipe?
This specific volume of batter is designed for the height of 6-inch pans. If you switch to 8-inch pans, you must double the recipe to achieve the same vertical presence. Note that larger pans will require a shorter baking time of approximately 25 to 30 minutes.
How do I get the matcha green color to be more intense?
The intensity of the green depends on the grade of matcha used; ceremonial grade offers a brighter hue than culinary grade. If you need a deeper forest green, add the powder to a tiny amount of hot water to create a paste before folding it into the buttercream. This hydrates the powder and releases the full pigment.
Variations That Hold Up
While the white cake base is traditional for birthdays, you can adapt the flavor profile for different preferences. Substituting 50 grams of the flour for high-quality cocoa powder will create a sturdy devils food layer cake that maintains the same structural integrity. Ensure you sift the cocoa powder twice, as it is prone to forming dense clumps that do not dissolve easily in batter.
For a different aesthetic, you can swap the strawberry preserves for seedless raspberry or blackberry alternatives. These fruits offer a higher acidity level, which may require an extra tablespoon of confectioners sugar to maintain the stiffness of the frosting. Always test the consistency of a small batch of buttercream before committing to the full decorative design.
You might also consider using a natural vanilla bean instead of paste for a more rustic appearance. Scrape the seeds from one full pod directly into the sugar before mixing the dry ingredients to distribute the oils. This method provides a deeper aromatic profile while keeping the crumb bright and clear for the camera.
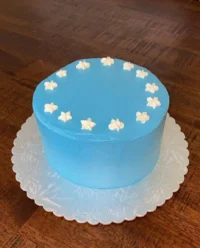
Finishing and Plating
Presentation is a key component of the birthday experience, especially when professional photography is involved. We recommend placing the cake on a simple, elevated pedestal that does not distract from the floral decorations. A white or light wood stand provides a neutral base that complements the pink and green buttercream accents.
For a coordinated dessert table, you can serve this alongside a classic two layer yellow cake chocolate frosting for the adult guests. This allows the birthday child to have their own dedicated cake while providing a familiar flavor for others. Keep the smash cake at room temperature for at least two hours before serving to ensure the buttercream is soft and the flavors are fully developed.
Clear the area of any sharp objects or valuable linens before the smashing begins. The strawberry and matcha pigments are natural but can still stain certain fabrics if left to sit. Having a damp cloth and a change of clothes ready will make the transition from the cake smash to the rest of the party much more efficient.

The Bottom Line
Precision in the kitchen results in a cake that is as functional as it is beautiful. By weighing your ingredients and monitoring your oven temperature, you remove the guesswork from the baking process. This Two-Layer Smash Cake was designed through rigorous testing to provide a reliable centerpiece for a landmark celebration. We tested this — here’s what won: the combination of temperature control and quality fats creates the ultimate crumb.
If you enjoyed this technical approach to baking, you might find our three layer italian cream cake equally rewarding for its unique texture. Consistency is the hallmark of a skilled baker, and this recipe provides the roadmap to achieve it every time. Please share your results with our community as you master the art of the birthday smash.
