My grandmother always said that a dessert without a little bit of mystery in the middle wasn’t worth the calories, and this marble creation is the most delicious puzzle I know.

This Two-Layer Marble Cake brings together the soulful warmth of a Southern kitchen with the refined elegance of a professional pastry shop. You will find layers of tender cake swirled with dark cocoa and vanilla, tucked between blankets of homemade vanilla pastry cream and a rich chocolate filling. It is a dessert designed for the center of the table, offering a crumb so tender it nearly melts on the fork. Whether you are hosting a Sunday dinner or a quiet afternoon tea, this cake promises a sophisticated result with every single bite.
The Heart of This Two-Layer Marble Cake
Prep: 60 min · Serves: 12 · Difficulty: Medium
- Contrasting swirls of chocolate and vanilla in every bite.
- Silky vanilla pastry cream adds a luxurious mouthfeel.
- Deep cocoa notes balanced by real vanilla bean.
- Sturdy layers that hold their shape beautifully when sliced.
- Professional presentation that surprises guests with hidden layers.
This stunning dessert captures the spirit of the neapolitan anniversary cake while offering a unique chocolate and vanilla profile. This is the recipe my family requests every single time we gather under the shade trees for a reunion.
Get The Full Cake Recipe
Print
Two-Layer Marble Cake
- Total Time: 1 hour 45 mins
- Yield: 12 servings
Description
This elegant marble cake features alternating swirls of vanilla and cocoa cake layered with rich chocolate filling and silky vanilla pastry cream. Finished with a glossy ganache, this Southern-inspired dessert offers a sophisticated balance of flavors and a beautiful presentation perfect for any gathering.
Ingredients
- All purpose flour
- Salt
- Sugar
- Baking soda
- Baking powder
- Salted butter
- Eggs
- Vanilla extract
- Sour cream
- Cocoa powder
- Espresso or strong coffee
- Corn starch
- Milk
- Heavy cream
- Vanilla bean paste
- 70% Dark chocolate
Instructions
- Prepare base batter. Whisk together dry ingredients, then beat in eggs, softened butter, vanilla, and sour cream until light and fluffy.
- Create chocolate batter. Transfer portion of vanilla batter to a separate bowl and mix in sifted cocoa powder and hot espresso until glossy.
- Swirl marble layers. Dollop alternating spoonfuls of vanilla and chocolate batter into a parchment-lined square pan and gently smooth with an offset spatula.
- Bake the cake. Bake at 350°F for 12 minutes, rotate the pan, and continue baking for another 10 minutes until springy.
- Cook pastry cream. Whisk corn starch, salt, sugar, milk, cream, yolks, and vanilla over medium-low heat until thick, then strain and chill.
- Prepare chocolate filling. Heat milk, cream, sugar, and starch, then pour over chopped chocolate and whisk until smooth.
- Slice cake layers. Once cooled, horizontally slice the marble cake into two even layers using a serrated knife.
- Build internal layers. Place bottom layer back in pan, spread with chocolate filling, and top with half the prepared vanilla pastry cream.
- Final cake assembly. Add the second cake layer, top with remaining pastry cream, and refrigerate to set.
- Glaze with ganache. Pour warm chocolate and cream ganache over the chilled cake, spread to the edges, and return to the fridge to set before slicing.
Notes
- Use a metal pan for superior heat conduction and crispier edges compared to glass.
- Room-temperature ingredients are crucial to prevent the cake batter from curdling.
- Dip your knife in hot water and wipe clean between each cut for professional, sharp slices.
- Strain your pastry cream through a fine-mesh sieve if any lumps form during cooking.
- Freeze cake layers for twenty minutes before slicing to make them easier to handle and assemble.
- Prep Time: 60 mins
- Cook Time: 45 mins
- Category: Dessert
- Method: Baking
- Cuisine: Southern
Gather These From the Pantry

Creating this masterpiece requires a balance of pantry staples and high-quality dairy to achieve that signature Southern richness. We rely on room-temperature butter and eggs to create a smooth emulsion that results in an even rise and a delicate crumb. The addition of sour cream provides a subtle tang that balances the sweetness of the chocolate ganache and the vanilla cream.
- Salted Butter: Provides a savory depth that enhances the natural sweetness of the cocoa and sugar.
- Sour Cream: This is the secret to a moist texture that stays fresh for days on the counter.
- Espresso: A small amount of hot coffee awakens the cocoa powder without leaving a lingering coffee taste.
- Vanilla Bean Paste: Use this for those beautiful black specks and a deep, floral aromatic profile.
- 70% Dark Chocolate: Choosing a high-quality bar over chips guarantees a smooth melt for the ganache and filling.
- Egg Yolks: These are essential for thickening the pastry cream into a velvety, custard-like consistency.
| Ingredient | Why It Matters |
|---|---|
| All Purpose Flour | Provides the structural foundation for the tender cake layers. |
| Baking Soda | Works with the sour cream to create a light and airy rise. |
| Cocoa Powder | Delivers the intense chocolate flavor and dark visual contrast. |
| Heavy Cream | Creates the luxurious body in both the filling and the ganache topping. |
| Corn Starch | Acts as the thickening agent to keep the pastry cream stable between layers. |
Walking Through the Bake

Step 1: Prepare the Base Batter
Begin by whisking together your flour, salt, sugar, baking soda, and baking powder in a medium bowl until no clumps remain. Add the room-temperature eggs, softened salted butter, vanilla extract, and sour cream to the dry ingredients. Use a hand mixer on high speed for exactly two minutes until the batter looks light, fluffy, and pale in color. This process incorporates the air necessary for a soft crumb that feels light on the palate.
Step 2: Create the Chocolate Contrast
Transfer roughly 300 grams of your vanilla batter into a separate mixing bowl to begin the chocolate portion. Sift the cocoa powder over this portion and pour in your hot espresso or strongly brewed coffee. Beat these together on low speed at first to prevent the cocoa from dusting your counter, then move to high speed until the chocolate batter is dark and glossy. This contrast in color is what makes the interior of the cake so visually striking.
Step 3: Swirl the Marble Layers
Line your square metal pan with a parchment paper sling to facilitate a clean release after baking. Use a scoop to place alternating dollops of vanilla and chocolate batter into the bottom of the pan, much like a checkerboard pattern. Once the pan is filled, use an offset spatula to gently smooth the top without over-mixing the two colors. You want distinct ribbons of flavor rather than a muddy, blended appearance in the finished slice.
Step 4: Bake Your Two-Layer Marble Cake to Perfection
Slide the pan into your preheated 350-degree oven on the center rack for an even distribution of heat. Bake for 12 minutes, then rotate the pan 180 degrees to guarantee the edges brown at the same rate. Continue baking for another 10 minutes or until a tester comes out clean and the cake feels springy to the touch. Let the cake rest in the pan for ten minutes before lifting it by the parchment edges to cool fully on a wire rack.
Step 5: Cook the Vanilla Pastry Cream
In a heavy-bottomed pot, whisk the corn starch, salt, and sugar before slowly adding the milk and heavy cream. Whisk in the egg yolks and vanilla bean paste, then place the pot over medium-low heat while stirring constantly. The mixture will transition from a thin liquid to a thick, pudding-like consistency quite suddenly, so remain vigilant and keep the whisk moving across the bottom of the pot. Once thick, strain the cream through a fine-mesh sieve and press plastic wrap directly onto the surface to prevent a skin from forming.
Step 6: Prepare the Chocolate Filling
Place your chopped 70% dark chocolate into a heat-safe bowl and set it aside for the moment. In a small pot, whisk together the sugar, starch, and salt with the milk and heavy cream over medium heat until the mixture begins to bubble softly. Pour this hot liquid over your chocolate and let it sit for one minute before whisking it into a smooth, dark cream. This filling needs to cool completely at room temperature so it remains spreadable but firm enough to hold the weight of the cake.
Step 7: Slice the Cake Layers
Once the marble cake is completely cold, use a long serrated knife to carefully slice the cake horizontally into two thin, even layers. This requires a steady hand and a slow sawing motion to keep the layers from tearing or crumbling. Because the cake is exceptionally soft, you may find it helpful to chill the cake in the freezer for twenty minutes before slicing. If the cake does break slightly during this process, simply piece it back together inside the pan during assembly.
Step 8: Build the Internal Layers
Place the bottom cake layer back into the parchment-lined 9×9 pan and pour the chocolate cream filling over it, smoothing it to the very edges. Whip your chilled vanilla pastry cream with a hand mixer until it is smooth again, then spread half of it over the chocolate layer. Be gentle with your spatula to avoid mixing the white cream into the dark chocolate filling. This creates the beautiful stack of colors that people will see once the cake is sliced into squares.
Step 9: Final Cake Assembly
Lay the second marble cake layer over the cream fillings and top it with the remaining half of the vanilla pastry cream. Smooth the top into an even plane and cover the pan tightly with plastic wrap before placing it in the refrigerator. The cake needs at least an hour to set up, though waiting longer will make the final slicing process much cleaner. This resting period allows the moisture from the creams to soften the cake layers even further for a melt-in-your-mouth experience.
Step 10: Glaze with Chocolate Ganache
Heat your heavy cream until it is steaming and pour it over the remaining chopped chocolate in a small bowl. Whisk gently until the mixture becomes a dark, reflective mirror of ganache and let it cool for ten minutes so it thickens slightly. Pour this over the top of the chilled cake, spreading it to the corners with the back of a spoon for a rustic yet polished finish. Return the cake to the fridge for a final chill before you lift it out of the pan and slice it into generous squares.
What I’ve Learned the Hard Way

If your pastry cream develops lumps during the cooking process, do not panic; immediately remove the pot from the heat and whisk vigorously. If the lumps remain, pressing the cream through a fine-mesh sieve into a clean bowl will remove them and restore the silky texture you desire. This is a common hurdle when working with egg-based custards, and it is easily fixed with a bit of patience and a steady hand.
Using a metal pan rather than glass is essential for this recipe because metal conducts heat more efficiently, leading to sharper edges and a more even rise. Glass tends to hold heat too long, which can result in overbaked edges while the center remains gooey. For a different take on the classic two-layer format, you might also enjoy my classic two layer yellow cake chocolate frosting which uses a similar pan size.
To get the cleanest slices possible, I recommend dipping your sharp knife into a tall glass of hot water and wiping it dry between every single cut. This prevents the cream layers from dragging into the cake layers and keeps the marble pattern looking sharp. It is also helpful to consult a professional technique for marbling cake batter and filling to ensure your swirls are as beautiful as they are delicious.
Make certain that your butter and eggs are truly at room temperature before you begin the batter. Cold ingredients will cause the batter to break or curdle, resulting in a dense cake that lacks the characteristic lightness of a Southern sponge. I usually set my ingredients out on the counter at least two hours before I plan to start my baking session to guarantee they are ready for the mixer.
Always use high-quality chocolate bars rather than standard baking chips for the ganache and the filling. Chocolate chips are formulated with stabilizers that prevent them from melting into a perfectly smooth liquid, which can leave your ganache looking grainy. A bar with 70% cocoa content provides the deep, bittersweet flavor that balances the sweetness of the vanilla bean paste in the pastry cream.
If you find that your cake layers are too soft to handle after slicing, place them on a baking sheet and slide them into the freezer for fifteen minutes. This firming period makes them much easier to lift and move without the risk of the cake snapping in half. This little trick has saved many of my desserts when I am working in a warm kitchen during the height of a Southern summer.
When pouring the ganache, wait until it has cooled slightly so it does not melt the delicate pastry cream layer beneath it. If the ganache is too hot, the two will mingle and lose the sharp definition that makes this cake look so professional. A ten-minute rest on the counter is usually the ideal amount of time for the chocolate to reach the proper temperature for pouring.
Frequently Asked Questions
How should I store the leftover cake squares?
Because this cake contains both pastry cream and a chocolate milk filling, it must be kept in the refrigerator. Place the slices in an airtight container or cover the serving platter tightly with plastic wrap to keep the cake from drying out. It will stay fresh and delicious for up to three days when chilled properly.
Can I make this marble cake in a round pan instead?
You can certainly use two 8-inch round pans if you prefer a traditional circular appearance for your dessert. However, you will need to adjust the baking time as the depth of the batter will change, so keep a close eye on it. The square metal pan is recommended here because it makes slicing uniform squares for a crowd much easier.
Why did my pastry cream not thicken properly?
The most common reason for thin pastry cream is not cooking it long enough to fully activate the corn starch. You must continue whisking over the heat until the mixture bubbles, as the heat is what triggers the thickening process. If it is still thin after cooling, it likely needed another minute of simmering on the stovetop.
Can I freeze this cake for later use?
While the marble cake layers themselves freeze beautifully, the pastry cream and chocolate filling can sometimes change texture after thawing. If you need to work ahead, I suggest baking and freezing the cake layers separately, then assembling the cream layers fresh before serving. This ensures the fillings remain silky and do not become watery during the defrosting process.
What is the best way to get a clean marble swirl?
The secret is to avoid over-mixing the two batters once they are in the pan. A simple zig-zag motion with a knife or spatula is all you need to create the pattern without blending the colors into a solid brown. The goal is to see clear ribbons of vanilla and chocolate when you finally cut into the center of the cake.
Is it necessary to use vanilla bean paste?
While vanilla bean paste provides a superior flavor and beautiful visual specks, you can certainly substitute it with an equal amount of pure vanilla extract. Make sure you are using high-quality extract rather than imitation flavoring to maintain the integrity of the dessert. The floral notes of real vanilla are vital for balancing the richness of the dark chocolate fillings.
Reunion-Worthy Variations
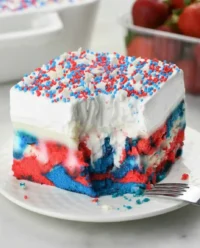
For a festive twist that adds a pop of color to the dessert table, you can try my red white blue marble cake during the summer months. You can also incorporate different extracts into the vanilla portion of the batter, such as almond or even a touch of peppermint during the winter season. These small changes allow the recipe to feel fresh and new every time you bring it to a family gathering.
If you prefer a bit of texture in your dessert, consider folding half a cup of finely chopped toasted pecans into the chocolate batter before marbling. The crunch of the nuts provides a wonderful contrast to the soft pastry cream and the tender crumb of the cake. This variation is particularly popular at autumn church potlucks where hearty, nutty flavors are always in high demand among the guests.
For those who love a boozy finish, you can brush the cake layers with a simple syrup spiked with bourbon or dark rum before adding the fillings. This adds a layer of sophisticated warmth to the dessert that pairs beautifully with the dark chocolate and vanilla bean. It is a subtle change that transforms the cake from a family-friendly treat into a grand finale for an adult dinner party.
Pairing & Presentation
This Two-Layer Marble Cake is a grand dessert that deserves a beautiful presentation on a glass cake stand or a vintage ceramic platter. I like to serve individual squares with a dollop of lightly sweetened whipped cream and a few fresh raspberries on the side. The acidity of the berries cuts through the richness of the chocolate ganache and the vanilla pastry cream perfectly. If you are a fan of cream-filled desserts, you might find this similar in satisfaction to a two layer boston cream cake.
For a mid-afternoon treat, pair a chilled slice with a cup of strong black coffee or a glass of cold milk. The bitterness of the coffee complements the 70% dark chocolate filling, while the milk echoes the creamy vanilla notes in the cake. This is the kind of cake that invites people to linger around the table long after the meal has ended, sharing stories and second helpings. Southern hospitality is all about making people feel welcome, and a generous slice of cake is the best way to do exactly that.

The Last Word
Baking this Two-Layer Marble Cake is a labor of love that rewards you with a dessert that is as beautiful as it is delicious. It combines the comforting flavors of home with the precise techniques that make a cake truly memorable. When you pull this from the fridge and see those layers of cream and dark chocolate, you will know the effort was worth every minute. This recipe is a testament to the idea that Southern soul and professional technique can live together on the same plate.
I hope this cake brings as much joy to your table as it has to mine over the years. If you find yourself craving even more chocolate richness, you should try my devils food layer cake for your next celebration. Please share your baking results with me and join our community of home bakers who believe that every occasion deserves a homemade cake. From my kitchen to yours, happy baking.


