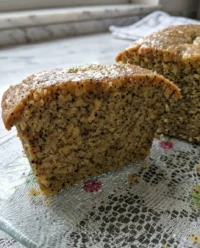
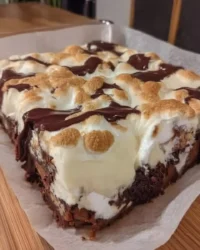
The beauty of a cake often lies in its quiet imperfections, like the way a hand-poured glaze settles unevenly or how a three-layer sponge shows the honest texture of the tea leaves within.

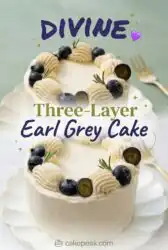
This Three-Layer Earl Grey Cake is an invitation to slow down and appreciate the subtle fragrance of bergamot paired with bright, citrus notes. The sponge is tender and infused with a deep tea flavor, balanced by a tangy orange cream cheese buttercream that feels like a crisp autumn morning. It is a bake that rewards patience, designed for the quiet joy of the farmhouse kitchen.
The Beauty of This Three-Layer Earl Grey Cake
Prep: 180 min · Serves: 12 · Difficulty: Medium
- Deep bergamot scent warms the whole kitchen.
- Tender crumb holds its shape when sliced.
- Tangy orange frosting cuts through the sweetness.
- Simple ganache adds a touch of elegance.
- Ideal for slow weekend afternoon tea time.
This is the honest, wholesome bake that makes the Saturday farmers market trip feel complete when shared with friends. If you enjoy building layers of flavor, you might also find comfort in our classic vanilla bean layer cake for your next gathering.
Get The Full Cake Recipe
Print
Three-Layer Earl Grey Cake
- Total Time: 205 mins
- Yield: 12 servings
- Diet: Vegetarian
Description
This elegant three-layer cake features tender sponges infused with aromatic Earl Grey tea, balanced by a bright, citrus-forward orange cream cheese buttercream. It is a refined dessert that celebrates the harmonious blend of bergamot and fresh zest, perfect for a sophisticated afternoon tea.
Ingredients
- Whole milk
- Loose leaf Earl Grey tea
- Boiling water
- Granulated sugar
- Unsalted butter
- Eggs
- All-purpose flour
- Baking powder
- Salt
- Sour cream
- Vanilla extract
- Orange zest
- Orange juice
- Cream cheese
- White chocolate
Instructions
- Infuse the milk. Bring whole milk to a simmer, remove from heat, stir in tea leaves, and steep covered for twenty minutes before straining.
- Prepare Earl Grey syrup. Steep tea in boiling water, strain, add sugar, and simmer until reduced to a glossy, amber syrup.
- Prepare the kitchen. Preheat the oven to 160°C (325°F) and line three 6-inch cake tins with parchment paper.
- Cream the base. Beat softened butter, cooled tea syrup, and sugar in a stand mixer until the mixture is pale and fluffy.
- Add the eggs. Incorporate room-temperature eggs one at a time, beating well after each addition to ensure a stable emulsion.
- Mix the batter. Whisk wet ingredients, then alternate adding dry and wet mixtures to the butter base, mixing briefly to maintain a tender crumb.
- Bake the cakes. Divide batter between prepared tins and bake for twenty-five minutes until springy to the touch.
- Cool the sponges. Rest cakes in pans for ten minutes before inverting onto a wire rack to cool completely.
- Craft the frosting. Whisk flour, sugar, salt, and milk into a pudding base, cool, then beat into butter and incorporate zest, juice, and cream cheese.
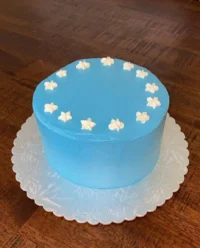
- Assemble the cake. Stack layers with buttercream, apply a thin crumb coat, chill, and finish with a final layer of frosting using a watercolor technique.
Notes
- Use a kitchen scale for precision, as slight variations in flour can significantly impact the sponge texture.
- Ensure your cream cheese and pudding base are at the same room temperature before mixing to prevent curdling.
- Test your ganache drip consistency on a cold glass before applying it to the cake to ensure a perfect flow.
- Always zest oranges by avoiding the white pith, which can introduce unwanted bitterness to the frosting.
- Level your cake layers only once they are fully cooled to achieve cleaner, more professional results.
- Prep Time: 180 mins
- Cook Time: 25 mins
- Category: Dessert
- Method: Baking
- Cuisine: Modern British
Honest Ingredients

Creating a cake this fragrant requires respect for each component, starting with loose leaf tea that has been stored in a cool, dark place to preserve its aromatic oils. The interaction between the citrus oils in the bergamot and the fresh zest of the oranges creates a profile that is both grounded and bright. Every ingredient, from the local farm-fresh eggs to the cultured butter, plays a role in achieving a sponge that is light yet sturdy.
- Loose Leaf Earl Grey: Provides the essential floral and citrus foundation for both the milk and the syrup.
- Orange Zest: The oils in the skin offer a far more concentrated citrus flavor than the juice alone.
- Sour Cream: This adds a necessary fat content that ensures the crumb remains moist after baking.
- Unsalted Butter: Using high-quality butter allows the subtle tea notes to shine without being masked by salt.
- Granated Sugar: Provides structure and sweetness while helping to create a delicate, crackled top on the layers.
- Cream Cheese: Brings a farmhouse tanginess that balances the rich pudding-style buttercream base.
- White Chocolate: Selected for its creamy profile to create a slow-moving, decorative drip.
| Ingredient | Why It Matters |
|---|---|
| Earl Grey Tea | Foundational floral scent and depth. |
| Orange Zest | Bright citrus contrast to the tea. |
| Sour Cream | Ensures a tender, lasting moisture. |
| Cream Cheese | Balanced tang in the frosting. |
A Slow, Steady Bake

Step 1: Infusing the Milk
In a small heavy-bottomed pot, bring your whole milk to a gentle simmer until tiny bubbles form around the edges. Remove the heat, stir in the loose leaf tea, and cover with a small plate to keep the aromatic steam trapped. Let the leaves steep for twenty minutes until the milk turns a deep tan color and smells strongly of bergamot.
Step 2: Preparing the Earl Grey Syrup
Combine boiling water and tea leaves in a bowl, letting them steep for five minutes before straining into a small saucepan. Stir in the sugar and cook over a medium flame until the liquid thickens into a glossy, amber syrup that coats the back of a spoon. Set this aside to cool on the counter so it does not melt the butter during the mixing process.
Step 3: Prepping the Kitchen
Set your oven to 160°C (325°F) for a fan-assisted bake or slightly higher for a conventional oven. Grease three 6-inch round cake tins with a bit of butter and line the bottoms with circles of parchment paper to ensure the delicate sponges release cleanly. Gather your wooden cutting board and weigh out your flour, baking powder, and salt into an enamel bowl.
Step 4: Creaming the Base
Place your softened butter, cooled tea syrup, and granulated sugar into the bowl of a stand mixer. Beat these on medium speed for several minutes until the mixture looks pale and has a fluffy, cloud-like texture. Scrape down the sides of the bowl with a flexible spatula to ensure every bit of butter is fully incorporated.
Step 5: Adding the Farm-Fresh Eggs
Turn the mixer to a lower speed and add your room-temperature eggs one at a time, allowing each to disappear into the batter before adding the next. This slow addition prevents the emulsion from breaking, keeping the batter smooth and thick. If the mixture looks slightly curdled, add a tablespoon of your measured flour to help it bind.
Step 6: Mixing the Batter
In a separate jug, whisk together the infused milk, sour cream, and vanilla extract until smooth. Alternate adding the dry flour mixture and the wet milk mixture to the butter base, starting and finishing with the dry ingredients. Mix for only fifteen seconds after each addition to keep the gluten relaxed and the crumb tender.
Step 7: Baking the Three-Layer Earl Grey Cake
Divide the thick, fragrant batter evenly between your prepared tins and smooth the tops with an offset spatula. Bake for twenty-five minutes, or until the centers feel springy to the touch and a wooden skewer comes out with only a few moist crumbs. The tops should have a light golden hue and the edges will begin to pull away slightly from the sides of the tins.
Step 8: Cooling and Resting
Remove the cakes from the oven and let them rest in their pans on a wire rack for ten minutes. Carefully invert them onto the rack, peel away the parchment paper, and leave them to cool completely. A cool sponge is much easier to level and frost than one that still carries the heat of the oven.
Step 9: Crafting the Orange Buttercream
Whisk flour, sugar, salt, and milk in a saucepan over medium heat until it thickens into a gloopy pudding texture. Once cooled to room temperature, beat this pudding into your creamed butter spoonful by spoonful until the frosting is light and stable. Fold in the orange zest, juice, and cream cheese at the very end to keep the texture firm and the flavor bright.
Step 10: Assembly and the Watercolor Finish
Place one layer on your serving plate and spread a generous layer of orange buttercream across the top. Repeat with the second and third layers, then apply a thin crumb coat over the entire surface before chilling for thirty minutes. Finish with a smooth layer of frosting, dabbing small amounts of colored buttercream on the sides and scraping them flat to create a rustic, weathered watercolor appearance.
Notes From the Kitchen

Always use a kitchen scale to weigh your ingredients rather than relying on volume cups for this recipe. Baking is a craft of precision, and even a small excess of flour can turn a delicate tea sponge into something dense and dry. When the ingredients are this honest and simple, their ratios become the most important part of the process.
If your buttercream appears curdled or lumpy, it is usually because the pudding base was still too warm when added to the butter. To fix this, place the entire mixing bowl in the refrigerator for ten minutes, then beat it again on medium speed until the fats realign and the mixture becomes smooth. You can find more advice on handling complex frostings in our guide for the three layer italian cream cake which uses similar techniques.
Temperature is your most important tool when working with the white chocolate ganache drip. If the ganache is too hot, it will run all the way to the bottom of the plate; if it is too cold, it will clump at the top. Test a single drip on the side of a chilled glass to see if it holds its shape before committing to the cake.
For a deeper tea flavor, you can grind a teaspoon of loose Earl Grey leaves into a fine powder and whisk it directly into the dry flour ingredients. This adds visual interest with small dark specks throughout the sponge and intensifies the bergamot aroma. Learn more about how to achieve a balanced tea infusion to ensure your sponge never tastes bitter.
Level your cake layers using a long serrated knife while they are cold from the refrigerator. Cold cake has a tighter structure and produces fewer crumbs, allowing you to create flat surfaces that stack without leaning. Save the trimmed scraps for snacking or for crumbling over a bowl of morning yogurt.
When zesting your oranges, stop as soon as you reach the white pith beneath the orange skin. The pith is bitter and can ruin the delicate balance of the tangy cream cheese frosting. Fresh, oily zest from a firm orange will provide the best aromatic results for this specific bake.
Frequently Asked Questions
Can I use tea bags instead of loose leaf tea?
Yes, you can use the contents of about 6-8 tea bags if you do not have loose leaf tea on hand. Ensure the tea is high quality and fresh, as the flavor of the cake depends entirely on the strength of the infusion. If the tea inside the bags is very finely ground, you may want to reduce the steeping time by five minutes.
How should I store this cake to keep it fresh?
The cake is best kept in an airtight container or a cake dome to prevent the sponge from drying out. It can stay on the counter in a cool kitchen for one day, but should be moved to the refrigerator for longer storage due to the cream cheese in the frosting. Always bring the cake to room temperature for at least thirty minutes before serving to soften the butter.
Why did my cake layers sink in the middle?
Sinking usually happens if the oven door was opened too early or if the leavening agents were expired. It can also occur if the butter and sugar were over-creamed, incorporating too much air that the structure could not support once heated. Ensure your baking powder is fresh and keep the oven door closed until at least twenty minutes have passed.
Can the cake layers be frozen ahead of time?
Absolutely, these layers freeze remarkably well and can be made up to two weeks in advance. Wrap the completely cooled sponges tightly in plastic wrap and then a layer of foil before placing them in the freezer. Thaw them in the refrigerator overnight before leveling and frosting for the best texture.
What can I use if I do not have sour cream?
Full-fat Greek yogurt is an excellent substitute for sour cream and will provide the same moisture and tang to the crumb. Avoid using low-fat versions, as the fat content is necessary for the tender texture of this tea-infused sponge. The acidity in both ingredients reacts with the baking powder to help the cake rise.
Is the white chocolate ganache drip mandatory?
The drip is entirely optional and serves mainly as a decorative element to highlight the rustic watercolor frosting. The cake is equally beautiful with a simple smooth finish or even a few dried edible flowers pressed into the sides. If you skip the drip, you can use the extra frosting to pipe more rosettes on the top for height.
What Else the Season Offers
When the first berries of spring arrive, you might consider replacing the orange zest in the frosting with a handful of crushed raspberries. The tartness of the berries complements the floral notes of the Earl Grey beautifully, creating a cake that feels lighter and more suited for a garden party. For those who enjoy floral profiles, our rose water layer cake offers another way to use botanicals in your baking.
During the colder months, a honey-infused soak can be brushed onto the cake layers before frosting to add a deep, autumnal warmth. Simply replace the Earl Grey syrup in the batter with a high-quality local wildflower honey and add a pinch of cinnamon to the dry ingredients. This version feels grounded and substantial, perfect for serving alongside a hot cup of tea on a rainy afternoon.
If you prefer a more traditional citrus profile, lemon can easily stand in for the orange throughout the recipe. The sharp acidity of lemon juice and zest provides a brighter contrast to the bergamot than the softer orange. This variation is particularly refreshing during the peak of summer when you want a dessert that cleanses the palate after a heavy meal.
Serving It Simply
This cake belongs on a plain white porcelain plate, where the subtle colors of the watercolor frosting can truly be appreciated. Place a single slice on a linen tea towel next to a steaming pot of the same Earl Grey tea used in the bake. The warmth of the tea helps to release the bergamot oils in the sponge, making every bite more fragrant.
For a more festive occasion, serve this dessert with a side of lightly sweetened whipped cream or a dollop of lemon curd. The sharp citrus of the curd emphasizes the orange notes in the buttercream, while the cream softens the floral intensity of the tea. You might also pair it with the airy texture of our chantilly cake recipe if you are hosting a larger dessert spread.
When the fruit is this good, keep it simple by adding a few fresh orange slices or a sprig of fresh thyme to the top of the cake. These natural garnishes speak to the farm-to-table spirit of the recipe without the need for fussy decorations. Let the cake cool on a windowsill before bringing it to the table to share with those you love.

The Quiet Goodbye
There is a deep satisfaction in pulling a cake like this from the oven, knowing that the time spent infusing the milk and simmering the syrup has resulted in something truly special. This Three-Layer Earl Grey Cake is not about flash or ornament; it is about the honest harmony of tea and citrus. It reminds us that the best things in life are often the ones we take the time to prepare with care and patience.
I hope this bake finds a permanent place in your seasonal rotation, perhaps shared on a quiet Saturday afternoon with a close friend. If you find yourself craving something more decadent as the evenings grow longer, our double chocolate layer cake is always a reliable companion. Honest ingredients make an honest cake, and that is a philosophy that never goes out of style.

