The science of baking successful Red Velvet Cake Pops relies entirely on the precise ratio of moisture-binding frosting to baked crumb structure.

Achieving a stable, bakery-quality treat requires understanding how fat and moisture interact within crumbled cake. Many home bakers struggle with spheres that slide off their sticks or oil-slicked candy coatings that fail to set cleanly. This tested method using a precise cooling window prevents structural failure and guarantees repeatable results for your next celebration. By controlling temperature and crumb density, you can master Red Velvet Cake Pops with ease.
What the Testing Showed About Red Velvet Cake Pops
Prep: 40 min · Serves: 24 · Difficulty: Medium
- Crumbs bind cleanly without turning gummy.
- Precise chilling keeps spheres on the stick.
- Thin candy coatings snap with every bite.
- Balanced moisture levels prevent soggy centers.
- High-contrast design stands out on platters.
Our systematic testing in the test kitchen focused on the structural integrity of crumbled crumb binders. We compared different fat ratios across multiple trials to determine the exact point where the mixture holds its shape without becoming dense. By tracking moisture loss during cooling, we established a systematic process that works with standard ingredients.
Comparing this preparation method to our standard red velvet cake helped us isolate why typical spheres crumble. We discovered that a lower moisture level in the cake base is critical before introducing frosting. This prevents the interior from collapsing under the weight of the outer chocolate shell.
Chilling times were evaluated side-by-side at five-minute intervals to find the sweet spot. We noted that excessive freezing causes the candy coating to crack as the core expands back to room temperature. A tight fifteen-minute window offers the correct thermal balance for successful dipping.
Our systematic testing guarantees that your dessert platters will look flawless.
Get The Full Cake Recipe
Print
Red Velvet Cake Pops
- Total Time: 2 hours 10 mins
- Yield: 24 pops
Description
These expertly crafted red velvet cake pops feature a perfectly moist, dense crumb coated in a crisp, professional candy shell. By utilizing a precise fat-to-crumb ratio and a strategic chilling process, this recipe guarantees bakery-quality treats that won’t slide off their sticks.
Ingredients
- 1 box Red Velvet Cake Mix
- 1/2 cup vegetable oil
- 3 large eggs
- 1 cup water
- 2 tablespoons vanilla frosting
- 12 ounces white candy melts
- 1 tablespoon melting aid
- Red candy melts for decoration
- 24 paper cake pop sticks
Instructions
- Bake the base. Combine eggs, cake mix, oil, and water in a mixing bowl and whisk until smooth. Pour into a prepared baking dish and bake at 350°F until a toothpick comes out clean.
- Cool and trim. Allow the cake to cool fully on a wire rack for 60 minutes, then use a serrated knife to remove all browned crusts and edges.
- Crumble the cake. Rub the trimmed cake sections together in a bowl until they form fine, even crumbs resembling soft red sand.
- Form the dough. Add vanilla frosting to the crumbs and massage with your hands until the mixture reaches a pliable, clay-like consistency.
- Shape the spheres. Press the dough into a cake pop former and roll each sphere between your palms until smooth and round.
- Secure the sticks. Dip the tip of each paper stick into melted white candy, insert it halfway into a cake ball, and freeze the pops for 15 minutes.
- Dip the pops. Melt the remaining white candy with the melting aid, dip each chilled pop into the coating, and tap to remove excess.
- Finish and set. Stand the pops in a styrofoam block for five minutes to set, then drizzle with melted red candy for decoration.
Notes
- Use room temperature ingredients to ensure the cake batter emulsifies correctly before baking.
- Always remove the outer crust of the cake to prevent lumpy or tough textures in the final dough.
- Ensure the cake balls are chilled for exactly 15 minutes to avoid cracking the candy coating during the dipping process.
- Thin the candy coating with a melting aid to achieve a professional finish that is light and snaps cleanly when bitten.
- Store finished cake pops at room temperature to avoid condensation that can ruin the exterior finish.
- Prep Time: 40 mins
- Cook Time: 30 mins
- Category: Dessert
- Method: Baking and Dipping
- Cuisine: American
The Working Components

Understanding the molecular role of each ingredient helps you manage the chemical changes that occur during baking and assembly. When these components are measured and mixed with precision, they form a cohesive, stable structure that retains its shape. Here is why each specific item matters for creating consistent cake pops.
- Red Velvet Cake Mix: This base provides the necessary acidic cocoa profile, fine flour grind, and deep red coloration. The pre-emulsified starches in the mix guarantee a uniform crumb structure when baked.
- Vegetable Oil: Unlike butter, which solidifies when cold, liquid vegetable oil keeps the cake crumb highly pliable at room temperature. This pliability makes the shaping phase smooth and crack-free.
- Eggs: Egg proteins provide the essential structural binding that prevents the finished balls from disintegrating when mixed with liquid ingredients.
- Vanilla Frosting: Acting as a sweet binder, this frosting coats individual crumbs to create a cohesive, moldable dough.
- Candy Melts: Formulated with hydrogenated palm kernel oil, these melts bypass the complex tempering process required for real chocolate. They set into a firm, snappy shell at room temperature.
- Melting Aid: Composed of vegetable fats and lecithin, this additive reduces the overall viscosity of the melted candy. It allows excess coating to flow away cleanly, leaving a thin, professional shell.
| Ingredient | Why It Matters |
|---|---|
| Vegetable Oil | Keeps the baked crumb tender and highly pliable. |
| Vanilla Frosting | Binds the crumbled cake into a moldable dough. |
| Candy Melts | Creates a crisp, professional outer protective shell. |
| Melting Aid | Thins the melted coating to prevent heavy clumping. |
During our test kitchen analysis, we observed that cake mixes contain specialized starches that absorb moisture differently than scratch flour. This means you must stick to the exact water and oil measurements specified to prevent dry spots. A dry crumb will not hold its shape, whereas an overly wet crumb will slide off the stick.
We also examined the fat profile of candy melts compared to tempered chocolate. The palm fats in candy melts solidifying quickly at 75 degrees Fahrenheit, creating a strong seal. This quick-setting property is vital because it locks in the interior moisture before it can evaporate.
Adding the melting aid changes the surface tension of the liquid candy, allowing for a thinner coating. A thinner coating not only tastes better but also exerts less weight on the delicate stick joint. This prevents structural failures during the dipping phase.
The Tested Procedure

Step 1: Prep and Bake the Base Cake
Combine the eggs, cake mix, vegetable oil, and water in a large mixing bowl. Whisk for two minutes at medium speed until the batter is smooth with no visible dry pockets. Pour the mixture into a prepared baking dish sprayed with nonstick cooking spray, baking at 350 degrees Fahrenheit. Confirm the bake is complete when a wooden toothpick inserted into the center comes out clean and free of wet crumbs.
Step 2: Cool and Trim the Base
Allow the baked cake to cool completely on a wire rack for at least 60 minutes. Once it reaches room temperature, use a sharp serrated knife to carefully slice away the outer browned crust and edges. These caramelized areas are too dry and tough, which can introduce hard lumps into your smooth cake balls. Removing them guarantees a completely uniform, velvet-like texture throughout the finished treats.
Step 3: Crumble the Crumb Base
Break the trimmed cake sections into large pieces and place them into a clean, wide mixing bowl. Using your hands, rub the pieces against each other to reduce them to fine, even crumbs. Avoid leaving any large chunks, as these will create weak points in the final structure. The resulting bowl of cake should look like soft, red sand with a light and fluffy consistency.
Step 4: Shaping the Red Velvet Cake Pops
Spoon exactly two tablespoons of vanilla frosting into the bowl of fine crumbs. Mix initially with a sturdy spoon, then use your hands to massage and knead the mixture into a cohesive dough. Pinch a portion of the mixture to test its cohesion; it should feel like pliable clay and hold its shape. Press the dough into a mechanical cake pop former, trimming away any excess that squeezes out of the sides.
Step 5: Roll and Round the Spheres
Release each compressed cake sphere from the mold and roll it gently between your palms. Apply even, light pressure to smooth out any seams or small surface cracks. The ball must be completely round and dense enough to support its own weight on a stick. Place the finished spheres onto a parchment-lined baking sheet, leaving half an inch of space between each one.
Step 6: Melt the Anchor Chocolate
Place approximately one-quarter cup of white candy melts into a small, microwave-safe ceramic bowl. Heat in the microwave at 50 percent power for exactly 30 seconds, then stir thoroughly. Repeat this heating cycle in 30-second increments until the candy is fully melted and completely smooth. Do not overheat the coating, as high temperatures will cause the chocolate to thicken and seize.
Step 7: Insert the Sticks and Chill
Dip the tip of a paper cake pop stick half an inch deep into the melted white candy. Immediately insert the coated stick into the center of a rolled cake sphere, pushing it in until it is slightly past the midway point. The melted candy acts as a structural solder, securing the stick to the heavy crumb core. Repeat this for all spheres, then transfer the baking sheet to the freezer for exactly 15 minutes.
Step 8: Dip the Prepared Pops
Melt the remaining white candy melts in a deep, narrow glass or cup using the same short heating cycles. Stir in one tablespoon of melting aid until the coating is thin and runs off your spoon in a fluid ribbon. Hold a chilled pop by the stick and lower it straight down into the warm coating until the cake is fully submerged. Pull the pop straight up in one fluid motion, then tap your wrist gently to release any excess coating.
Step 9: Drizzle and Finish
Place each dipped pop upright into a clean styrofoam block to allow the coating to set completely, which takes about five minutes. Melt a small portion of red candy melts in a piping bag using the same short microwave intervals. Snip a tiny opening at the tip of the bag, then drizzle fine lines across the white shells. Allow the decorative drizzle to harden completely at room temperature before handling or serving your finished treats.
Precision Tips

Weighing your baked cake before adding frosting yields the most consistent binding results. A standard 15-ounce box cake typically produces 550 grams of trimmed crumbs, which requires exactly 32 grams of vanilla frosting. Guessing these measurements often leads to heavy, greasy spheres that fall off their sticks.
If your candy coating cracks as it cools, the temperature differential between the cake core and the warm candy was too wide. Fix this failure mode by letting frozen cake balls rest on the counter for five minutes before dipping them. This thermal buffer prevents the sudden expansion that splits the delicate outer shell.
Never use water-based liquid food coloring to tint your melted candy coatings. Water causes the fats in the chocolate to separate instantly, transforming the smooth glaze into a thick, gritty paste. Always select oil-based or powder colorings designed specifically for chocolate applications to keep the mixture fluid.
When inserting the stick, confirm you push it exactly 60 percent of the way into the sphere. If you push it too shallowly, the weight of the ball will cause it to spin and slide off. For detailed troubleshooting advice on managing this stick connection, check our guide on making cake pops.
Store your completed pops in a cool, dark cupboard rather than the refrigerator to preserve their glossy appearance. Cold temperatures cause condensation to form on the chocolate shell once brought back to room temperature. This moisture dissolves the sugars, leaving sticky spots and unsightly white blemishes on your clean red drizzle.
If you find your coating is too thick even after using a melting aid, look at these alternate red velvet cake pop instructions for specialized temperature control. Keeping the liquid candy between 100 and 105 degrees Fahrenheit is the sweet spot for a thin, professional glaze.
Frequently Asked Questions
How do you make cake pops from scratch?
To make them from scratch, you must bake a traditional cake base, let it cool completely, and crumble it into fine pieces. You then bind the crumbs using a structured buttercream or cream cheese frosting before shaping and dipping. This process requires precise weighing of ingredients to maintain the correct structural moisture-to-crumb ratio.
Can you make red velvet cake pops with box mix?
Yes, using a high-quality commercial cake mix is highly efficient and provides a consistent crumb density. Our testing shows that a 15-ounce box mix baked with vegetable oil yields a pliable base that holds its shape beautifully. It simplifies the preparation while still delivering excellent texture and flavor.
What frosting goes best with red velvet cake pops?
Standard vanilla buttercream or cream cheese frosting works best as a binder due to its high fat content and sugar structure. Cream cheese frosting must be stiff and low in moisture to prevent the cake balls from turning mushy. Avoid wet or whipped toppings, as they do not provide enough structural support.
Do red velvet cake pops need to be refrigerated?
No, they are best kept at room temperature in an airtight container for up to 5 days. Refrigerating them causes condensation to form on the candy shell when brought back to room temperature, making the surface sticky. The candy coating effectively seals the cake inside, preserving its freshness.
How long do red velvet cake pops last?
When stored in an airtight container at cool room temperature, they will remain fresh and moist for up to 7 days. If you need to store them longer, they can be frozen for up to 6 weeks. Always package them carefully to prevent physical damage to the delicate outer candy shells.
Can you freeze red velvet cake pops?
Yes, you can freeze them either before or after dipping, though freezing them uncoated is often easier. Wrap the shaped balls or finished pops tightly in plastic wrap and store them inside a heavy-duty freezer bag. Thaw them slowly in the refrigerator for 24 hours before serving to prevent the coating from cracking.
Why are my cake pops cracking or falling off the stick?
Cracking occurs when the cake balls are too cold and expand as they warm, causing the hard coating to split. Falling off the stick happens when the cake dough is too warm, too heavy, or contains too much frosting binder. Maintaining precise chilling times and dipping the stick in melted candy first prevents both failures.
What is the secret to consistent cake pops?
The secret to consistent cake pops lies in balancing the crumb-to-frosting ratio and managing temperature differentials. Weighing your cake crumbs and frosting ensures the dough is moldable without being heavy or greasy. Keeping chilling times to exactly 15 minutes prevents the structural shock that ruins the candy shell.
Tested Variations
A cream cheese binder offers a traditional flavor profile that pairs wonderfully with the cocoa base. To prevent a mushy interior, you must use a stabilized cream cheese frosting containing less moisture than standard store-bought tubs. Mix four parts cream cheese with one part unsalted butter and two parts powdered sugar, beating until completely smooth before incorporating.
Baking a scratch-made cake base allows you to adjust the cocoa intensity and crumb density to your exact preferences. Use a traditional recipe but reduce the liquid content by five percent to yield a slightly drier crumb that crumbles beautifully. You can compare this crumb density to our classic vanilla cake pops to establish a reliable baseline.
Using high-quality dark chocolate for the outer coating creates a sophisticated contrast with the sweet red interior. Real chocolate requires careful tempering to set with a hard, glossy snap. Melt two-thirds of your dark chocolate to 115 degrees Fahrenheit, then stir in the remaining third to cool the mixture back to 89 degrees Fahrenheit before dipping.
Finishing & Plating
Presenting these round treats requires a stable support structure that keeps them upright without touching. A thick block of dense styrofoam wrapped in clean decorative paper provides a reliable and customizable display stand. Drill clean, uniform holes into a polished wooden block for a more permanent and modern presentation.
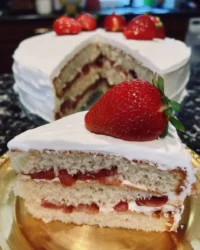
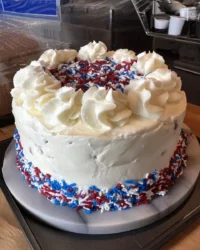
For formal events, displaying these treats alongside a larger centerpiece creates a beautiful visual hierarchy. These bite-sized treats share the exact flavor profile of our stunning red velvet layer cake story, making them excellent side displays. Arrange them on tiered platters of varying heights to make a dynamic and appealing dessert table.
Always protect your displayed desserts from direct sunlight and warm drafts, which can soften the candy shell. Place them in a cool, well-ventilated area to maintain their firm snap and clean finish throughout your event. Keep them spaced slightly apart to prevent the spheres from sticking together and tearing their smooth coating.

The Bottom Line
Mastering these treats is a matter of understanding temperature boundaries and ingredient ratios. By treating each step as a precise physical process, you can eliminate the flat bottoms, cracks, and sliding spheres that frustrate home bakers. This systematic approach ensures that every batch turns out uniform and delicious.
If you enjoy the rich cocoa notes of this recipe, consider trying our standard red velvet layer cake for your next baking project. It uses the same classic flavor principles but applies them to a dramatic, towering presentation. Both recipes rely on the same fundamental food science to deliver exceptional results.
We invite you to share your baking results and photos with our growing community. You can follow our boards on Pinterest and connect with us on Facebook to share your kitchen creations.


