October brings a sharp chill to the farmhouse kitchen, turning my thoughts toward warm, quick bakes that can be stirred together while the kettle begins to whistle on the stove.

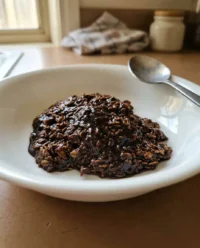
When the wind rattles the windowpanes in late autumn, there is a quiet comfort in preparing a warm Chocolate Mug Cake using nothing more than a deep ceramic mug and a fork. This humble dessert delivers a rich, dark crumb that feels deeply satisfying when you want a sweet treat without heating up the large stone oven. We rely on simple cupboard staples to build a deeply cocoa-infused crumb that rises beautifully in the microwave. It is a simple, honest bake that honors the quiet hours of a chilly evening.
Why Rustic Wins with a Quick Chocolate Mug Cake
Prep: 4 min · Serves: 1 · Difficulty: Easy
Sometimes the craving for a rich dessert strikes when you least expect it, making a full-sized cake impractical. While I often spend my Saturdays baking a traditional chocolate cake recipe to share with neighbors, this single-serving alternative offers immediate, warm comfort. It embraces the beauty of small-batch baking with zero preheating required.
- Stirs together in under five minutes flat.
- Uses basic pantry staples from your cupboard.
- Creates zero messy mixing bowls to wash.
- Delivers deep cocoa flavor in small portions.
- Bakes beautifully without heating up the kitchen.
This warm chocolate cake will become your favorite quiet evening companion.
Get The Full Cake Recipe
Print
Chocolate Mug Cake
- Total Time: 8 mins
- Yield: 1 serving
- Diet: Vegetarian
Description
Enjoy a rich, molten-centered chocolate cake in minutes with this simple, single-serving microwave recipe. It is the perfect cozy treat for quiet evenings, requiring only basic pantry staples and no preheating.
Ingredients
- 4 tablespoons all-purpose flour
- 2 tablespoons white sugar
- 2 tablespoons unsweetened Dutch-process cocoa powder
- 1/4 teaspoon baking powder
- 1 pinch fine sea salt
- 3 tablespoons whole milk
- 1/4 teaspoon instant coffee granules
- 1/4 teaspoon pure vanilla extract
- 2 tablespoons neutral vegetable oil
- 1 tablespoon dark chocolate chunks
Instructions
- Mix dry ingredients. In a 12-ounce ceramic mug, whisk together the flour, sugar, cocoa powder, baking powder, and salt until uniform.
- Prepare wet mixture. In a separate small container, dissolve the instant coffee granules into the milk, then stir in the vanilla extract and vegetable oil.
- Combine batter ingredients. Pour the wet mixture into the mug and stir with a fork using circular motions until just combined and glossy, being careful not to overmix.
- Add chocolate chunks. Scatter the dark chocolate chunks over the top and gently press them into the center of the batter with a fork.
- Microwave the cake. Cook on high power for 60 seconds, checking for a set crumb; adjust timing based on your microwave’s specific wattage.
- Cool and rest. Carefully remove the mug from the microwave and let it rest on a trivet for 3 minutes before serving to allow the center to finish setting.
Notes
- Use a heavy-walled stoneware mug for the most even heat distribution during the cooking process.
- Measure flour by spooning it into the measuring spoon to prevent packing, which can lead to a dry or rubbery texture.
- Ensure the milk is at room temperature to prevent the vegetable oil from clumping upon contact.
- Resting the cake for three minutes post-microwave is essential for achieving the perfect tender, melt-in-your-mouth crumb.
- Prep Time: 4 mins
- Cook Time: 1 min
- Category: Dessert
- Method: Microwave
- Cuisine: American
Honest Ingredients

Great baking does not require complicated ingredients or rare additions from specialty shops. We begin with the simple contents of a farmhouse pantry, focusing on clean pantry staples that combine to create a remarkably tender texture. Each element plays a clear role in helping the cake rise properly in its small ceramic home.
- All-Purpose Flour: This provides the structural foundation for our cake, keeping the crumb tender yet stable enough to hold its shape.
- Unsweetened Cocoa Powder: I prefer a high-quality Dutch-process variety which lends a deep, dark color and a robust, earthy chocolate profile.
- Cultured Whole Milk: The natural fats in whole milk tenderize the flour proteins, keeping the crumb soft rather than rubbery.
- Unflavored Vegetable Oil: Using a neutral oil keeps the cake incredibly moist, preventing it from drying out under the intense heat of the microwave.
- Dark Chocolate Chunks: Dropping a few hand-chopped pieces of fifty-percent dark chocolate into the center creates a molten, gooey core that mimics a slow-baked pudding.
- Instant Coffee Granules: A tiny pinch of espresso powder or instant coffee does not make the cake taste like coffee; instead, it coaxes out the deepest notes of the cocoa.
- Pure Vanilla Extract: This aromatic liquid rounds out the sharpness of the cocoa, grounding the sweet and bitter notes in a warm, comforting background.
| Ingredient | Why It Matters |
|---|---|
| Flour | Establishes the crumb structure without adding heaviness |
| Cocoa Powder | Delivers a rich, earthy chocolate base to the batter |
| Whole Milk | Adds fat and moisture for a tender, soft bite |
| Dark Chocolate | Melts into rich, molten pockets during the quick bake |
| Instant Coffee | Intensifies the natural flavor of the cocoa powder |
From Bowl to Oven

Step 1: Prep Your Mug and Whisk Dry Ingredients
Select a sturdy, thick-walled ceramic mug that holds at least twelve ounces of liquid to prevent any batter from spilling over the sides during the bake. Measure the all-purpose flour, white sugar, unsweetened cocoa powder, baking powder, and a generous pinch of fine sea salt directly into the bottom of the mug. Use a small, dry fork to whisk these components together until the color is a uniform, pale dusty brown, making sure no small pockets of baking powder remain hidden at the bottom seam. The mixture should look light and dry, with a gentle chocolaty aroma rising from the vessel.
Step 2: Dissolve the Coffee and Prepare the Wet Mixture
In a separate small glass or bowl, measure out three tablespoons of cold whole milk and stir in the instant coffee granules. Use a small spoon to press the granules against the side of the container until they fully dissolve into a smooth, tan-colored liquid. Pour in the pure vanilla extract and two tablespoons of neutral vegetable oil, stirring gently to integrate the liquids. You will notice the oil forming small, golden droplets across the surface of the milk, which is exactly how the emulsion should begin.
Step 3: Combine the Dry and Wet Ingredients
Carefully pour the wet ingredients directly into the center of your prepared mug containing the dry cocoa mixture. Take your fork and stir the contents with small, circular motions, working from the center outward to pull the flour down into the liquid. Mix only until the flour disappears and a thick, glossy chocolate batter forms, which should take no more than twenty strokes. Avoid overmixing the batter, as excessive stirring develops the gluten and leads to a tough, bready texture rather than a delicate crumb.
Step 4: Fold in the Dark Chocolate Chunks
Scatter the coarsely chopped dark chocolate chunks over the top of the smooth, dark brown batter inside your mug. Use a small spatula or the back of your fork to gently press the chocolate pieces down into the middle of the batter so they are completely submerged. As they bake, these pieces will gather together in the center, melting into a rich, molten pocket of pure chocolate. The batter should look thick, heavy, and glossy, with a few rustic bumps where the chocolate chunks sit beneath the surface.
Step 5: Microwave Your Chocolate Mug Cake Until Set
Place the filled ceramic mug directly onto the center of your microwave plate, where the heat will distribute most evenly. Program the microwave to cook on high power for sixty seconds, keeping a close eye through the glass window as the batter begins to rise. You will watch the mixture swell slowly, climbing up toward the rim of the mug like a rustic soufflé before settling slightly as the steam escapes. Test the center with a clean wooden toothpick or a thin knife to make sure it is not dry; it should come away mostly clean, with perhaps a smear of melted chocolate chunk.
Step 6: Cool and Finish with Simple Toppings
Remove the hot mug from the microwave using a thick linen tea towel, as the ceramic sides will be quite warm to the touch. Place the cake on a wooden trivet on your kitchen counter and allow it to rest undisturbed for two to three minutes. During this brief cooling period, the internal steam will finish cooking the very center of the cake while the texture settles into a tender, melt-in-your-mouth crumb. The top will look slightly uneven and cracked, which is the very hallmark of a rustic, honest home bake.
What I’ve Learned at the Counter

Choosing the right ceramic vessel is the foundation of a successful microwave bake. A mug that is too narrow or thin-walled will cause the batter to heat unevenly, leaving you with a dry top and a raw, muddy bottom. Look for a heavy, stoneware mug with a wide mouth and a capacity of at least twelve ounces to allow the steam to escape freely during the rapid rise.
If your cake turns out rubbery or dry, here is why and how to fix it. This common disappointment usually happens because of overcooking or using too much flour. Microwave ovens vary wildly in wattage; a high-powered unit might cook this delicate crumb in forty-five seconds, while a gentler machine needs seventy seconds. Start checking the texture at forty-five seconds, and always measure your flour by spooning it lightly into the measuring spoon rather than scooping directly from the bag, which packs the flour too tightly.
For those who enjoy a slightly more complex flavor profile, try browning your butter on the stove before adding it to the mug. While vegetable oil provides the most reliable moisture, substituting cooled brown butter adds a rich, nutty depth that pairs beautifully with the dark cocoa. You can learn more about managing fat ratios in single-serving desserts by studying classic easy chocolate cake methods, which share similar structural rules.
The choice of chocolate determines the character of your molten center. Avoid using standard chocolate chips, as they contain stabilizers designed to help them keep their shape under high heat. Instead, cut a bar of high-quality dark chocolate with a sharp knife on your wooden board to create uneven shards that melt easily into luxurious pools of fudge. This simple step mimics the luxurious texture found in professional double chocolate microwave baking methods that home bakers adore.
Temperature plays a silent role in how well your batter integrates. Ensure your whole milk is at room temperature before whisking it with the dry ingredients. Cold milk can shock the vegetable oil, causing the mixture to clump together unevenly and resulting in a dense, heavy cake rather than a light and spongy crumb.
Allowing the baked cake to rest on the counter is equally important as the microwave step. Eating the cake immediately will burn your tongue, and the crumb will taste wet and unfinished. A short three-minute rest on a linen tea towel lets the internal starch set, turning a hot batter into a tender cake that holds its structure beautifully.
Frequently Asked Questions
How long should I microwave a mug cake?
Most mug cakes cook beautifully in sixty to seventy seconds in a standard thousand-watt microwave. Because microwave wattages vary so much, it is best to start checking the cake at forty-five seconds by inserting a toothpick into the center. If it comes out wet, continue cooking in short ten-second bursts to avoid overbaking the delicate crumb.
What size mug should I use?
You should always use a ceramic mug that holds at least twelve ounces of liquid. This generous size guarantees that the batter, which rises rapidly during the baking process, has plenty of room to expand without spilling over the rim. A wide-mouthed stoneware mug is ideal because it allows the steam to escape evenly.
Why did my mug cake turn out rubbery or dry?
A rubbery texture usually indicates that the batter was overmixed or cooked for too long. Overmixing develops the gluten in the flour, while overcooking evaporates the essential moisture provided by the milk and oil. To prevent this, stir the ingredients just until combined and check the cake early during the microwave cycle.
Can I make a mug cake without eggs?
Yes, this particular recipe is naturally egg-free, which keeps the texture incredibly light and tender. Egg-based mug cakes often develop a spongy, rubbery consistency due to the rapid microwave cooking process. Leaving the egg out helps create a soft, cake-like crumb that mimics a traditional oven bake.
Can I make a mug cake in the oven?
While this recipe is optimized for the rapid steam of a microwave, you can bake it in a conventional oven if needed. Transfer the batter to an oven-safe ceramic ramekin and bake at three hundred fifty degrees Fahrenheit for twelve to fifteen minutes. Keep a close eye on the cake, checking the center with a toothpick to make sure it does not dry out.
Can I make this recipe gluten-free?
You can easily adapt this bake by substituting the regular flour with a high-quality, one-to-one gluten-free baking blend. Look for a blend that contains xanthan gum to help hold the structure of the quick cake together. The texture will remain beautifully soft and tender, though it may require an extra five seconds of cooking time.
Can I store a leftover mug cake for later?
This sweet treat is designed to be enjoyed warm, straight from the microwave while the chocolate chunks are still molten. If you do have leftovers, cover the mug tightly with plastic wrap and store it at room temperature for up to twenty-four hours. Warm it in the microwave for ten seconds before eating to soften the crumb and melt the chocolate pockets.
Make It Your Own
For an autumn-inspired twist, you can introduce a spoonful of creamy nut butter or pumpkin puree into the center of the batter before baking. Drop a tablespoon of smooth almond butter or local peanut butter directly onto the top of the chocolate mixture, letting it sink slightly but not mixing it in. As the microwave heats the mug, the nut butter will soften into a warm, savory pocket that beautifully cuts through the sweetness of the cocoa. This technique creates a rich contrast similar to a slow-baked lava cake recipe from a country inn.
When the late summer orchard fruits are at their peak, a handful of fresh berries can transform this simple bake into a seasonal masterpiece. Toss a few fresh raspberries or wild blackberries directly into the batter along with the dark chocolate chunks. The heat will cause the berries to burst, releasing their tart juices into the rich crumb and creating a wonderful balance of fruit acidity and deep chocolate richness. It is a lovely way to let the season write the recipe when you want a quick sweet treat.
If you prefer a deeply caramelized flavor profile, try swapping the white sugar for dark brown sugar wrapped in parchment paper. The molasses in the brown sugar adds a damp, gooey quality to the cake, giving it a texture that closely resembles a traditional warm pudding. Pair this with a tiny pinch of flaky sea salt scattered across the top right after baking to highlight the deep caramel undertones of the batter.
Bringing It to the Table
In keeping with the honest, rustic nature of this bake, I prefer to serve this cake straight from the warm ceramic mug. Place the mug on a thick wooden board alongside a vintage spoon, allowing the cake to cool slightly on the kitchen table before diving in. A simple dusting of unsweetened cocoa powder or powdered sugar scattered through a small mesh strainer is all the adornment this dessert needs to look inviting.
For a slightly more indulgent afternoon treat, top the warm cake with a cold dollop of freshly whipped heavy cream. The contrast between the hot, steaming chocolate crumb and the cool, unsweetened cream is incredibly satisfying. If you are hosting a casual gathering, you might offer a selection of warm mug bakes alongside a richer, pre-baked flourless chocolate cake for those who prefer to share a larger dessert.
A cup of bitter black coffee or a steaming mug of herbal mint tea makes the perfect companion to this rich chocolate dessert. The herbal notes of the tea cut through the intense sweetness of the dark chocolate chunks, cleansing the palate between each warm spoonful. It is a lovely way to end a quiet autumn day, sitting by the window as the twilight fades over the country garden.

The Quiet Goodbye
There is a simple, unhurried joy in preparing a single-serving dessert that requires nothing more than the staples already sitting in your kitchen cupboard. This small chocolate treat is a testament to the idea that we do not need hours of prep work or a sink full of dirty dishes to enjoy an honest, warm bake. It reminds us to slow down, even for five minutes, and appreciate the comforting aroma of melting chocolate filling the farmhouse air.
While a grand chocolate fudge cake has its place at a crowded festive table, this quick microwave dessert belongs to the quiet, solitary moments of the week. It is for the late-night reader, the rain-soaked gardener, or anyone who needs a small pocket of warmth on a cold evening. I hope you take a few minutes tonight to stir together this simple batter, pull up a chair, and enjoy a warm spoon straight from the mug.
If this quick recipe brought a touch of warmth to your evening, I would love to hear about your farmhouse baking adventures. Share your rustic kitchen creations with our growing community on Pinterest or join the warm conversation on Facebook to connect with fellow scratch-bakers. You can also catch quick kitchen moments on TikTok or receive direct seasonal baking inspiration on our Telegram channel.


